How To Use maldet to Scan & Remove Malware on Linux Server
In this article we will demonstrate useful maldet commands for malware scanning and removal on a Linux server.
Following our previous guide on how to install maldet on linux server, in this article we will demonstrate some useful maldet commands for detecting and quarantining/removing malware.
Remember, that, depending on the structure of your filesystem and how deep your scanning will go, maldet may consume considerable amount of resources, so use with caution!
Generally, the steps you need to follow on a typical day is Scan the server/directories, Analyze the results, and Action (Remove/Quarantine files) if needed.
Scan Specific Files/Folders with maldet
Use the following command if you want maldet to scan recursively the entire directory under /var/. This means files under /var/, sub-directories such as /var/www/html/, and so on.
root@localhost:~$ maldet -a /var/Important: Depending on the size of the directory you wish to scan, and the number of sub-folders and files under that directory, maldet can take a significantly long time to complete which may result in server’s memory exhaustion.
Check maldet Scan Report
You can view the full scan report using the following command. Replace <Scan_ID> with the ID of the scan which will be provided as soon as maldet completes its scanning process.
root@localhost:~$ maldet -e <Scan_ID>
or
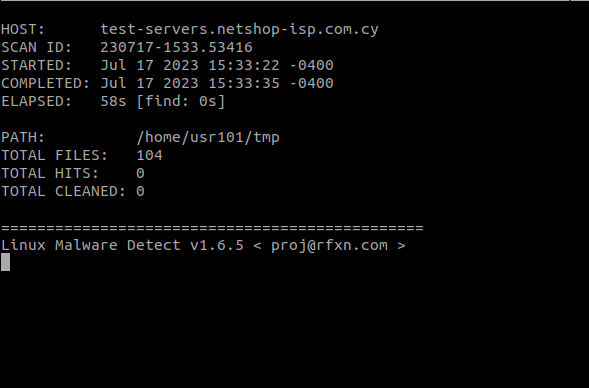
root@localhost:~$ maldet --report <Scan_ID>A sample of the provided report is shown below.
Remove Malicious Files Detected by maldet
Assuming your maldet scan identified malware or files with malicious code, these will be counted as “Hits” in maldet’s scan report.
You can remove them by executing the following command – make sure you replace <Scan_ID> with the correct scan report id.
root@localhost:~$ maldet -q <Scan_ID>
or
root@localhost:~$ maldet --quarantine <Scan_ID>
It’s preferred using the quarantine option to remove malicious files, as this will allow you to restore files that may have been wrongly identified as malware (known as false positives).
You can do so by executing the following command:
root@localhost:~$ maldet -s folder/file
or
root@localhost:~$ maldet --restore folder/file
That’s it! In this article we have demonstrated the commands to scan your linux server with maldet, view the scan report, delete the malicious files identified by a scan and restore files/folders from a specific scan job.