NetShop ISP to showcase its iGaming Hosting solutions at ICE London 2022
London, April 2022 – The multi-awarded hosting provider announces its participation at ICE London to showcase its igaming-oriented hosting products and solutions.
London, April 2022 – The multi-awarded hosting provider announces its attendance at ICE London to showcase its iGaming-oriented hosting products and solutions.
NetShop ISP’s iGaming experts will be participating in the world’s largest exhibition for online gaming at ExCel London. Alongside the traditional cloud and server hosting solutions offered to B2C and B2B iGaming businesses, NetShop ISP now offers a newly launched service that enables ultra-low latency between operator’s and supplier’s infrastructure. Details about the innovative service can be shared during a meeting with the company’s representatives.
“I believe this year’s ICE exhibition will be one of the most successful of all times as everyone missed the chance to meet in person during the pandemic. I expect our meeting slots to be fully booked by the end of this week, so I encourage everyone who wishes to meet with us to contact us as soon as possible.” said Katerina Burtsava, Head of Sales.
During the three-day event, visitors can arrange a meeting to discuss infrastructure hosting requirements, request a quote for database replication servers, inquire about Disaster Recovery Solutions, and seek assistance for IT Audit and Licensing in multiple jurisdictions.
The company will be represented at this event by Stefano Sordini, CEO, and Katerina Burtsava, Head of Sales.
ICE London is an international B2B Gaming industry exhibition. Taking place at ExCel London from 12-14 April 2022, its aim is to engage with the latest solutions, content and networking opportunities across the globe and across all sectors of gaming. https://www.icelondon.uk.com
About NetShop Internet Services
NetShop Internet Services is a multi-awarded iGaming hosting provider offering Dedicated Servers, Cloud hosting, Colocation, Disaster Recovery Solutions and Gaming license IT Audit Services. https://netshop-isp.com.cy
Leading Cloud & Infrastructure Provider NetShop ISP to participate in Forex Expo 2022 in Cyprus
The leading Cyprus-based Hosting Provider, NetShop ISP, announces its participation in Forex Expo 2022 to be held in Limassol, Cyprus on the 31st of March 2022 (Parklane Luxury Resort & Spa).
The leading Cyprus-based Hosting Provider, NetShop ISP, announces its participation in Forex Expo 2022 to be held in Limassol, Cyprus on the 31st of March 2022 (Parklane Luxury Resort & Spa). The company will be represented at the event by Stefano Sordini (CEO) and Katerina Burtsava (Head of Sales).
“This event is an excellent platform for networking and building strategic business relationships. Over the past few months we have signed up numerous forex brokers with whom we partnered for low-latency Forex VPS and Disaster Recovery as a Service. This event comes at a right time as we will be able to catch up with existing customers and partners in the Forex industry.” said Katerina Burtsava.
Forex Expo is a global interactive B2B event in the Forex industry organized by FINEXPO. For more information or to book tickets visit the event’s website.
To book a meeting with NetShop ISP’s Hosting Specialists click here.
How To Force HTTPS on WordPress: 2 Easy Ways
In this article we are going to demonstrate two easy ways to force HTTPS on a Wordpress website. This is a frequently asked question by web developers and marketing agencies that use NetShop ISP’s cPanel hosting plans, VPS or Dedicated Servers.
As of January 2017, Chrome began marking websites without https as non-secure. Before that time, SSL certificates were deemed important mainly for e-commerce sites accepting payments. As explained in a previous article, SSL improves the SEO performance of a website, when https is enabled, as search engines will reward it with higher ranking in search results.
In this article we are going to demonstrate two easy ways to force HTTPS on a WordPress website. This is a frequently asked question by web developers and marketing agencies that use our cPanel hosting plans, VPS or Dedicated Servers.
The prerequisite to enable HTTPS on your WordPress website is that you have a valid SSL certificate installed on your web hosting environment. You may get a free SSL or purchase one of your choice.
Let’s go through the 2 options to enforce HTTPS on your WordPress website.
Option 1: Force HTTPS via Really Simple SSL plugin
This option is best for beginners without coding experience as all you have to do is to install a plugin which does the job. There are many WordPress plugins available for SSL enforce. For the purpose of this tutorial we will be using the Really Simple SSL which is one of the highest rated plugins.
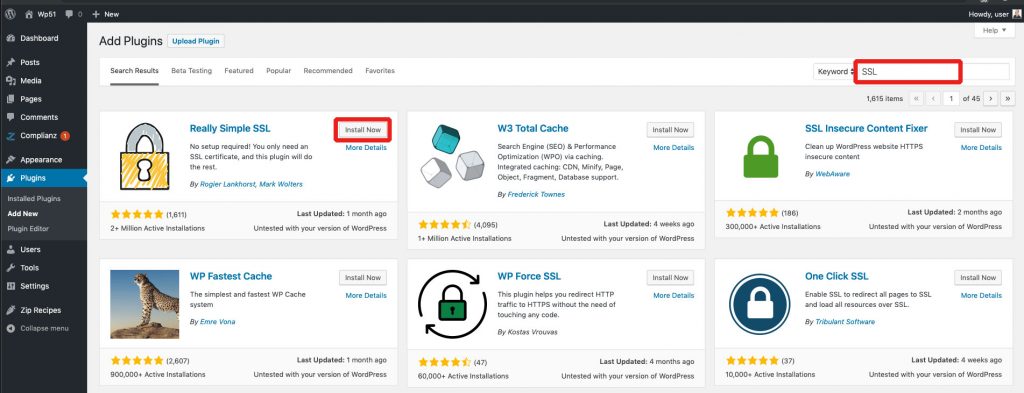
Step 1: Login to your WordPress admin area and go the Plugins section from the left side menu.
Step 2: Search for “SSL” and locate the “Really Simple SSL” plugin. According to its ratings should be the first option in search results.
Really Simple SSL WordPress Plugin – Force HTTPS
Step 3: Click the “Install Now” and then “Activate”
Step 4: Now click the button “Go ahead, activate SSL!”
Whilst the plugin has now been installed and activated, you will see some of the plugins’ recommendations. The plugin will work just fine as is for most of the websites, however you can adjust the settings as per your needs.
Option 2: Force HTTPS via .htaccess
The second option to force HTTPS on your WordPress website is done via .htaccess file. In contrast to the first option, this one is more permanent but involves code editing so it is generally preferred by experienced users.
Step 1: Login to your WordPress admin area
Step 2: Go to “General” > “Settings”
Step 3: Replace the “http” with “https” in the WordPress Address and Site URL Address fields
Step 4: Click “Save Changes”
Step 5: Using Filezilla FTP Client or any other File manager software, connect to your website’s public directory (usually is named public_html or htdocs).
Step 6: Edit the file “.htaccess”
Step 7: Add the following code just before the line that says # BEGIN WordPress:
RewriteEngine On
RewriteCond %{HTTPS} !=on
RewriteRule ^(.*)$ https://%{HTTP_HOST}%{REQUEST_URI} [L,R=301,NE]
Replace HTTP URL’s across your WordPress site
Any of the above two options will force HTTP to HTTPS. If you already have used hyperlinks in HTTP or uploaded images or files, these will need to be updated as well.
One of the best plugins to do this is called Better Search Replace. After installation you can use it to make sure that all references to HTTP URL’s will be replaced with HTTPS. Otherwise you will end up with a “Mixed Content” problem which will break the HTTPS on your Website.
Get Started with Managed WordPress Hosting
NetShop ISP offers a fully managed WordPress hosting so website owners can focus on other responsibilities.
Here is a list of things we can help with Managed WordPress hosting:
WordPress and Plugins installation
Malware removal and hacked websites fixing
Basic WordPress Optimization and Performance fine tuning
Resolution of errors related to File Ownership and Permissions
Installation of additional PHP or Apache modules required by specific plugins or themes
and more…
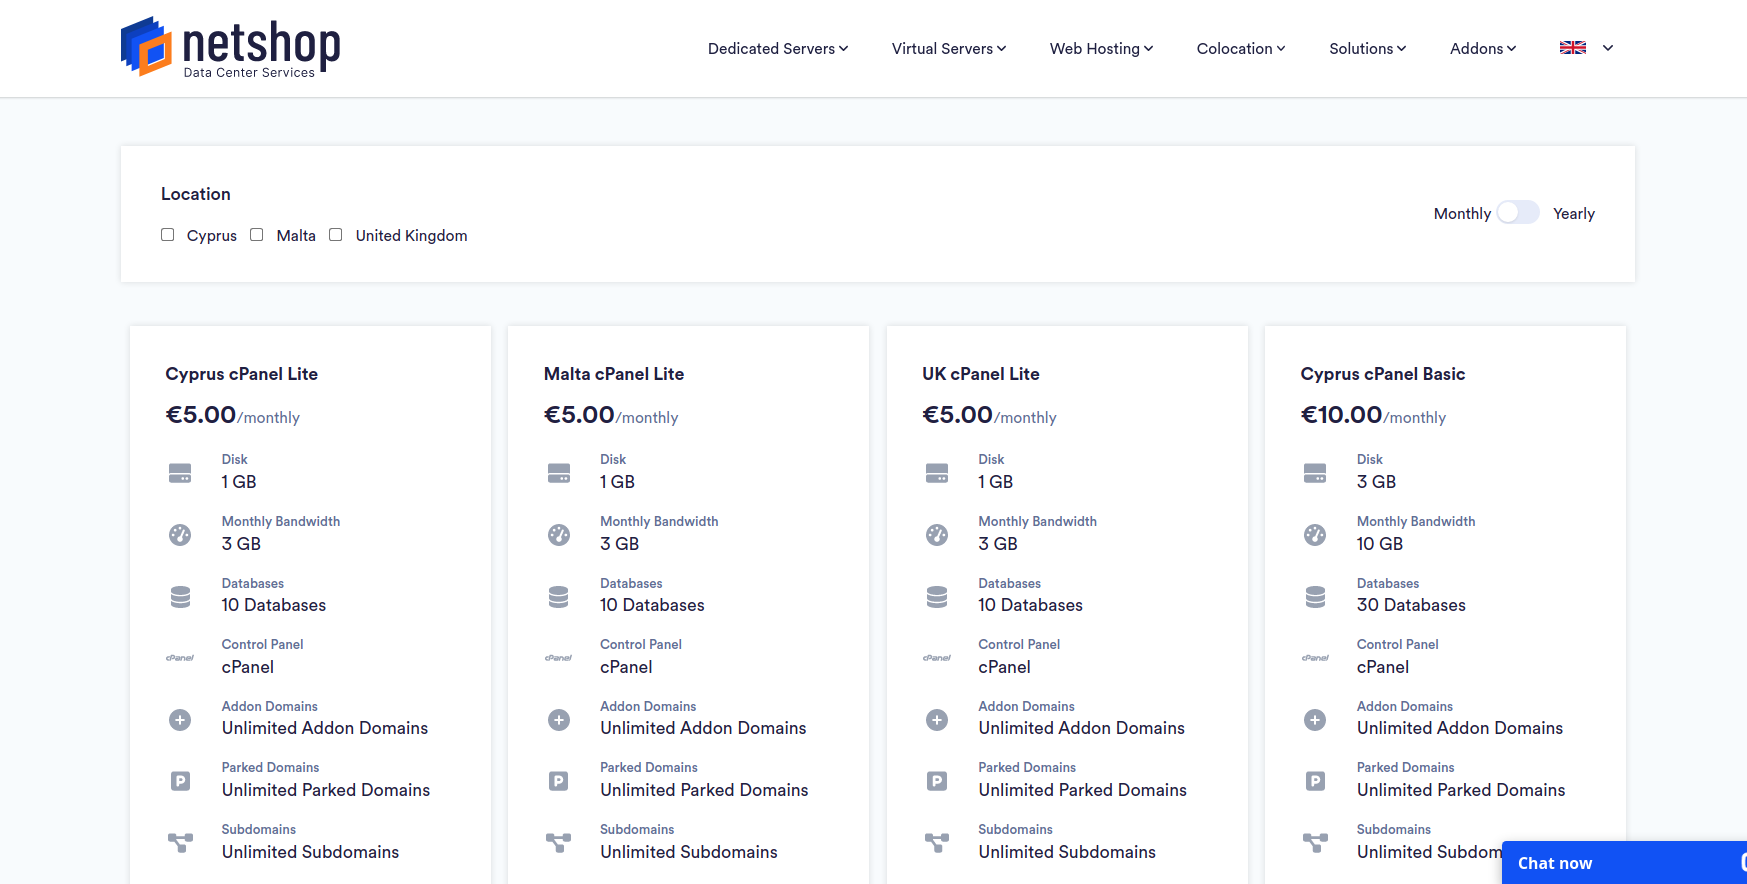
Managed WordPress Hosting Plans from €5/month
All WordPress hosting plans come with cPanel for even easier administration. Plans start from €5/month and are available in Cyprus, Malta and United Kingdom.
Major Internet Providers Disconnect Backbone Network in Russia
As announced earlier this week, two of the largest Internet providers worldwide, Cogent Communications and Lumen (former CenturyLink), pulled out of Russia.
As announced earlier this week, two of the largest Internet providers worldwide, Cogent Communications and Lumen (former CenturyLink), pulled out of Russia.
Cogent was the first U.S.-based internet carrier to withdraw from Russia as per their announcement on Friday, 4th of March 2022, with Lumen’s exit following on Tuesday 8th of March 2022.
As per an official statement published to Lumen’s website, “We decided to disconnect the network due to increased security risk inside Russia. We have not yet experienced network disruptions, but given the increasingly uncertain environment and the heightened risk of state action, we took this move to ensure the security of our and our customers’ networks, as well as the ongoing integrity of the global Internet.”
Cogent announced the decision of immediate Internet service termination to its customers in Russia via e-mail:
In light of the unwarranted and unprovoked invasion of Ukraine, Cogent is terminating all of your services effective at 5 PM GMT on March 4, 2022. The economic sanctions put in place as a result of the invasion and the increasingly uncertain security situation make it impossible for Cogent to continue to provide you with service.

All Cogent-provided ports and IP Address space will be reclaimed as of the termination date. For any colocation customers, your equipment will be powered off and kept in the rack for you to collect.

If not collected within thirty days, the equipment will be removed from the rack and stored. For any utility computing customers, you will not have access to your servers after the termination of service. The servers will be disconnected and kept in storage by Cogent for an indeterminate period.
About Cogent Communications
Cogent Communications is a multinational internet service provider based in the United States. Cogent’s primary services consist of Internet access and data transport, offered on a fiber optic, IP data-only network, along with colocation in data centers.
Lumen Technologies, Inc. (formerly CenturyLink) is an American telecommunications company headquartered in Monroe, Louisiana, that offers communications, network services, security, cloud solutions, voice, and managed services. The company is a member of the S&P 500 index and the Fortune 500.
NetShop ISP Integrates Revolut to facilitate one-click payments for its hosting services
NetShop ISP teams up with Revolut in an effort to provide customers yet another convenient payment solution for servers, web hosting and cloud services.
NetShop ISP teams up with Revolut in an effort to provide customers yet another convenient payment solution for servers, web hosting and cloud services.
In December 2020 NetShop ISP announced the acceptance of Revolut payments through the Revolut App. As of Tuesday, 8th of March 2022, Revolut has been fully integrated in myNetShop Portal enabling new and existing customers the option to pay securely using their Revolut account, physical or virtual cards with a single click.
“Our open mindset and flexible structure allows us to action swiftly in global regulatory changes and new trends. As we serve individuals and organizations from all over the world in different industries, payments can be a daunting task due to today’s global regulatory and banking environment. Without sacrificing our KYC and AML procedures, our integration with Revolut will help in expediting the time between payment capturing and service provisioning.” said Elena Efthymiou, Operations Manager at NetShop ISP.
In addition to Revolut’s integration, NetShop ISP offers a wide range of payment methods including Credit/Debit Card (JCC), PayPal, TransferWise, Coinbase, BitPay and Wire Transfer.
For more information about the acceptable payment methods please contact NetShop ISP’s Customer Care team via e-mail (customercare@netshop-isp.com.cy), phone (+357-24-250808) or live chat (https://netshop-isp.com.cy).
NetShop Internet Services (established 2004) is an Award Winning Data Center Services & Server Hosting Provider with privately-owned Infrastructure in Cyprus, Malta, United Kingdom, Netherlands, Singapore, United States and Hong Kong.
Its world-class, carrier-neutral data centers are strategically located in the world’s most prominent tech and financial markets to provide you with high-speed connectivity, ultra low latency hosting, cloud scalability and organizational flexibility.
NetShop ISP expands Infrastructure footprint with Secure Private Network in Three Continents
NetShop ISP, a leading provider of Bare Metal Servers, Data Center solutions, and cloud hosting, today announced the availability of its Secure Private Network (SPN) in Europe, Asia and the United States.
NetShop ISP, a leading provider of Bare Metal Servers, Data Center solutions, and cloud hosting, today announced the availability of its Secure Private Network (SPN) in Europe, Asia and the United States.
The Secure Private Network allows customers to interact with their servers without the use of additional VPN or secure tunnels. Additionally, SPN enables businesses to transfer large amounts of data and multimedia across the globe securely and fast.
“As a Datacenter company, we are committed in providing our customers a top-notch and resilient network to host their digital infrastructure. With more than 55% of our global Datacenters capacity to be used for serving online casinos, streaming and CDN companies, our Secure Private Network can guarantee content’s delivery fast, free and securely”, said Stefano Sordini, CEO NetShop ISP.
The backbone infrastructure of NetShop ISP’s transcontinental network is L3 fabric (also known as IP fabric) which has significant advantages over traditional L2-based solutions that most data centers use. L3 fabric offers true redundancy and high protection from Ddos attacks (specifically unicast flooding).
As announced today, the SPN available via NetShop ISP’s Data centers in Netherlands, Singapore and the United States and can be used by Cloud, Co-located and Bare metal servers, as well as by customers with Private racks. Each customer receives a dedicated network address which is fully isolated from other customers and the public Internet.
Traffic within the Secure Private Network is entirely free.
For more information about NetShop ISP’s Secure Private Network (SPN) in Singapore, Netherlands and US data center facilities, please contact Sales team or read more about it here.
How To Sync Multiple Linux Servers with Lsyncd
In this article we will demonstrate how to automate files and data synchronization using lsyncd; a popular and free open-source software used for keeping two or more servers synchronized automatically.
In an era when most businesses conduct online transactions, servers down time and network disruptions cause a major impact. The more visitors a website has, the more robust and bulletproof its underlying online infrastructure must be.
In the past few years we have witnessed large hosting and cloud providers going down due to cyber attacks and fire incidents. Business owners and IT managers need to ensure that the right disaster recovery and business continuity plans are in place to overcome potential threats that may impact their business.
Infrastructure horizontal scaling is a commonly used practice that increases the ability of a website to handle a significant amount of traffic and protect it against hardware failure of a standalone web or database server. Horizontal scaling is often implemented using cloud or dedicated servers in different hosting providers across multiple regions in order to eliminate as many single point of failures (SPoF) as possible.
Ensuring that all web servers have the same data is a challenging task as, otherwise, you will end up with missing or corrupted data when a backup server takes the primary role upon a disaster.
In this article we will demonstrate how to automate files and data synchronization using lsyncd; a popular and free open-source software.
What is Lsyncd
Lsyncd is a free, open-source utility that can be downloaded and configured with no charge for the software or use. It’s setup is simple as you only need to install a single package. Comprised of reliable technology, rsync and ssh, lsyncd makes the perfect utility for synchronizing data across two or more servers.
Please note that lsyncd is not real-time. It pushes changes every 15 seconds. This value can be modified via the configuration file if needed.
Modern sysadmins use lsyncd for several scenarios such as:
Load balancing – this works best when the traffic levels are relatively low (or intermittent), or new and modified content is not frequently accessed.
High availability – keeping in mind that there are multiple aspects of high availability. Using lsyncd to push data to another host that can take over in the event of a hardware failure is an excellent use-case.
Real-time offsite backups – a great way to keep a running record of the files and folders that have changed will ensure we push the changes to a second host for backup purposes.
Lsyncd Configuration on Linux CentOS
Install EPEL Repo
The first step is to add the EPEL repository which contains the lsyncd package.
root@server ~]# yum -y install epel-release
If everything goes well, you will see a “Complete!” message. Then you need to make sure the EPEL repo is enabled.
Open the epel.repo file as follows:
[root@server ~]# vi /etc/yum.repos.d/epel.repo
Change the “enabled=0” to “enabled=1” as follows:
[epel] name=Extra Packages for Enterprise Linux 7 - $basearch #baseurl=http://download.fedoraproject.org/pub/epel/7/$basearch metalink=https://mirrors.fedoraproject.org/metalink?repo=epel-7&arch=$basearch
failovermethod=priority
enabled=1
gpgcheck=1
gpgkey=file:///etc/pki/rpm-gpg/RPM-GPG-KEY-EPEL-7
Install Lsyncd
Proceed to install the lsyncd package using the following command:
[root@server ~]# yum -y install lsyncd
Configure SSH on Master
At this point we need to configure SSH on Master server so that it can push files to the slave/backup server without requiring password authentication or user intervention. To do so, we will create SSH keys on the master server as follows:
[root@server ~] # ssh-keygen -t rsa
Upon execution of the command above you will be prompted with several questions. You can use the defaults. When prompted to enter passphrase, hit Enter to proceed with empty passphrase.
Enter passphrase (empty for no passphrase):
Enter same passphrase again:
Your identification has been saved in /home/username/.ssh/id_rsa.
Your public key has been saved in /home/username/.ssh/id_rsa.pub.
The key fingerprint is:
SHA256:rCwcRH+3oop3kMhAehxmmNzi8vr0g/wOfwSowCsw user@server.localhost-2022-02-22-08:14:45+0000
The key's randomart image is:
+---[RSA 4096]----+
|. . . . |
| = o . . |
|o.= . . . . |
|oDo . . . . . |
|B. .. Y . |
|O+.. o . . |
|O++.o o . . . |
|=*. . ... . . o. |
|.o.=+.++. . . |
+----[SHA256]-----+
root@alt [~]#
Once the SSH keys are generated, transfer the public key (the file ending with .pub) to the slave server. In this way, master server will authenticate with the slave without the need for password.
NOTE: It is normal if when using the above command you are prompted to authenticate via password. This is because the SSH key is not yet in place.
Before proceeding to the next step, verify that the passwordless authentication works. From the master server, try to ssh to the slave server as follows:
Now that Lsyncd is installed and configured, along with the SSH keys for password-less authentication, execute the following commands to start and enable the lsyncd service.
[root@server lsyncd]# systemctl start lsyncd
[root@server lsyncd]# systemctl enable lsyncd
Created symlink from /etc/systemd/system/multi-user.target.wants/lsyncd.service to /usr/lib/systemd/system/lsyncd.service
Verify Lsyncd is Working
Check both your master and slave directories (/var/www/html/) are empty.
[root@server ~]# cd /var/www/html
[root@server html]# ls -luah
total 0
[root@server html]#

[root@slave-server ~]# cd /var/www/html
[root@slave-server html]# ls -luah
total 0
[root@slave-server html]#
Create an empty file on the master server named index.html. You can quickly do so by using the touch command as follows:
[root@server html]# touch index.html
After 15 seconds, lsyncd will notice the changes and push the new file to the slave server. We can monitor the lsyncd log on the master server to verify the transfer has occurred, and what files were transferred across.
[root@server ~]# cd /var/log/lsyncd
[root@server lsyncd]# cat lsyncd.log

Tue Feb 22 09:02:18 2022 Normal: Rsyncing list
/
/index.html
Tue Feb 22 09:02:20 2022 Normal: Finished (list): 0
[root@server lsyncd]#
Now, check the /var/www/html/ directory on the slave server to confirm the new index.html file has been pushed successfully.
[root@slave-server ~]# ls -luah /var/www/html
total 1
-rw-r--r-- 1 root root 10 Feb 22 09:04 index.html
[root@slave-server ~]#
Congratulations! You have now configured lsyncd on your two Linux servers for automatic file directories synchronization.
Network Stress Testing: How To Generate High Bandwidth Traffic on your Server
In this article we show you how to stress test your network by generating high bandwidth traffic using advanced ping command parameters. All commands shown further in this article work in any Linux Server.
Network and infrastructure uptime is vital to any online business in 2022. One of the main responsibilities of network engineers and system admins is to ensure the network and infrastructure work uninterruptedly and will stay consistent even through high bandwidth traffic periods, also known as peak hours.
In the same context, Internet Service Providers (ISP’s) and Managed Services Providers (MSP’s) are required to maintain stability of their Internet service in order to be aligned with the Uptime SLA’s offered to their customers.
This is where stress testing comes into play in order to ensure your network is resilient enough to withstand large influxes (spikes) of traffic or users at any given time.
In this article we show you how to stress test your network by generating high bandwidth traffic using advanced ping command parameters. All commands shown further in this article work in any Linux Server. Similar parameters exist for ping in Windows environment, which we will explain thoroughly in an upcoming article.
What is Stress Testing
Stress testing of a network is the practice of deliberately and intensively testing it by overloading it with all, or as many as possible, protocols (TCP, IP, UDP, and ICMP, etc.) and data types (audio, video, image, etc.).
This kind of testing, which is also known as “torture testing” involves pushing networks beyond their normal operating capacities, to find their breaking points. It is meant to find their limits and also to observe their network performance (or deterioration) as they approach these extremes.
How To Generate High Traffic with Ping Command
Stress testing a Network or Server with ICMP packets is the easiest way. Assuming the destination network is not blocking ICMP requests you can follow the examples below to generate high traffic.
Option 1 – Send Large and unstoppable Packets to a Target
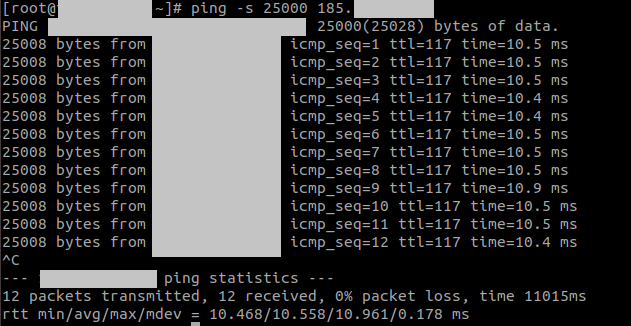
Using the “- s” parameter in ping you can change the size of bytes in an ICMP packet header and send it over a ping command as follows:
ping -s 25000 <target IP>
Option 2 – Create ICMP Packet Storm
The following command creates a ping flood or storm to the destination server/network.
ping -s 20000 -f <target IP>
As you can see from the above screenshot, in one simple command running for 2 seconds we managed to send 1,162 packets to the destination server.
Option 3 – Combination of the above
By combining the first two options (-s and -f parameters) you will be able to send a storm of packets with a custom defined packets header size. Be careful as this could put your server, router, and network into real stress!
ping -s 20000 -f <target IP>
As per the screenshot above, you can see that in just 5 seconds we have generated ~77,000 packets to the destination server.
Network Monitoring during Stress Testing
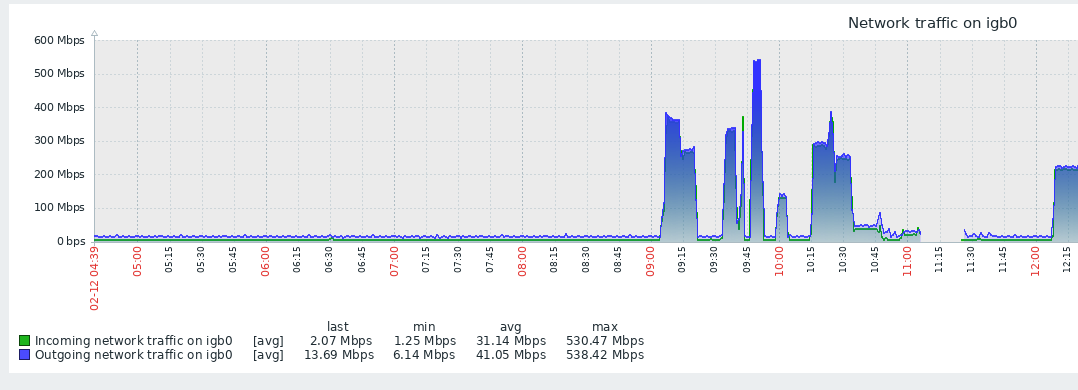
It is recommended that you monitor the bandwidth on the destination network during your stress testing. In this way you can gather valuable information such as min/avg/max network speed and bandwidth traffic. Additionally, using advanced packet sniffing tools you can further analyse how packets were handled on your network/server whilst it was “under attack”.
Bandwidth Monitoring using Zabbix during Network Stress Test
Hassle-free Network Administration & Stress Tests
NetShop ISP offers Premium support plans and Managed services for businesses that are short in IT staff or lack of specialization in network administration and infrastructure management.
Hundreds of the world’s largest Forex, Gaming and Gambling companies have delegated the management of their cloud and dedicated servers into our hands.
Contact us today to learn more about our Managed Services and how we can help you increase your network’s uptime while you can focus on developing your core business.
Introducing Acronis Cyber Infrastructure in Malta Data Centers
In this article, we’ll take a look at the importance of both solutions and how to best utilize Acronis Backup and Disaster Recovery, specifically in our Malta Data Centers.
When disaster strikes, whether that be due to a natural disaster or manmade occurrence like a cyber-attack, having effective solutions in place to protect your data and business is essential. Excessive downtime can be extremely costly for companies, so implementing Backup and Disaster Recovery solutions can guarantee a business is prepared for any unforeseen event.
When deciding on the appropriate solution to ensure business continuity, businesses tend not to realize the importance of having both Backup and Disaster Recovery, often believing that implementing just one solution is sufficient.
In this article, we’ll take a look at the importance of both solutions and how to best utilize Acronis Backup and Disaster Recovery, specifically in our Malta Data Centers.
The Importance of Data Backup
Data Backup has become a crucial component to the successful running of any company, with potential risks being posed in many forms. Cyber-attacks are rife, with hackers, ransomware and viruses being a huge threat to data security, as well as potential natural disasters that could destroy or severely damage data centers.
In effect, Data Backup, or Backup as a Service (BaaS), is a copy of all of your data securely stored on a remote server, with systems in place to make restoring it in the event of a disaster as quick and seamless as possible.
Why Disaster Recovery is Essential
Disaster Recovery is a lot more than just data backup – it’s a strategic plan and set of processes put in place to not only protect business data in the event of failure or disaster, but to allow them to rapidly reinstate access to their data and other IT resources, in order for business operations to reconvene as quickly as possible.
Disaster Recovery plans tend to include failover processes, allowing businesses to switch to redundant servers and continue running without interruption. A robust Disaster Recovery plan will guarantee a low Recovery Time Objective (RTO), meaning the time interval between disaster striking and your business operations resuming as normal will be significantly short.
Malta Data Centers for Backup and Disaster Recovery
When it comes to choosing your Backup and Disaster Recovery site, there are some fundamental factors that need to be considered. Other than the proximity of the site from that of your primary data center, uptime, connectivity and safety from natural disasters are all key to choosing the right location.
Ranked as the second safest country in the world in terms of natural disasters, Malta proves to be a low risk location that is optimal for DR and backup, with strong infrastructure in place guaranteeing minimal concern of downtime. In fact, each of NetShop ISP’s three Malta data centers are strategically located within industrial areas where there are no hazards or potential threats, and operate with a 2N redundancy model on critical systems, proving a popular choice for iGaming, Blockchain and other Financial industries who heavily rely on their IT infrastructure.
Acronis Backup and Disaster Recovery with NetShop ISP
Our Disaster Recovery as a Service (DRaaS) solution utilizes Acronis Cyber Cloud Infrastructure (ACI), meaning our customers get access to 3 core services; Cloud Backup, Application and Servers Recovery and Malware Scanning.
Implemented within just 2 business days, our solution provides quick and robust premium protection for all of your critical data, with RTO of up to just 5 minutes.
Get in touch with our Cyber security experts to discuss the optimal Disaster Recovery plan for your organization.
How To Install SSL Certificate on cPanel: Step-by-Step Tutorial
In this tutorial we will demonstrate how to generate and install a Commercial SSL Certificate Product on cPanel Lite Service.
An SSL certificate is a digital certificate that authenticates a website’s identity and enables an encrypted connection. SSL stands for Secure Sockets Layer, a security protocol that creates an encrypted link between a web server and a web browser. The connection becomes from the not secure http:// to the secure https:// URL.
In this tutorial we will demonstrate how to generate and install a Commercial SSL Certificate Product on cPanel Lite Service. The main steps of the procedure are the follow :
Generate the CSR in cPanel
Upload CSR in portal – Generate SSL Certificate
Install SSL Certificate.
Prerequisites
The following are required to execute the task:
An account on my.netshop-isp.com.cy: For the purposes of this tutorial, a demo account was created: netshop-tutorials@netshop-isp.com.cy.
A cPanel Lite Service: A Cyprus cPanel Lite Web Hosting product was purchased from my.netshop-isp.com.cy website. The product is hosted on https://athena.netshop-isp.com.cy:2083/
A domain: The domain ssldesk.com was purchased and associated with the cPanel service for this tutorial.
A Commercial SSL Certificate: A RapisSSLCertificate addon was acquired.
Let’s get started on how to install SSL Certificate on your cPanel account.
Step 1: Generate the CSR
The first step is to generate the CSR. A CSR (certificate signing request) is one of the first steps towards getting your own SSL certificate. Generated on the same server you plan to install the certificate on, the CSR contains information (e.g. common name, organization, country) the Certificate Authority (CA) will use to create your certificate.
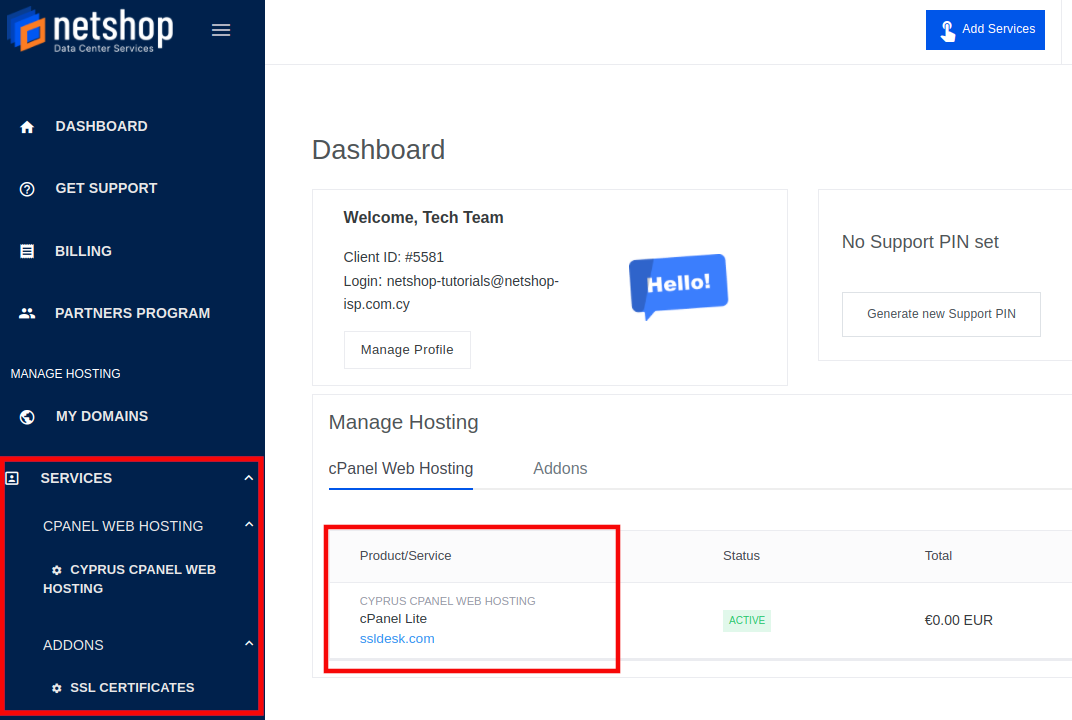
a. Login to your my.netshop-isp.com.cy portal and access your cPanel Lite Service. Through the main menu on the left, you can locate your services at the bottom. Select your cPanel Lite service.
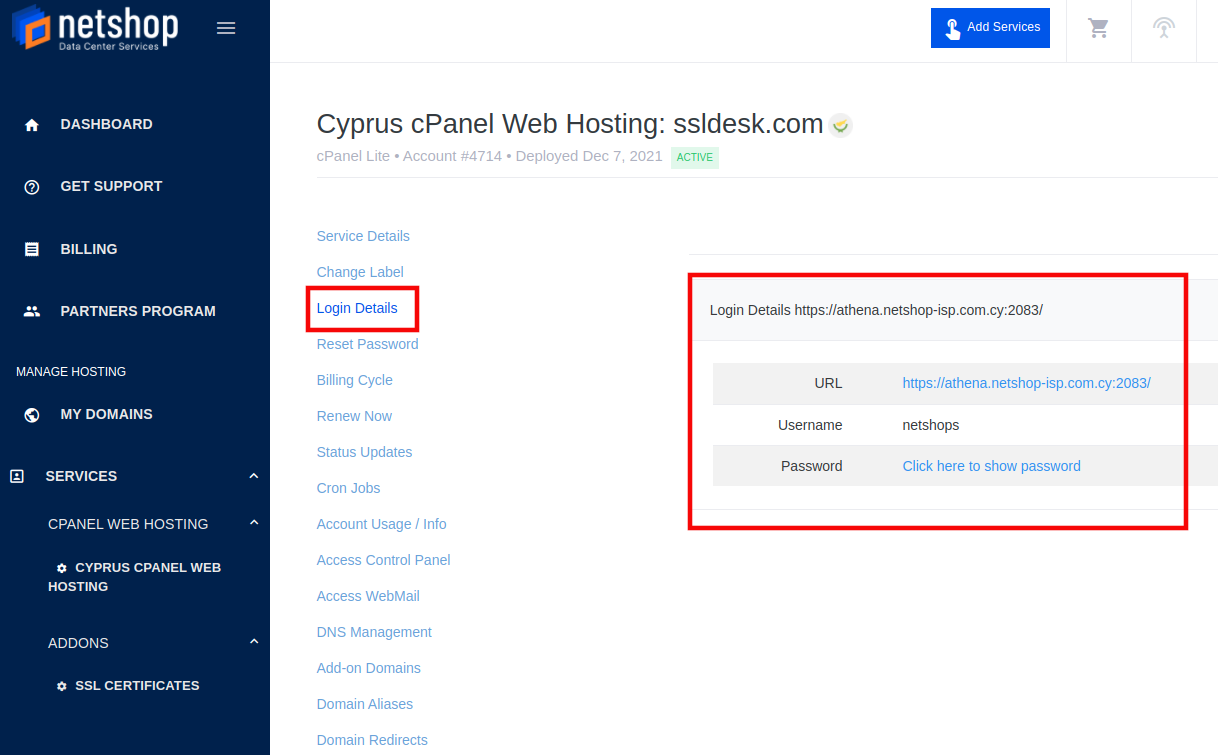
b. Click on the Login Details option to find the URL (https://athena.netshop-isp.com.cy:2083/) where your service is hosted, along with the credentials to access you account. Click on the URL to access cPanel and use the credentials to login into your cPanel account.
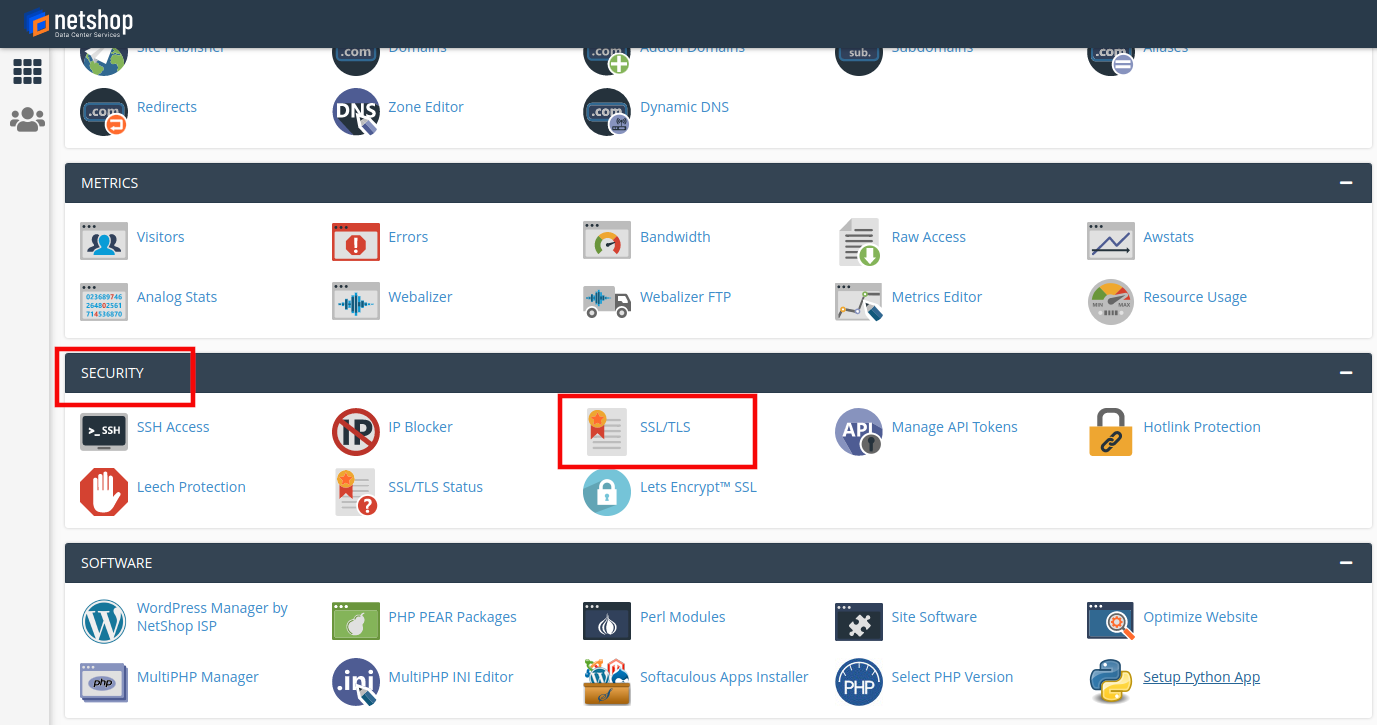
c. Once you are inside your cPanel account, scroll down to find SSL/TLS option under SECURITY tab.
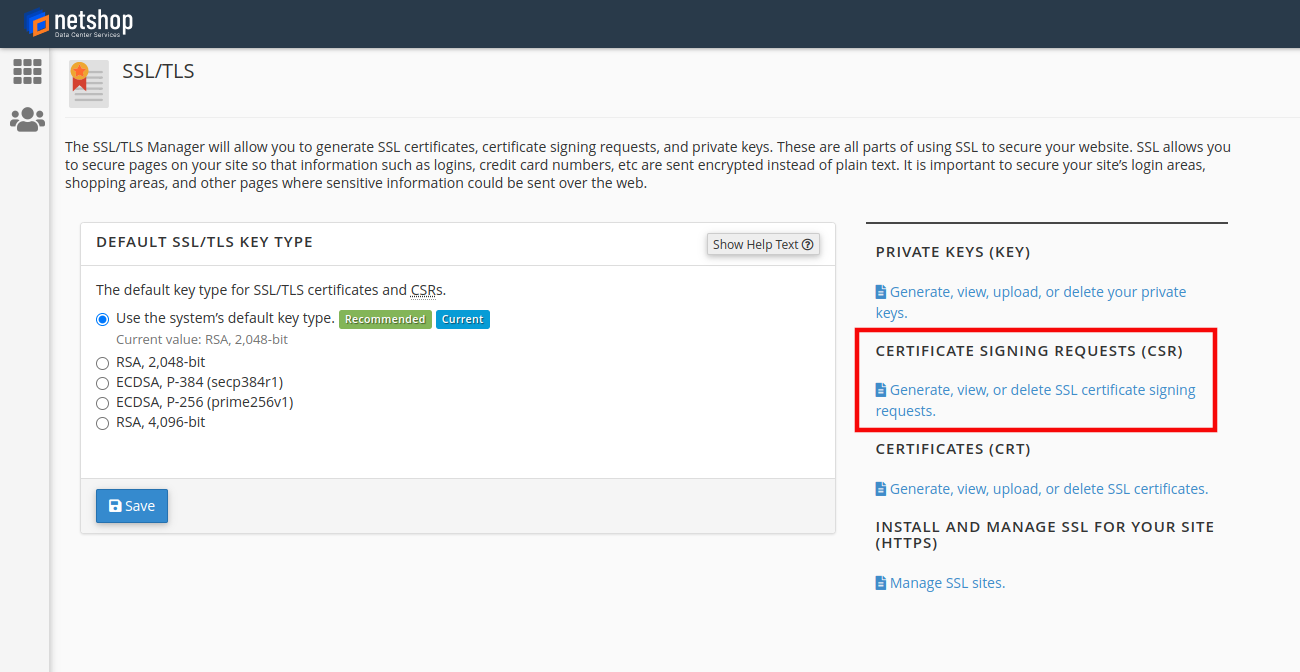
d. Next, click on the Certificate Signing Requests (CSR) on the right.
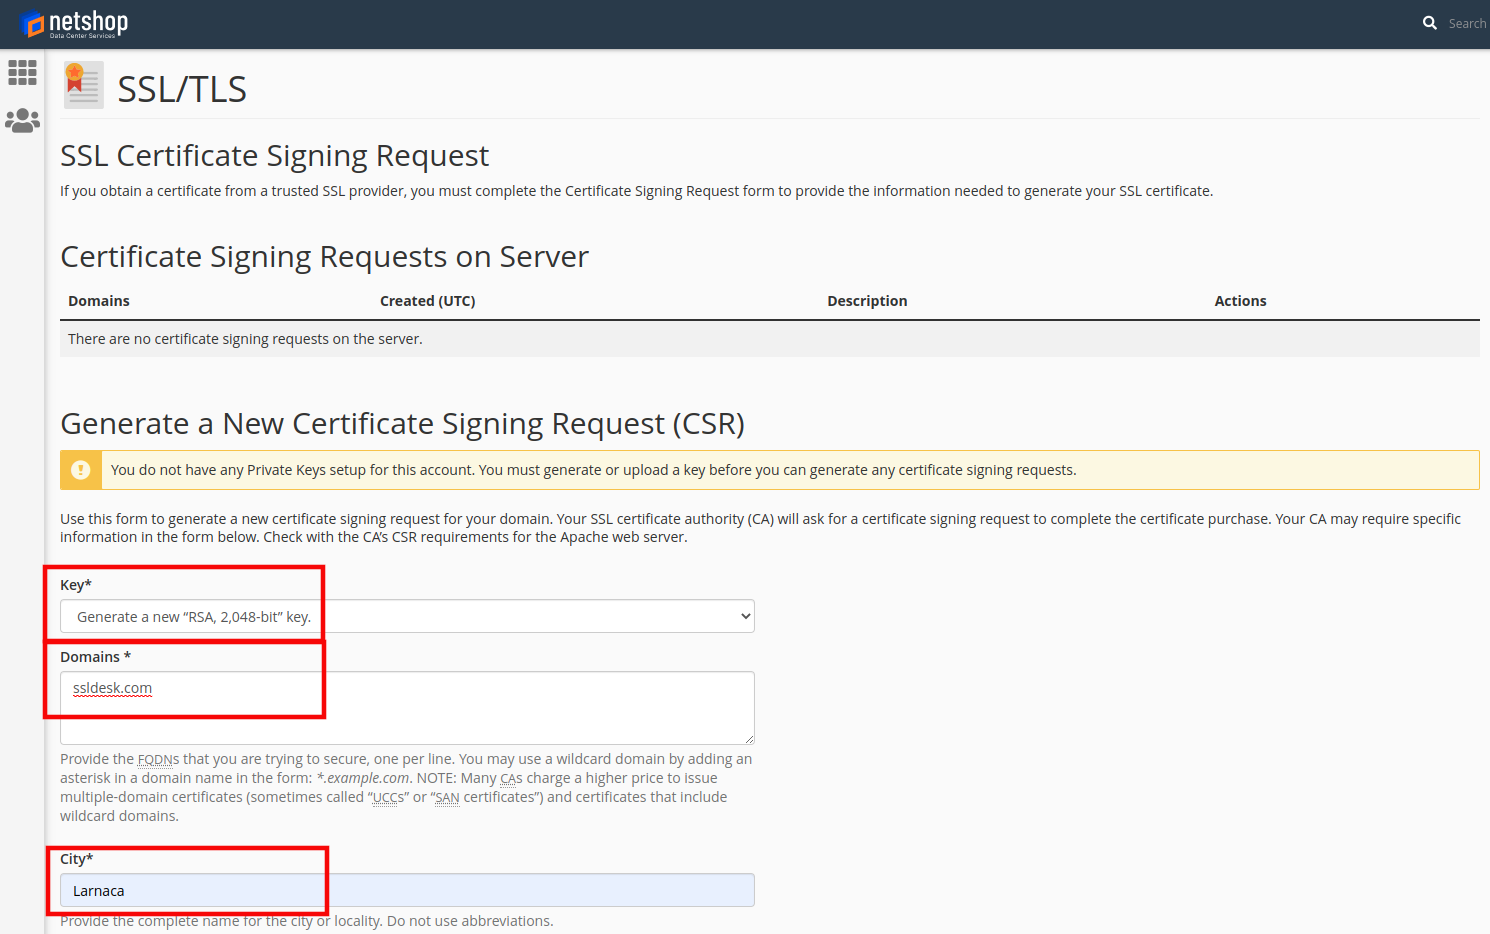
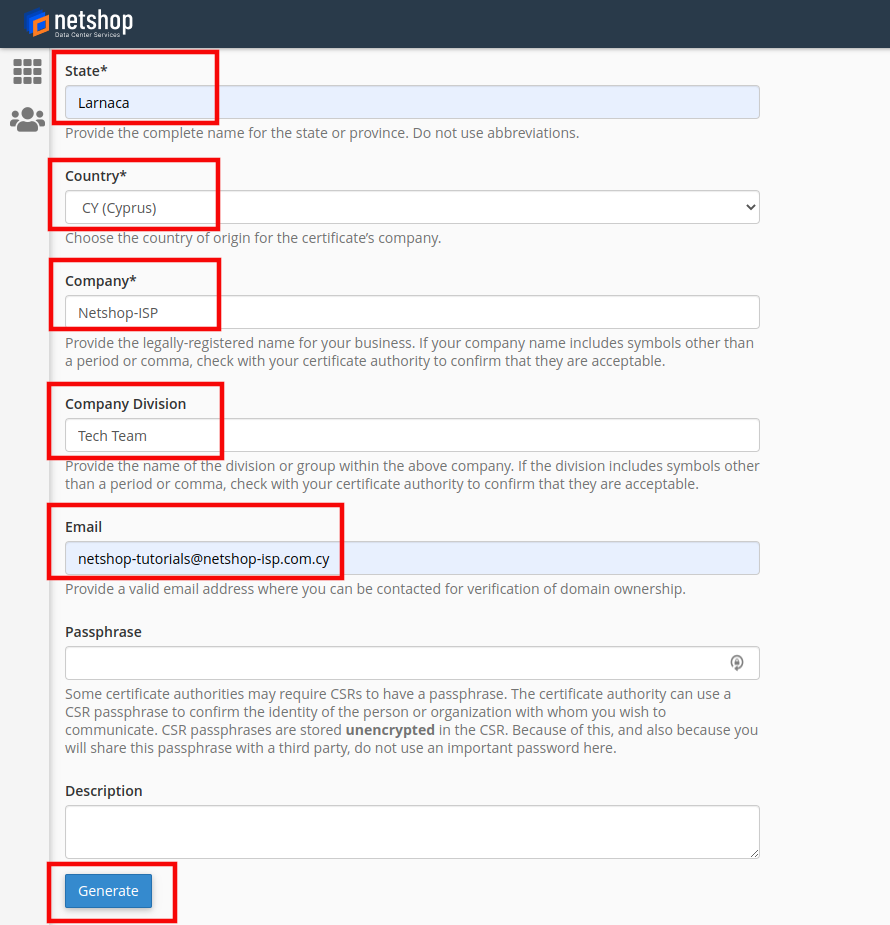
On the next page, you must fill some mandatory fields that will be used to generate your unique CSR.
d.1. Key: A mandatory field where you can select “Generate a New 2048-bit key” to generate a completely new Private Key, since this is the first time using the service.
d.2. Domains: A mandatory field you can add the domain(s) (example: ssldesk.com) you wish to secure. Keep in mind, ONLY Fully Qualified Domain Name(s) (FQDN) are valid.
If you purchased a Wildcard certificate, it should be represented with an asterisk in front of the domain (*.example.com). To create your CSR code for multiple domains, enter each domain in a new line.
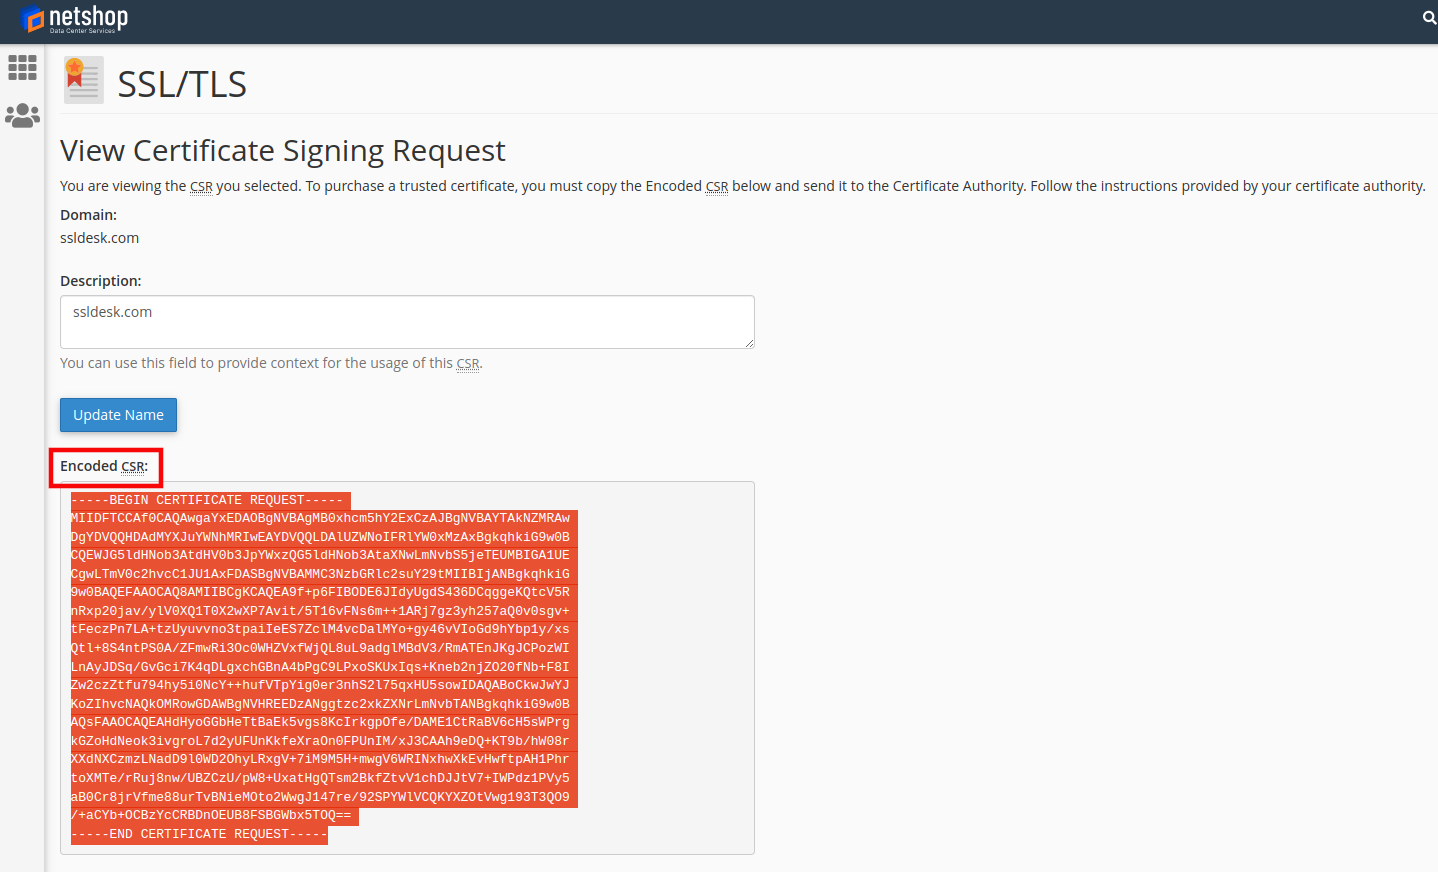
d.3. The next page will show the newly generated CSR. With the use of the generated Private Key and the information provided, the CSR Code is created. You can now use the Encoded Certificate Signing Request to activate the purchased SSL Certificate through my.netshop-isp.com.cy portal.
Keep the below Certificate tab open as we will need the Encoded Certificate Signing Request later on, or you can copy the contents of the Encoded CSR: box now to a notepad file for easier retrieval.
You will have to copy the entire CSR from -----BEGIN CERTIFICATE REQUEST----- until the end, including -----END CERTIFICATE REQUEST----- when submitting the CSR code for SSL activation.
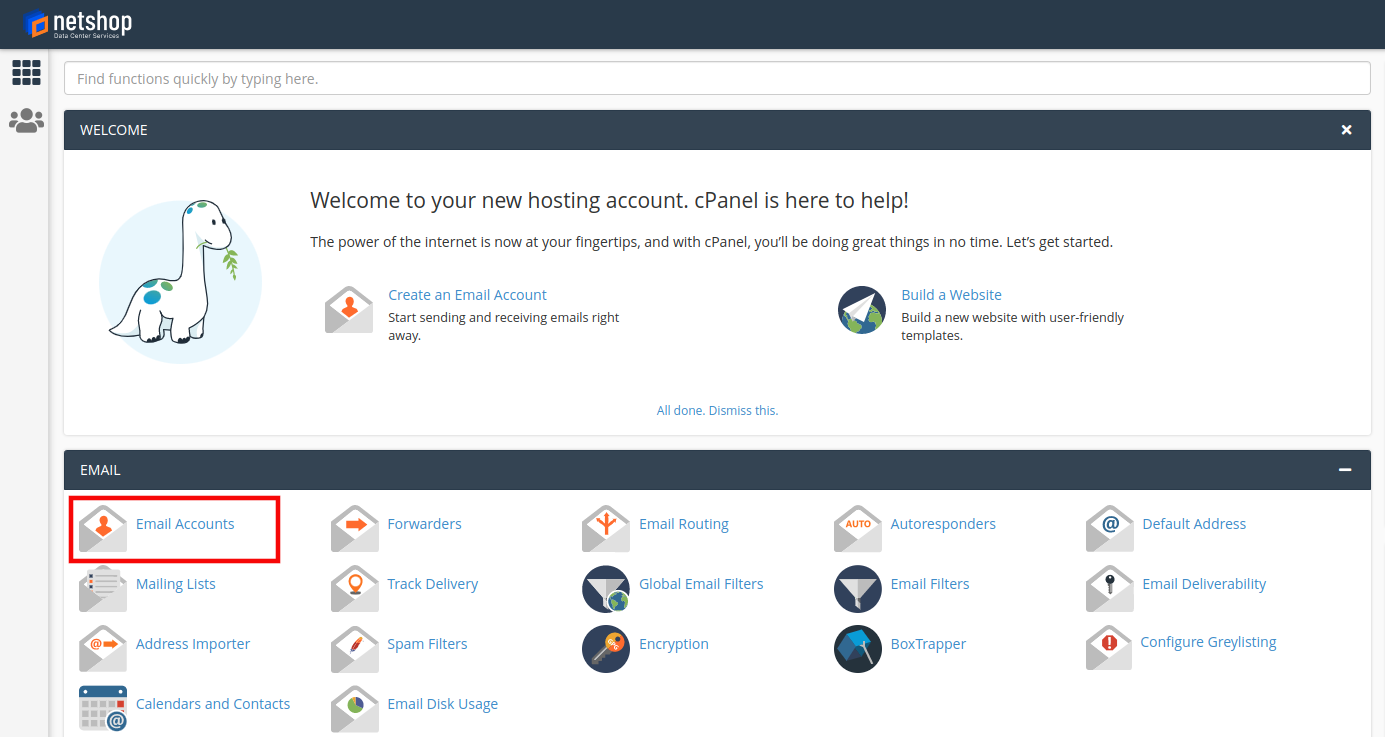
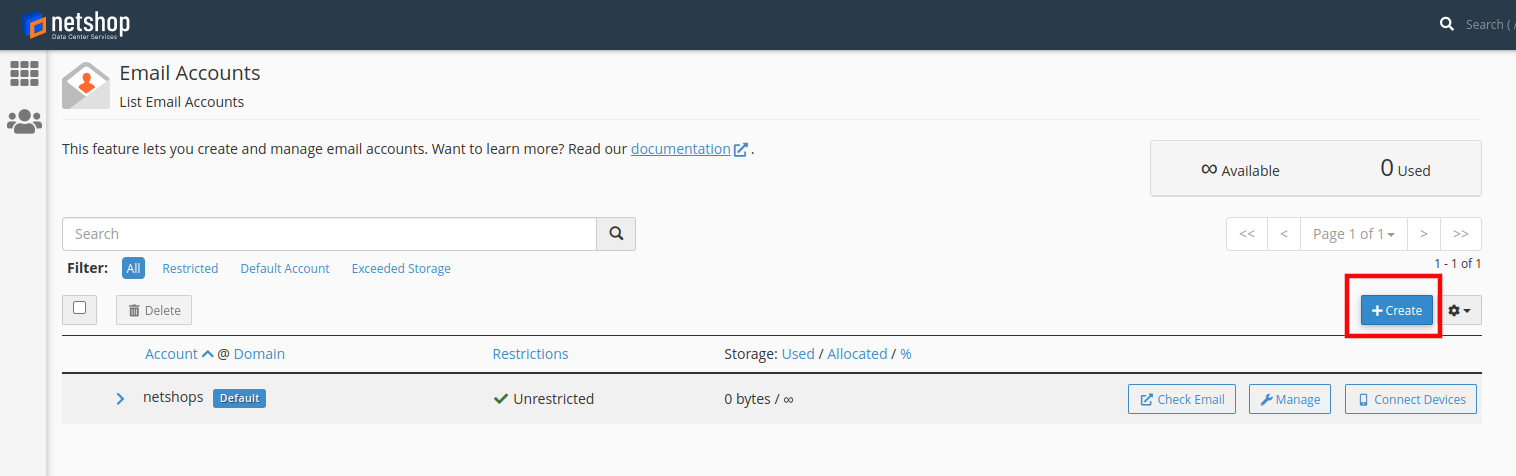
e. Before moving on to the next section (Upload CSR – Generate SSL), an email account should be created in cPanel to use it later for the domain validation and SSL request appoval (Upload CSR – Generate SSL, Step 4). Go back to the cPanel Dashboard and click on Email Accounts under EMAIL.
f. Then, click on the +Create button to create a new email account.
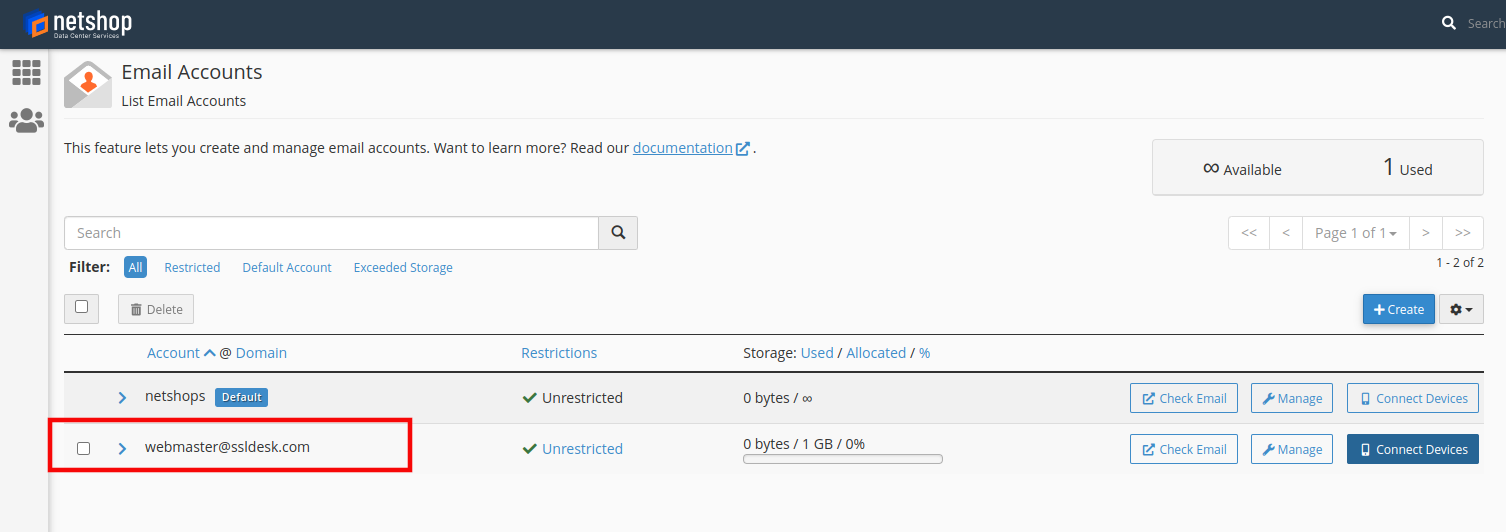
g. Add a Username and a Password in the respective fields and click the +Create button. For the username, you can choose between the reserved names: webmaster, administrator, admin, hostmaster or postmaster. In this example we have chosen webmaster@ssldesk.com. Instead of a password, you can send a login link to an alternate email address.
You can see that the new email is created under the current domain (@ssldesk.com).
Now that the CSR is generated and an email account is created, we can move on to the next section.
Step 2: Upload CSR in myNetShop Portal
In this step, we are going to use the CSR Code created in the previous steps and upload it in my.netshop-isp.com.cy portal. Then, we will approve the domain, activate the SSL through an email from the vendor and finally we can generate and download the SSL Certificate.
a. Log in to your my.netshop-isp.com.cy portal. Through the menu on the left, click on SSL CERTIFICATES under SERVICES -> ADDONS. Then click on the RapidSSL Certificate product.
Note that the Product/Service’ status is still pending. As soon as the SSL Certificate is generated, the status will become active.
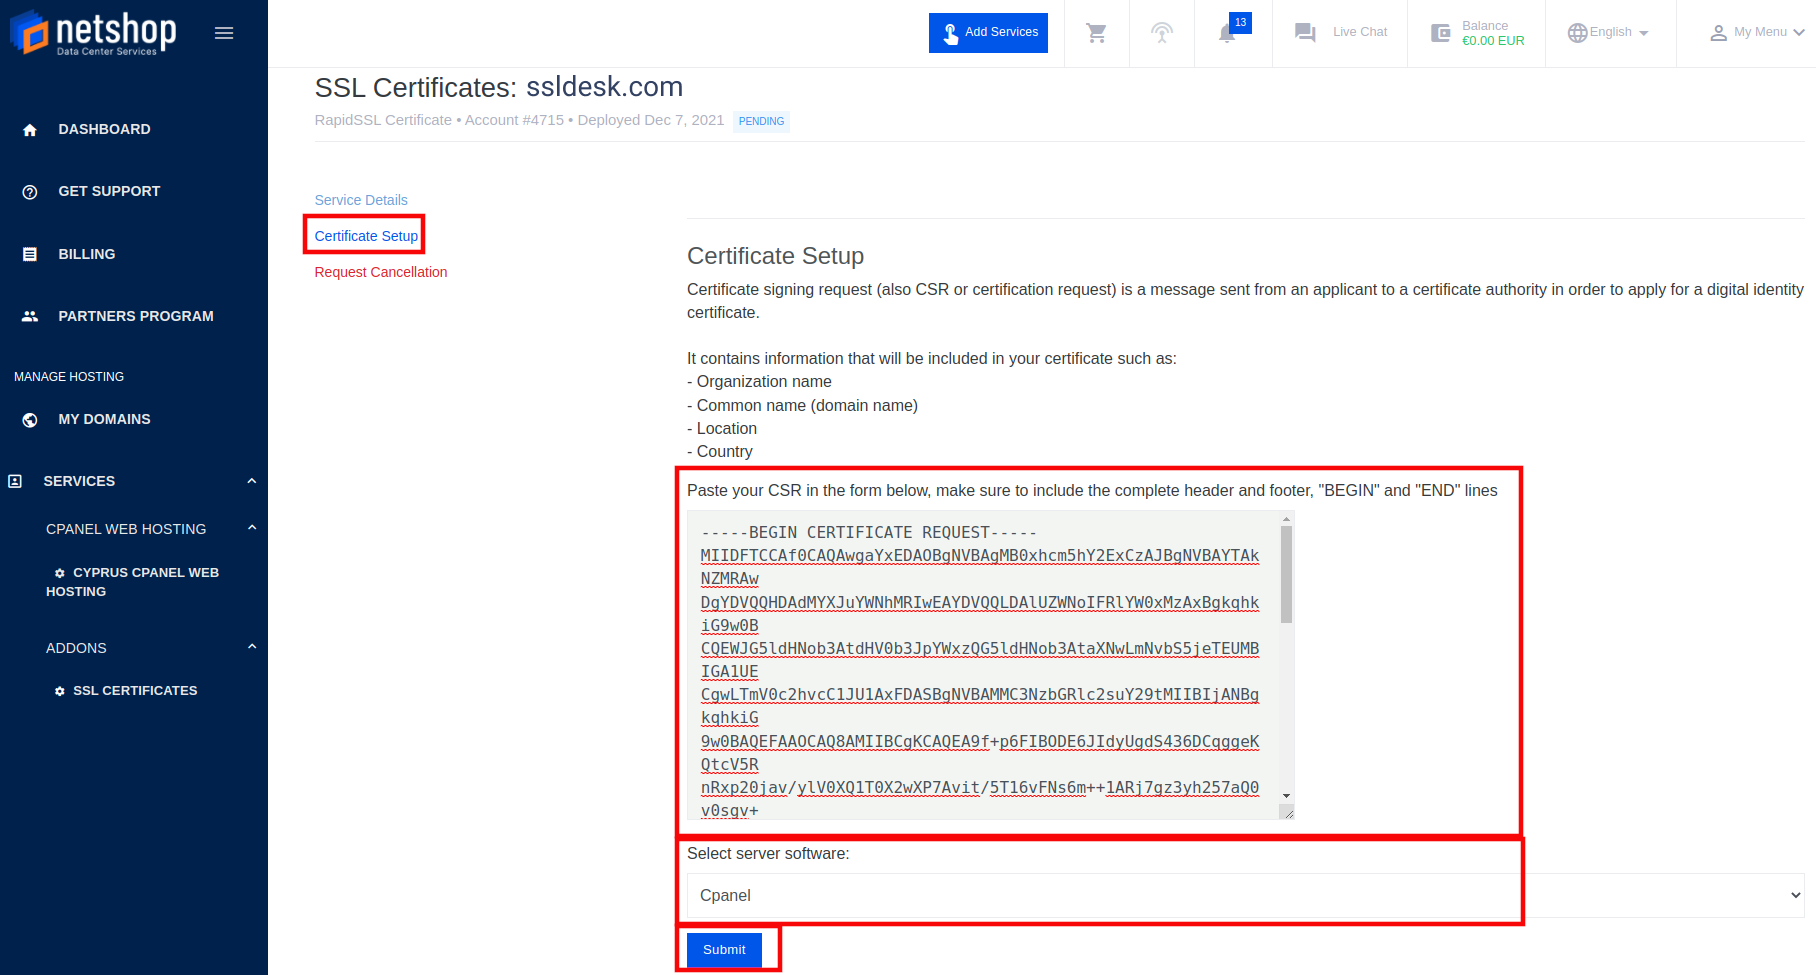
b. On the next page, click on the Certificate Setup on the left.
b.1. You will have to copy-paste (upload) the CSR Code generated earlier (Generate CSR – Step 5.12). If you didn’t keep the tab open or you didn’t copy it earlier, you can access the CSR Code from cPanel -> SSL/TLS -> CERTIFICATE SIGNING REQUESTS (CSR) under the Certificate Signing Requests on Server.
Reminder: You will have to copy the entire CSR from -----BEGIN CERTIFICATE REQUEST----- until the end, including -----END CERTIFICATE REQUEST----- when submitting the CSR code for SSL activation.
b.2. Under the Select server software: , choose cPanel and then submit.
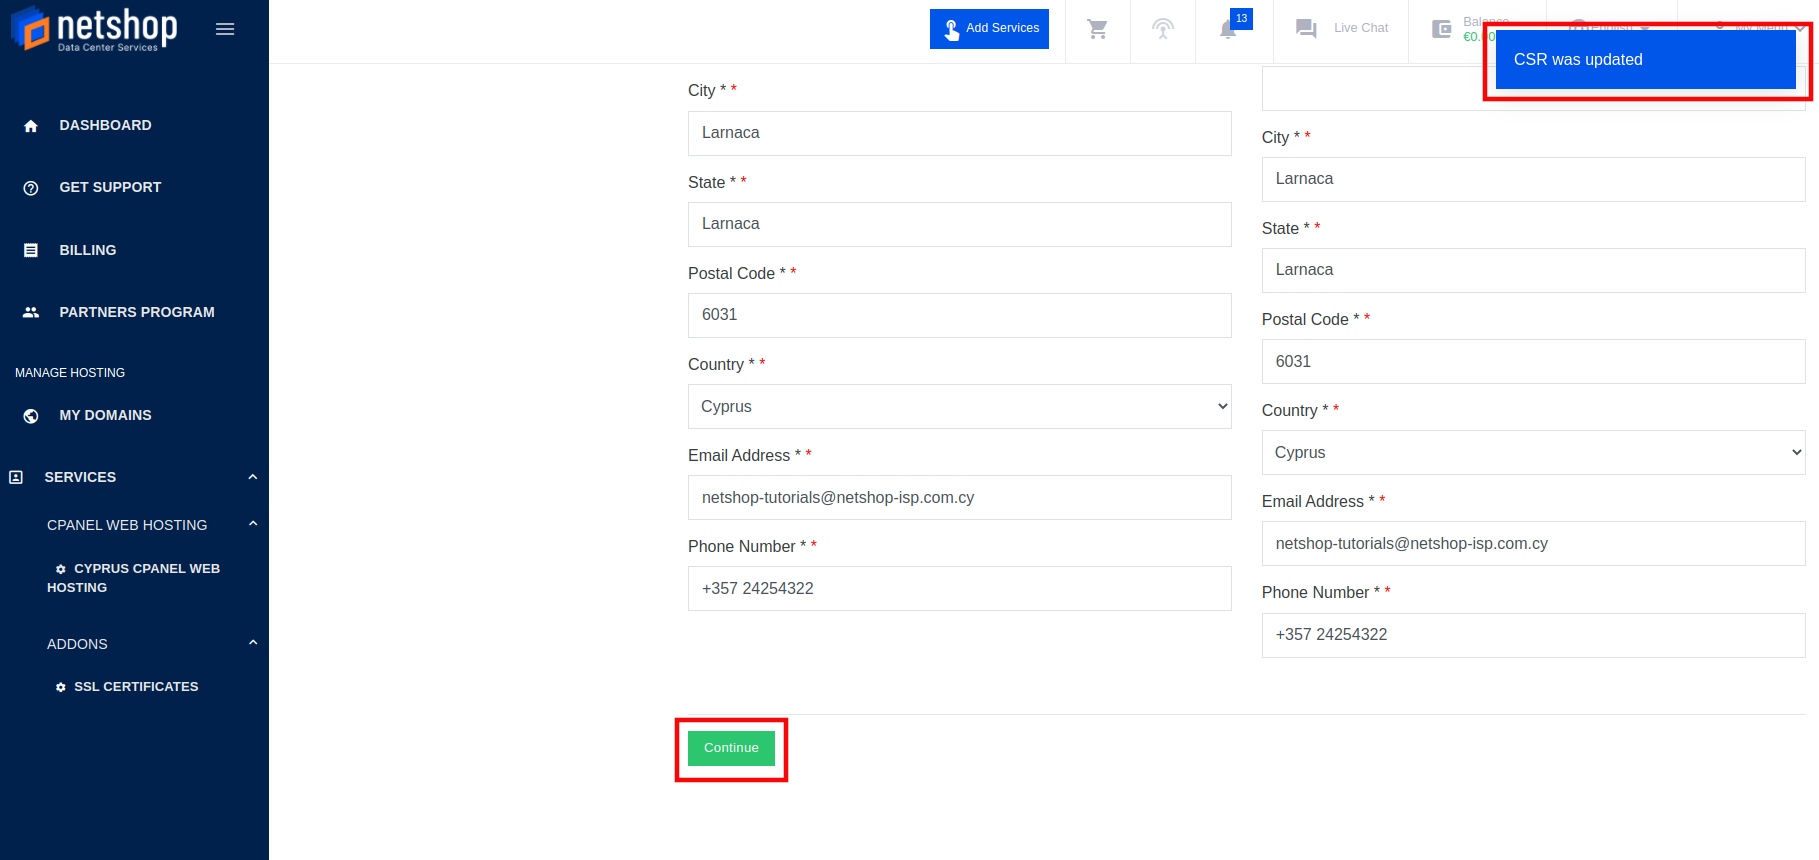
c. On the next page, you will see that the CSR information is uploaded. Also, at the top right of your browser you can see the pop up message that the CSR was updated. You need to check and verify the rest of the information and once done, scroll at the bottom and click the Continue button.
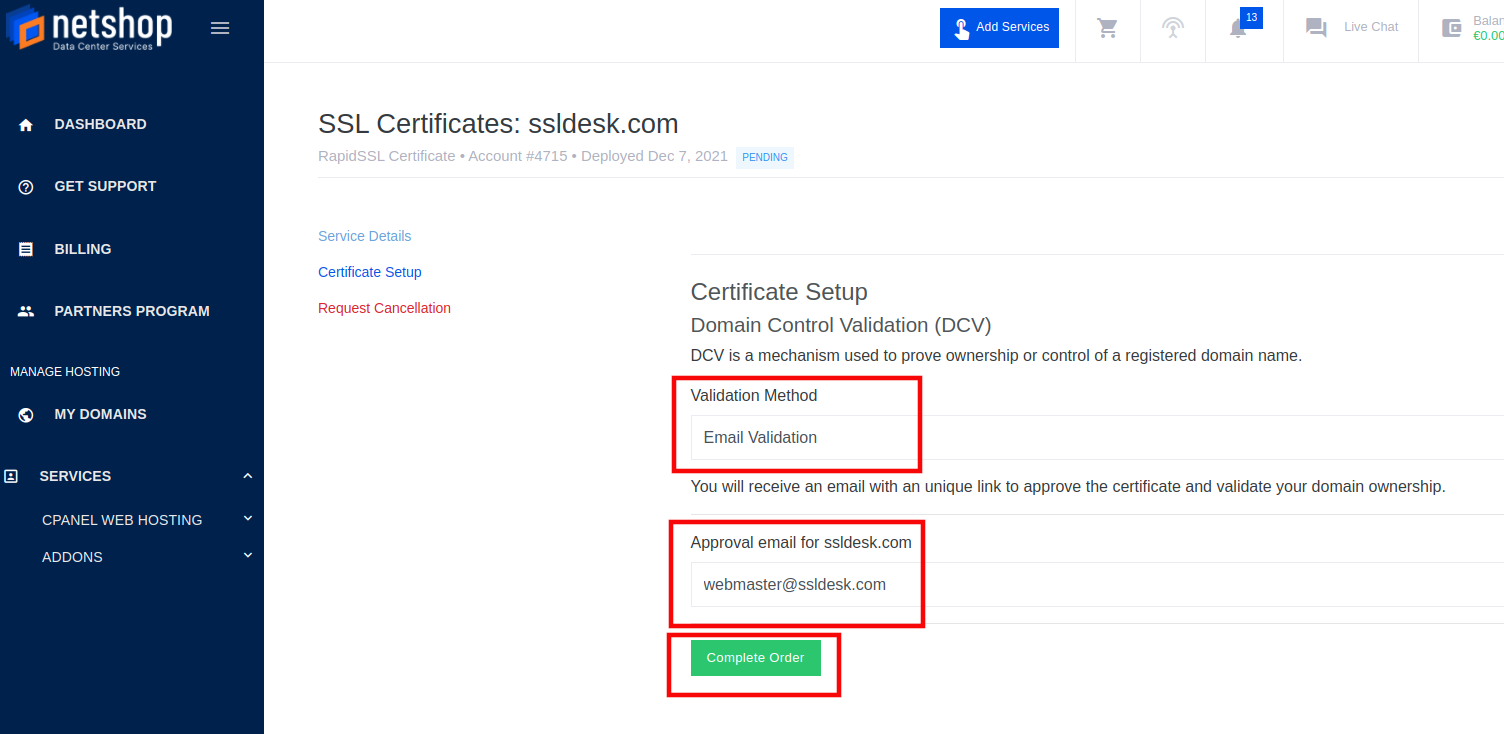
d. To complete the order, you have to choose the Validation Method. This is where theemail webmaster@yourdomain.com (in our tutorial: webmaster@ssldesk.com) is needed. On the Validation Method field select Email Validation and on the Approval email foryourdomain.com field, choose the email account you have created earlier (Generate CSR – Step 8). Click the Complete Order button when finished.
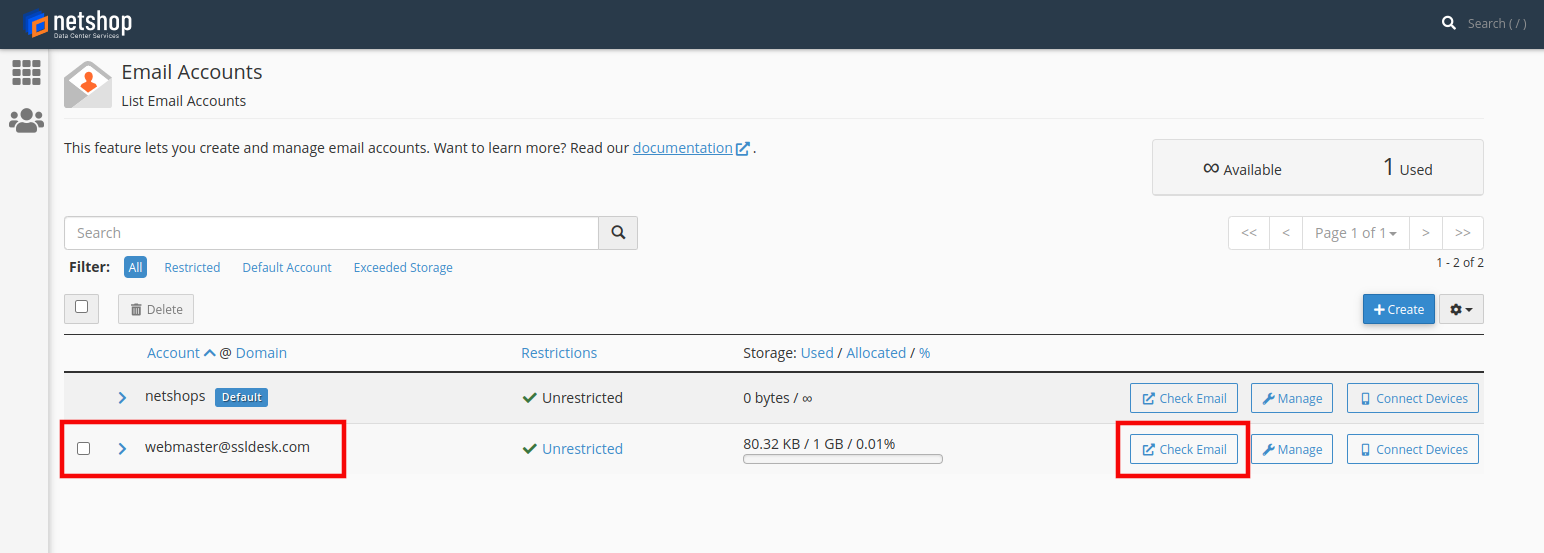
e. An email with a unique link will be send to the account specified. You need to access the inbox of the recently created email account (in our tutorial webmaster@ssldesk.com) to approve the certificate and validate your domain ownership. To access the inbox, go to your cPanel -> Email Accounts. Locate the email address (in this example: webmaster@ssldesk.com) and click Check Email.
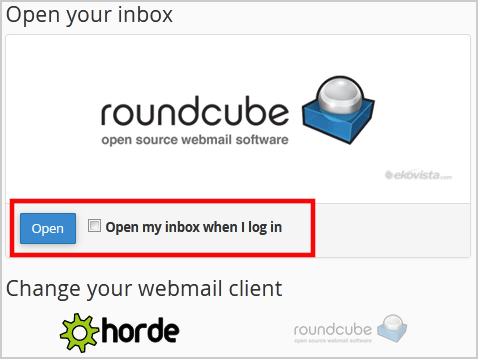
f. On the next page, click on the Open button and check the Open my inbox when I log in checkbox.
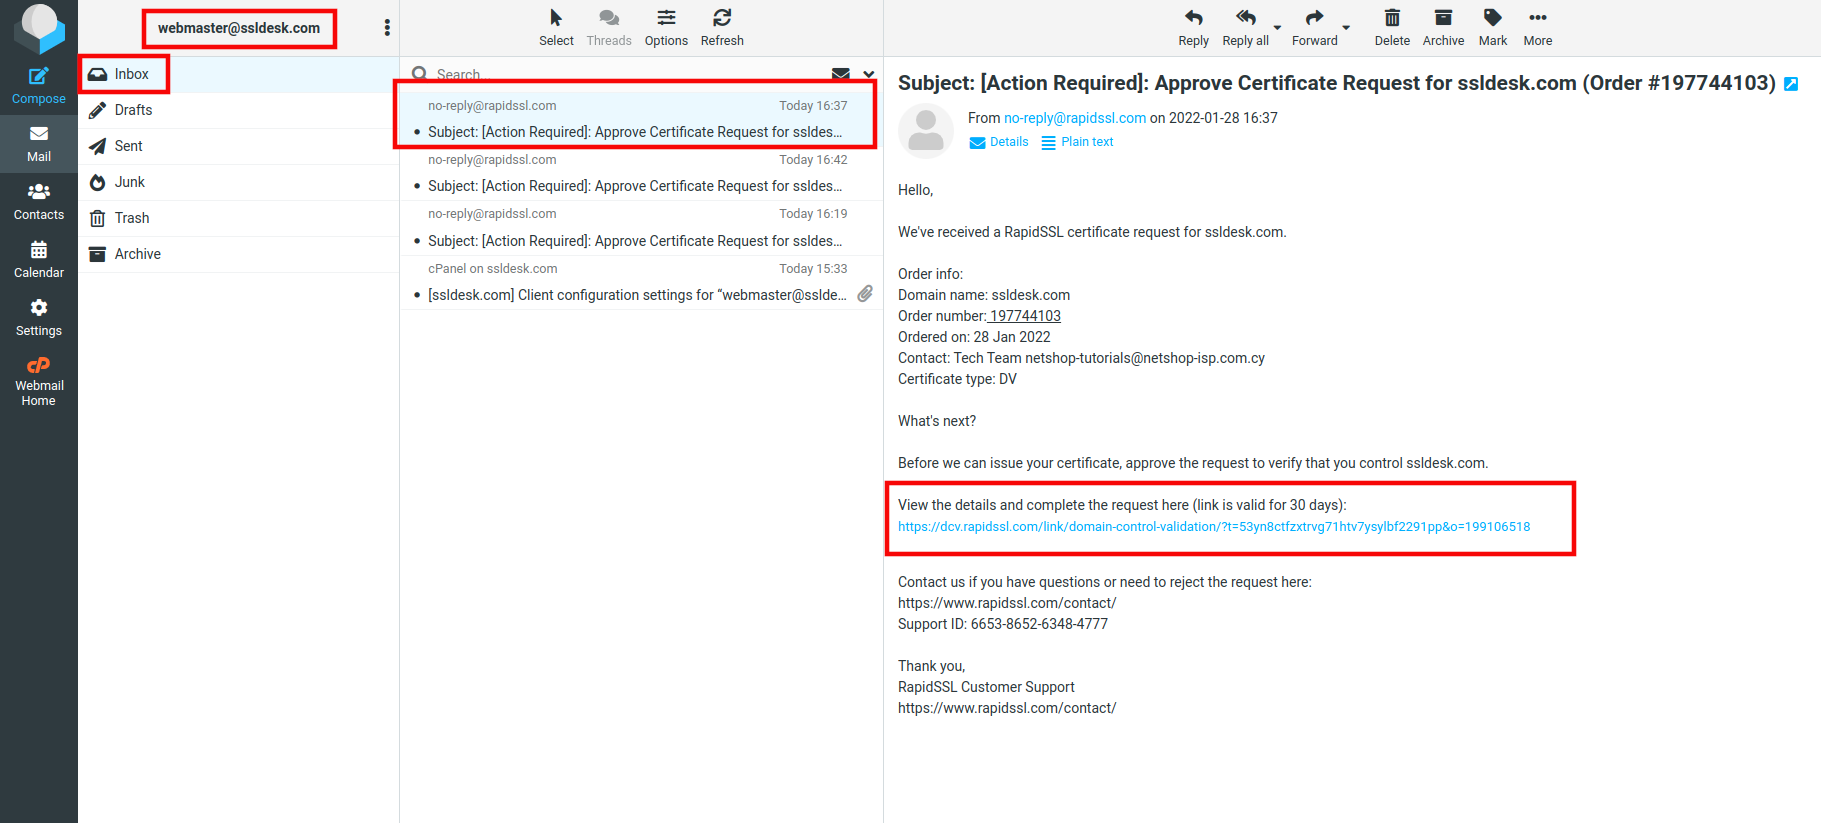
g. You should now have access to your email account associated with your domain (in this example: webmaster@ssldesk.com) through the RoundCube cPanel plugin. You should be able to see your Inbox along with all the necessary folders. Check your Inbox for the Certificate Approval Request email from the SSL vendor (RapidSSL).
Usually the email is received within a few minutes, but the vendor might need up to 24 hours to send the validation email.
Open the email from the SSL vendor and click the unique link included for certificate approval and domain ownership validation.
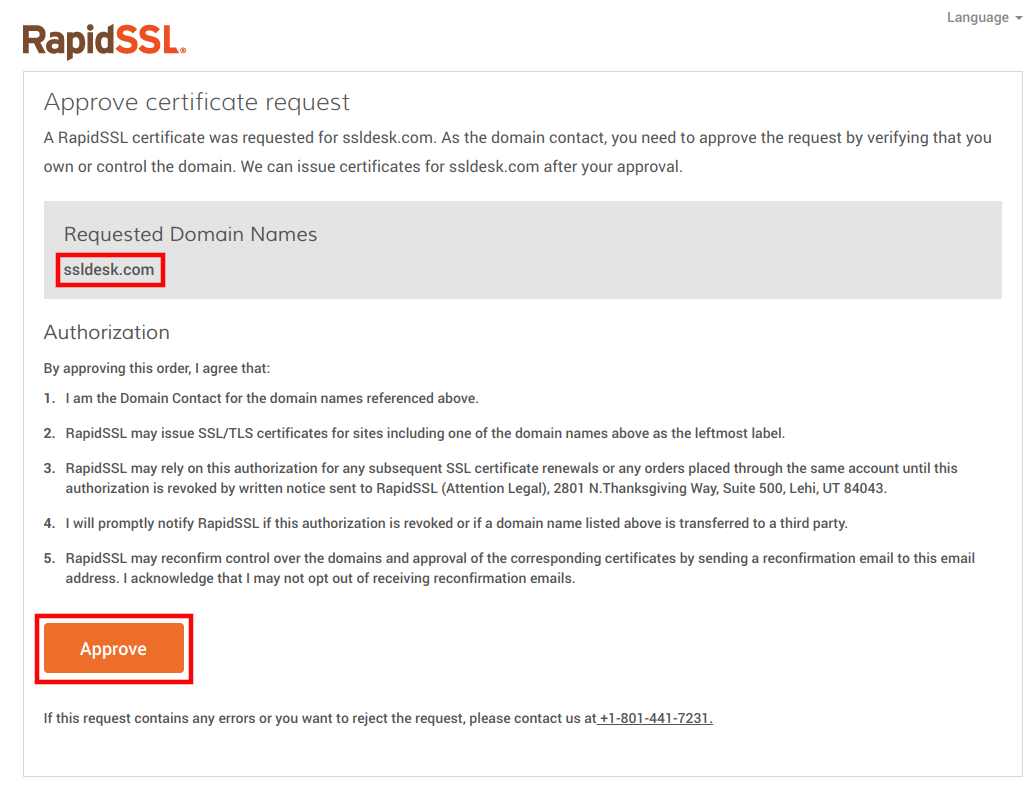
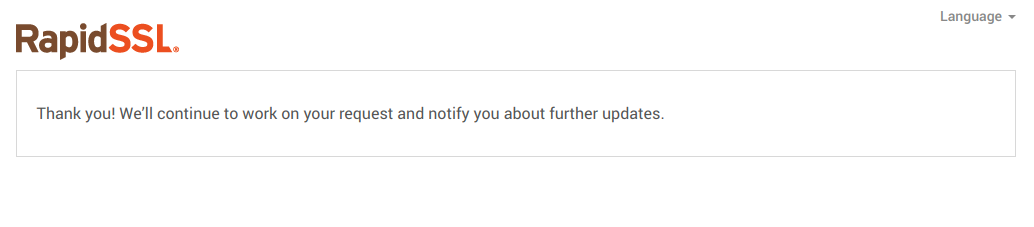
h. The unique link in the email will redirect you to a new browser tab to the vendor’s website where you need to approve your domain. Click on the Approve button to proceed.
Once you approved, a confirmation message should appear.
Now that the SSL Certificate is activated and the domain is validated, we can move to the next and final section where we will download the SSL Certificate from the portal and install it on the domain on cPanel to make it secure.
Step 3 – Install SSL Certificate
We are almost done! The final step is to download the generated SSL Certificate from my.netshop-isp.com.cy portal and install it on our domain associated with the cPanel Service.
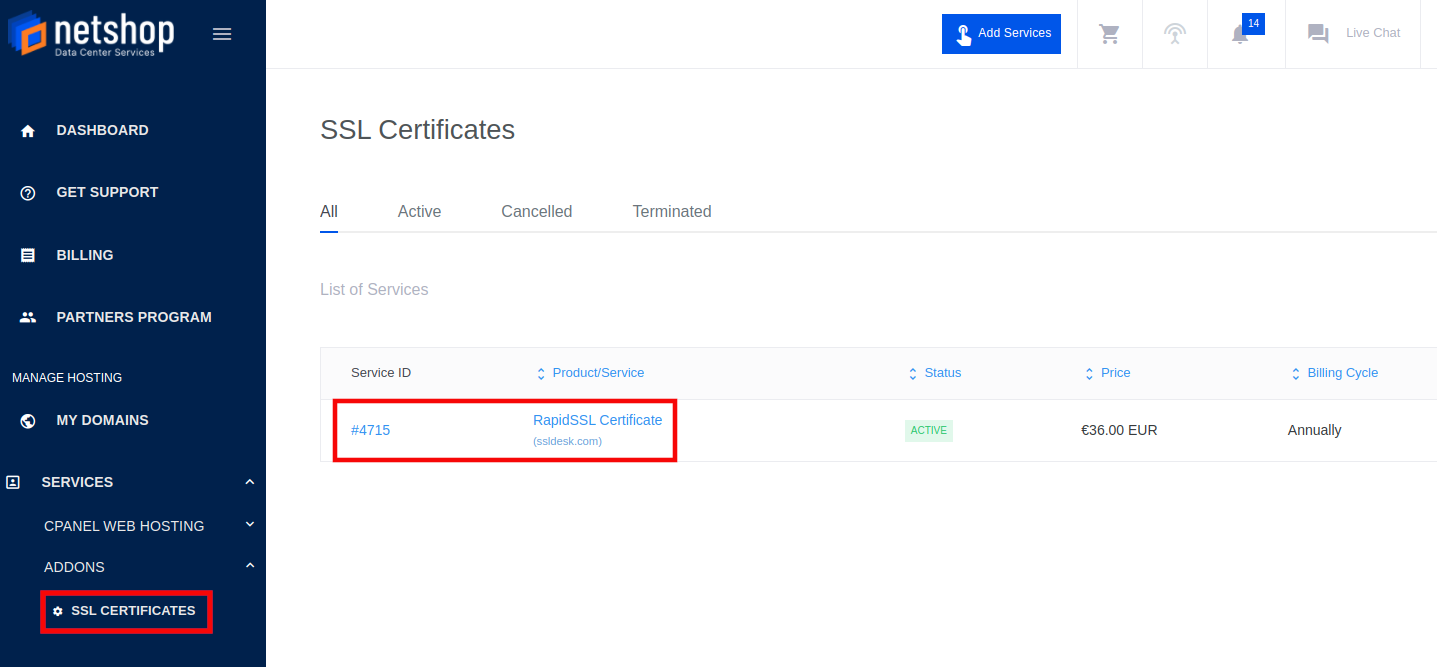
a. Go to your my.netshop-isp.com.cy portal. From the main menu on the left navigate to Services -> Addons -> SSL Certificates. Click on your SSL Certificate Service.
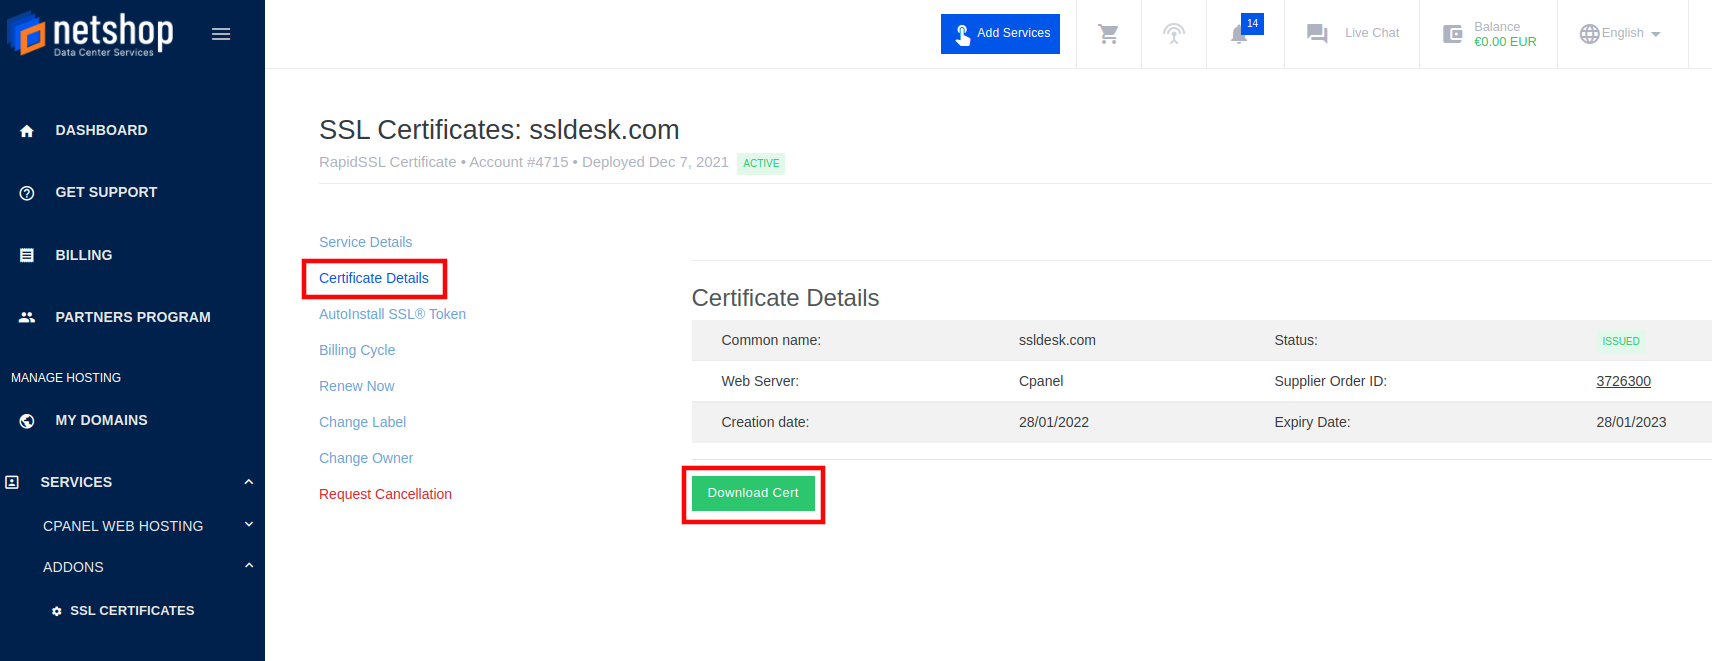
b. Click on Certificate Details and then click on Download Cert button to download the SSL Certificate.
c. A cert.zip file will be downloaded. The file contains the necessary files to install the SSL Certificate on your domain. Extract the file and open the CER – CRT Files folder.
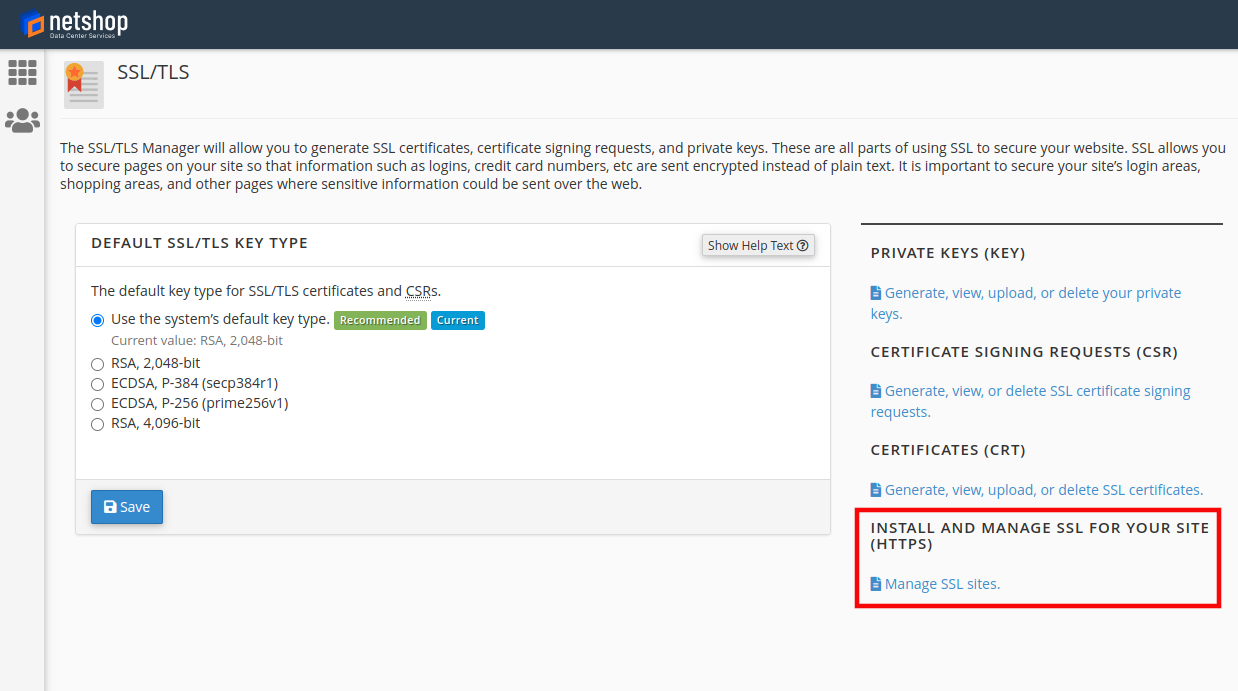
d. Go to your cPanel account -> SSL/TLS and choose INSTALL AND MANAGE SSL FOR YOUR SITE (HTTPS) option.
e. In the next page, you will find three empty fields that need to be filled with the contents of the downloaded SSL Certificate files and the CSR Code. Also, make sure to select the Domain for which the SSL Certificate is to be installed (example: ssldesk.com). Find below the association between the required files and the corresponding fields:
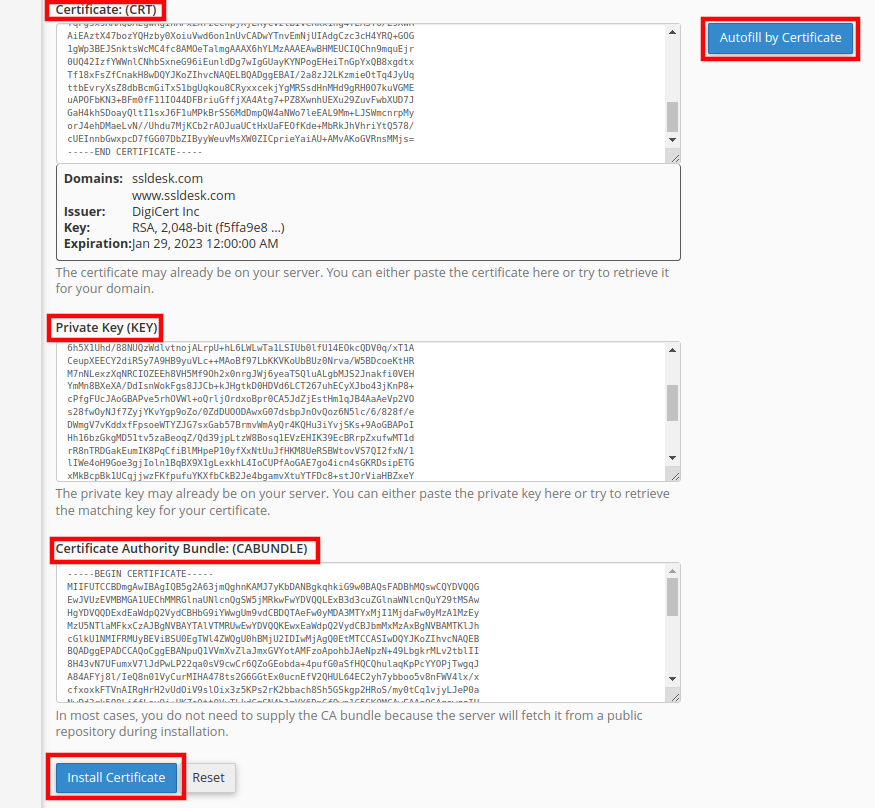
e.1. In the Certificate: (CRT) field you must copy-paste the contents of the ssldesk_com.crt (your domain) file from the SSL Certificate files (Step 3).
e.2. In the Private Key (KEY) field you must copy-paste the contents of the CSR Code generated in the previous steps (SSL/TLS -> PRIVATE KEYS (KEY)).
e.3. In the Certificate Authority Bundle: (CABUNDLE) field you must copy-paste the My_CA_Bundle.crt file from the SSL Certificate files (Step 3).
For each of the files, you will have to copy the entire code from -----BEGIN CERTIFICATE REQUEST----- until the end, including -----END CERTIFICATE REQUEST----- when submitting the text to install the SSL Certificate.
After uploading the Certificate: (CRT) in cPanel, you have the option to click the Autofill by Certificate button or the Autofill by Domain button to automatically fill the rest of the field boxes.
Finally, after all required files are uploaded in the respective fields you can click the Install Certificate button.
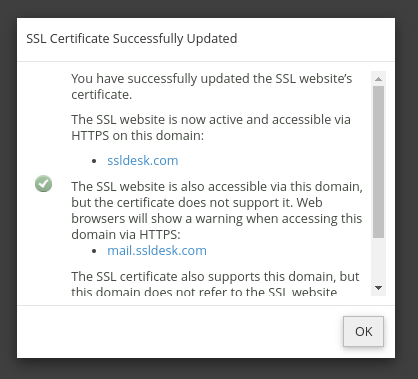
Upon successful installation of the SSL Certificate a pop up window will verify the activation.
That was it! The last confirmation is to visit the website and verify that is secure. Type https://ssldesk (or you https://yourdomain URL) and check the icon next to the URL.
Summary
Originally the domain ssldesk.com was not secured (http://). The SSL had to be installed to establish the website as secure (https://).
The CSR was created with the use of the generated Private Key and the information provided in cPanel.
The CSR Code was uploaded no the my.netshop-isp.com.cy portal.
The domain was verified and the certificate validated via email in cPanel.
The SSL Certificate was created and could be downloaded from my.netshop-isp.com.cy portal.
Finally, the SSL Certificate on the domain and now the web server and web browser connection is secured.
How To Create Software RAID 10 on Ubuntu 20.04 Server
Whilst hardware RAID may offer better performance and interoperability than software RAID, the latter is cheaper as no Hardware RAID controller is needed. In this tutorial, you will learn how to setup software RAID on Ubuntu 20.04.
In this tutorial, you will learn how to setup software RAID on Ubuntu 20.04. Whilst hardware RAID may offer better performance and interoperability than software RAID, the latter is cheaper as no Hardware RAID controller is needed. Additionally, software raid gives users the flexibility to configure arrays without being restricted by hardware due to a special multiple device (MD) driver that is contained in Linux kernels.
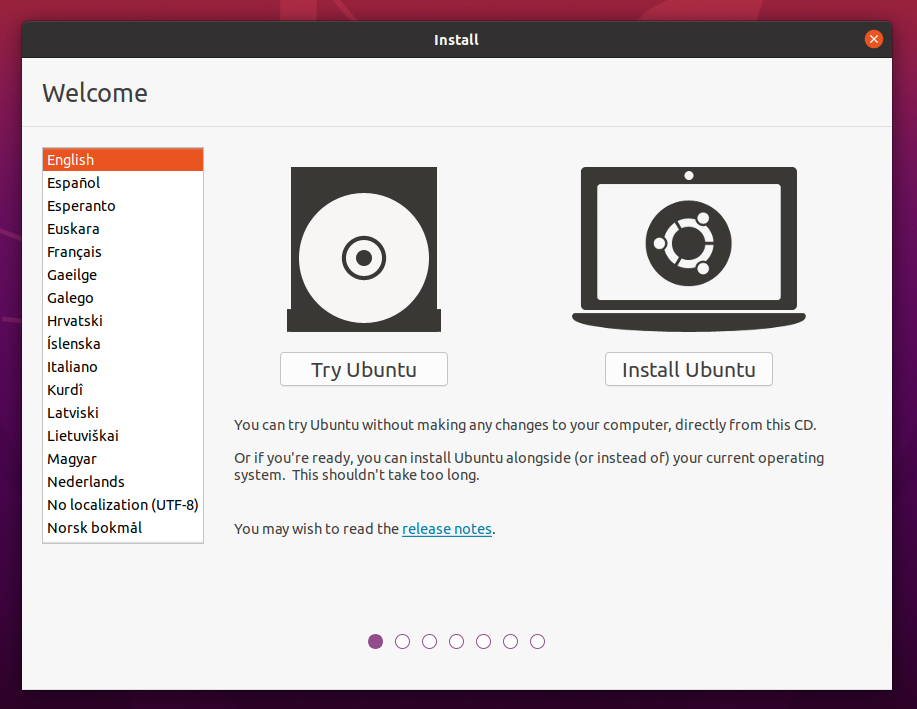
Ubuntu 20.04 installation wizard
About RAID Level 10 (mirroring+stripping)
RAID10, also known as RAID 1+0, is a RAID configuration that combines disk mirroring and disk striping to protect data. It requires a minimum of four disks and stripes data across mirrored pairs. If two disks in the same mirrored pair fail, all data will be lost as there is no parity in the striped sets.
Create Software RAID10 on Ubuntu 20.04
While it is possible to configure software raid on an existing Ubuntu installation using the mdadm tool, in this tutorial we will demonstrate how to do it during the Ubuntu 20.04 installation.
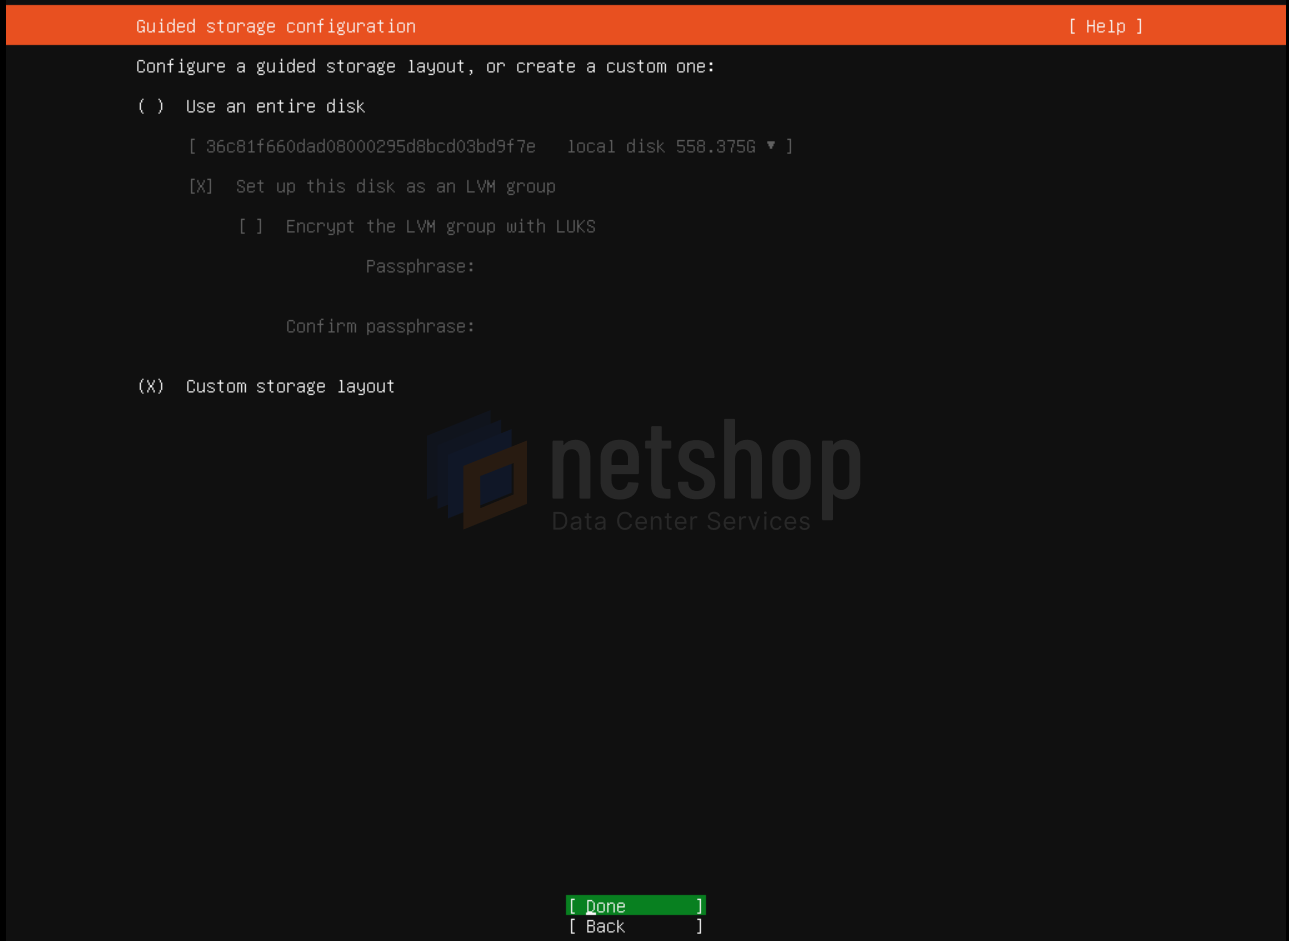
Step 1 – Guided Storage Configuration
Once prompted for disk partitioning, choose Custom Storage Layout
Ubuntu 20.04 Guided Storage Configuration
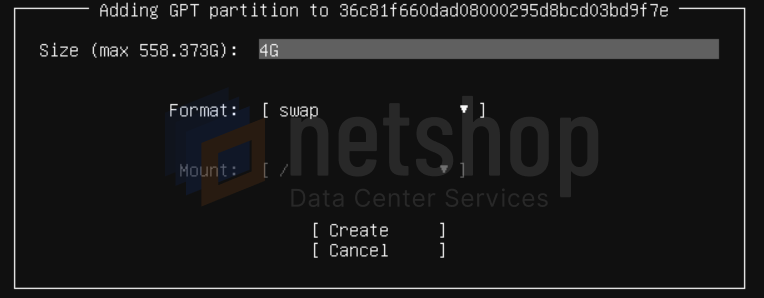
Step 2 – Create swap
In this step you need to create a swap partition for each individual disk. To do so, click the first device, hit Enter and then choose the option “Add a GPT Partition”.
Ubuntu 20.04 Add GPT Partition for swap
Type 4G to allocate 4 Gigabytes for your swap partition.
Ubuntu 20.04 allocate swap space
Repeat Step 2 for all your disk devices so that you create a 4G swap partition for all of them.
Once you have completed Step 2 for all devices, your partitioning layout should look like this:
Ubuntu 20.04 create swap partition on each disk
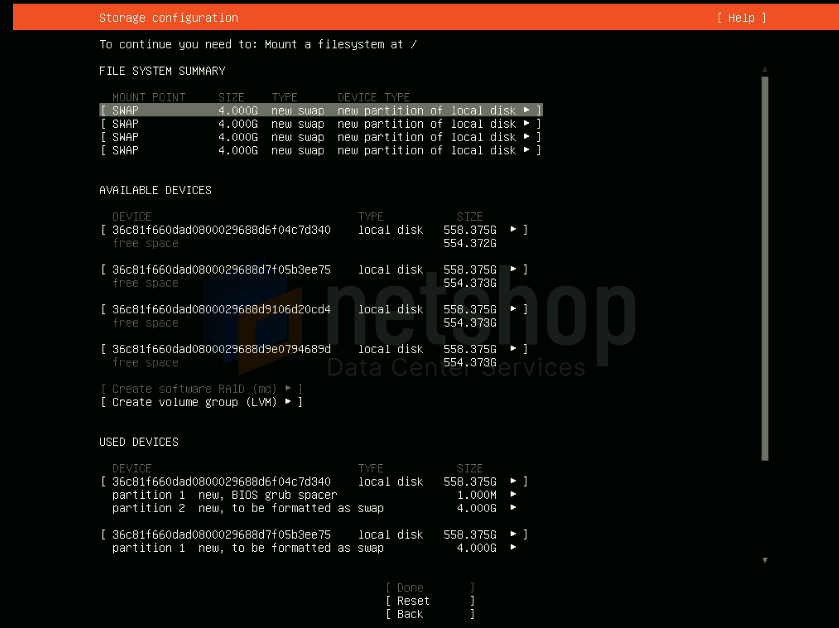
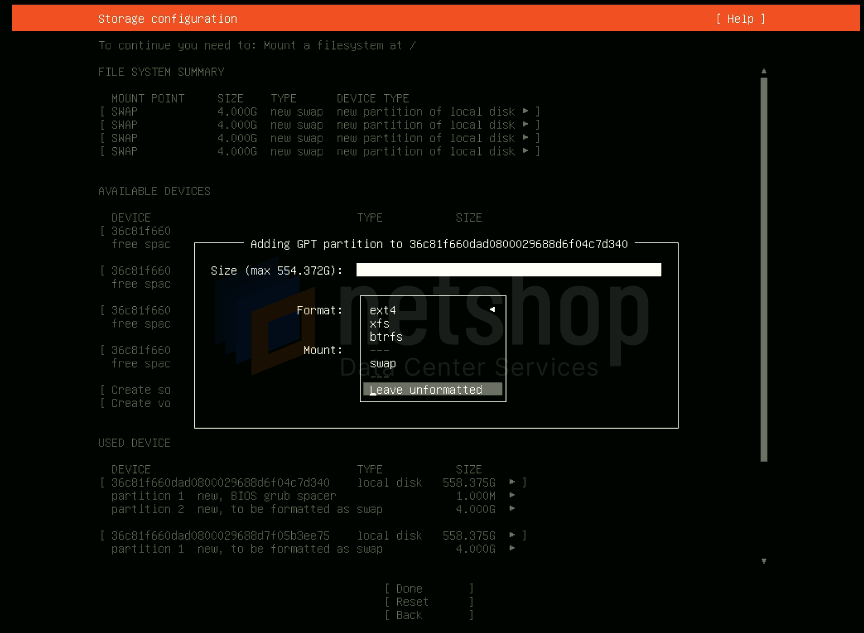
Step 3 – Create partitions
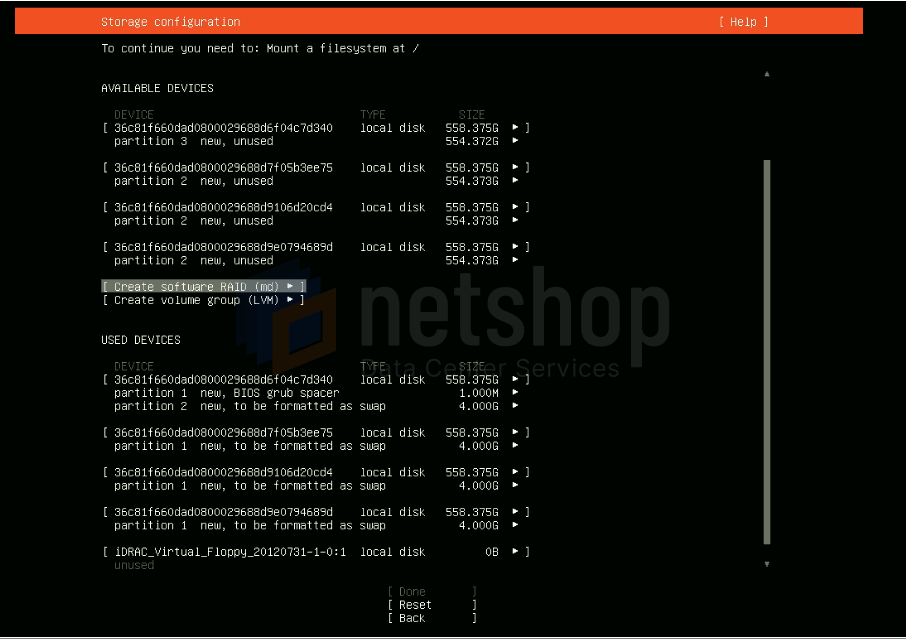
At this point we are ready to create the partition for each of our devices. From the available devices section, click the first device, hit Enter and then choose “Add a GPT Partition”.
Size: use the max value indicated
Format: choose “Leave unformatted”
Mount: choose “Leave unmounted”
Ubuntu 20.04 Create partitions wizard
Repeat Step 3 for all of your devices.
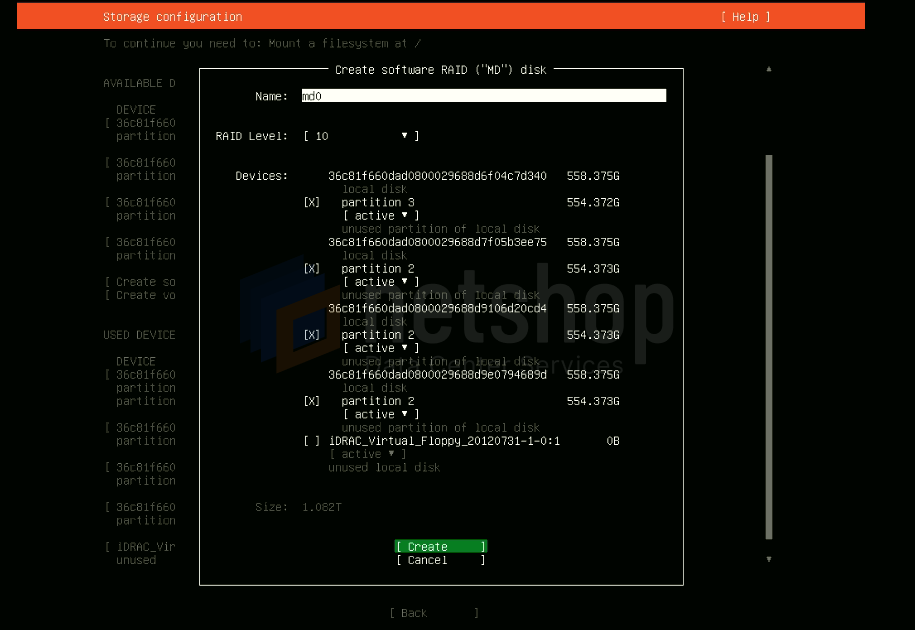
Step 4 – Create Software RAID10
Choose “Create software RAID (md)” and you will be prompted to a menu screen as follows:
Ubuntu 20.04 Create Software RAID
Choose RAID Level: 10 and mark the partitions to be included in the RAID.
Ubuntu 20.04 Allocate partitions for RAID10
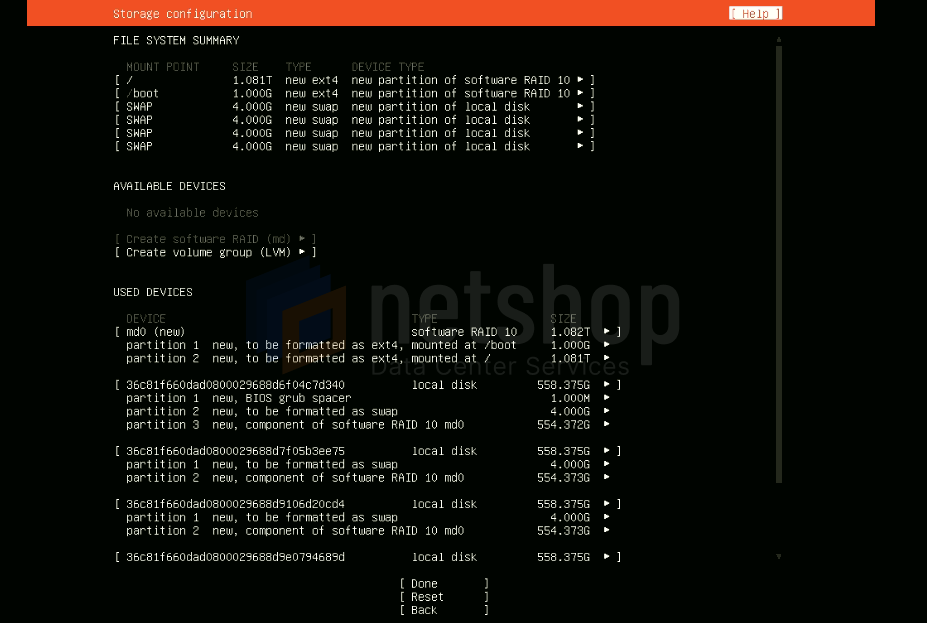
Step 5 – Create root and boot partitions
Click your newly created RAID10 partition (md0 in our example) to create the root “/” and boot partitions as shown below. Then hit [ Done ] to continue with the Ubuntu 20.04 installation.
Deploy Ubuntu 20.04 on a Cloud Server
NetShop ISP’s global cloud infrastructure is popular for deploying virtual server instances with fixed or customized specifications.
To deploy Ubuntu 20.04 on the Cloud simply choose your desired VPS plan and during Checkout choose “Ubuntu 20.04” Operating System. Upon order completion your Ubuntu cloud server will be up and running in less than 60 seconds.
Recommended Server Specifications for Ubuntu 20.04 Server edition
The recommended system requirements are:
CPU: 1 GHz or better
RAM: 1 GB or more
Disk: minimum of 2.5 GB
NetShop ISP launch their biggest Flash Sale yet
NetShop ISP is kicking off 2022 with the launch of our biggest ever flash sale on bare-metal dedicated servers. Starting on Monday 24th January, both new and existing NetShop ISP customers will be able to benefit from huge discounts of over 80% on reused servers.
NetShop ISP is kicking off 2022 with the launch of our biggest ever flash sale on bare-metal dedicated servers. Starting on Monday 24th January, both new and existing NetShop ISP customers will be able to benefit from huge discounts of over 80% on reused servers.
The reuse and repurposing of equipment is part of a strategic effort to adopt a more environmentally-friendly approach. NetShop ISP’s initiative to reuse server hardware not only offers clients significant savings, but also furthers the company’s efforts of implementing sustainable practises.
NetShop ISP’s CEO, Stefano Sordini comments, “By aligning our customer-centric and ecological values, we’re able to offer exceptional value for money in our best sale yet, whilst also doing our part to lessen our impact on the environment.”
Included in the sale are standardized server systems that can be found in our product portfolio, as well as customized systems that have been previously adapted to meet customer requirements. Servers purchased in the flash sale are pre-deployed in our racks, and will be provisioned instantly unless changes to the configuration are made during the checkout process, in which case provisioning may take up to 8 hours.
This limited time promotion allows customers to purchase servers listed in the flash sale within 7 days before they are withdrawn, and purchases cannot be combined with any other discount coupon.
To order your dedicated server and benefit from over 80% discount in our flash sale, visit our website here. You can also submit your details here to be notified of future sales and promotions.