[Video] How To Manage your cPanel Web Hosting via myNetShop Self-service portal
myNetShop self-service portal is a great tool to use to manage your cPanel web hosting account. Check out this 8-minute video to find out all functionality you can do from within our self-service portal.[Vv
myNetShop is an intuitive, purpose-built, self-service portal to manage your Web Hosting and Servers, communicate with our 24/7 customer service team and pay for your Invoices.
Whilst your shared web hosting account can be fully managed from the cPanel’s control panel interface, yet there are circumstances where the myNetShop portal can be useful to perform certain actions for your hosting account.
When Does myNetShop Come Handly for Hosting Management
1. Your IP address is blocked on cPanel server
One of the most common reasons your IP address might get blocked on cPanel’s firewall is when you have forgotten your e-mail’s login credentials. For security reasons, our firewall is triggered to auto-block your IP address after 5 failed login attempts within 300 seconds.
Whilst you can always contact our Support team to unblock your IP address, you can also login to your myNetShop account, navigate to your cPanel hosting service and change your e-mail account’s password instantly.
2. Forgotten cPanel Login Credentials
It happens! In case you have forgotten your cpanel login credentials, myNetShop is an easy way to quickly access your hosting service and either reset your cPanel’s password or perform the actions you have to do without losing time.
3. cPanel’s UI Can Be Confusing
Even though cPanel is considered to be the #1 web hosting control panel, people tend to get confused when seeing a page with a lot of functionality buttons. The way we have integrated cPanel into myNetShop, you get 1 page with all the important administration actions on the side so you can easily navigate to the section you wish and quickly complete your needed task.
Check out the following 8-minute video to explore how you can benefit from the myNetShop portal for managing your cPanel hosting service.
All our cPanel Web hosting plans start from €5 per month and are available in Cyprus, Malta and the United Kingdom.
For those who need larger plans can also consider our brand-new Reseller Web Hosting plans that come with a FREE Domain Name!
Advantages of Offshore Hosting vs. other popular hosting locations
Hosting your Website in an offshore location has advantages versus other traditional and popular hosting locations. In this article we explain what is offshore hosting and what are its advantages
Choosing your hosting location is something that needs careful consideration, and although it may be tempting to go for the cheapest or most prevalent location, your circumstances and requirements are what really determine the best hosting location for you.
In this article we’ll take a look at the advantages of offshore hosting in comparison to other popular hosting locations.
What is Offshore Hosting
Offshore web hosting really is exactly what it sounds like – hosting your website in a different country to the one that you live or operate in. You may be thinking that hosting your website in another country is pretty common – but it’s generally only considered offshore hosting when there’s a specific reason for you to be hosting there, like anonymity, privacy laws or other reasons related to the content you’re hosting, for example.
When it comes to where you choose to host your website, location really does matter. There are a lot of popular hosting locations and offshore hosting has some huge advantages. Here are some benefits of offshore web hosting.
Benefits of Offshore Hosting
Anonymity
One of the biggest reasons people decide to host their website offshore is the desire to remain anonymous. An ideal offshore hosting location will have a commitment to anonymity and strong privacy laws in place to protect your identity, like the Netherlands, for example.
DMCA Content
Following on from that point, as we already mentioned, the content that you’ll be hosting may be a big reason to opt for offshore hosting. A good offshore hosting location is one that is committed to freedom of speech, where the Digital Millennium Copyright Act (DMCA) is somewhat ignored and laws are in favor of confidentiality – making it less likely for your site to be forcibly taken down due to controversial content.
Cost
One obvious reason that website owners opt to host their websites offshore is that it may be cheaper. If you live somewhere where hosting services are expensive, opting for offshore hosting may simply be a cost-effective solution for you. If you’re also seeking to establish a business presence at your offshore hosting location, choosing somewhere with an attractive taxation system and promising business opportunities, like Cyprus, is ideal.
Safety
No matter where your server is located, you’re going to want the peace of mind of knowing that it’s in a safe and secure location. A prime offshore hosting location is one which is safe from natural disasters and therefore poses little risk of connectivity issues and power outages, like Malta, for example.
Close to your customers
Another big advantage of offshore hosting is that it allows you to host your website closer to your customers. If you’re based in the UK but your customer-base is mainly in Asia, hosting your website in Singapore will improve performance, reduce latency and ultimately offer your customers a better experience.
If you want to read more about the most popular Web Hosting locations in 2021, visit our website here.
NetShop ISP’s Popular Hosting Locations
NetShop ISP has privately-owned infrastructure in many popular hosting locations including Cyprus, Malta, the United Kingdom, Los Angeles, Singapore, Hong Kong and the Netherlands.
We’re proud to offer a range of Data Center and Hosting Services at various global destinations. For more information on our services and locations, please get in touch with our team.
How To Install Plesk Control Panel on Linux CentOS
In this article we will go through 2 easy ways on how to install Plesk on a Linux CentOS 7 server. For the purpose of this example, we will be using a UK VPS with 2GB RAM, 2 vCPU and 60GB SSD.
Plesk is a commercial web hosting and server data center automation control panel which can be installed on both Linux and Windows servers (vps or dedicated).
In this article we will go through 2 easy ways on how to install Plesk on a Linux CentOS 7 server. For the purpose of this example, we will be using a UK VPS with 2GB RAM, 2 vCPU and 60GB SSD (order this plan).
Option 1: Install Plesk on CentOS using CLI (command line)
Prerequisite for following the next steps is to execute all commands as root.
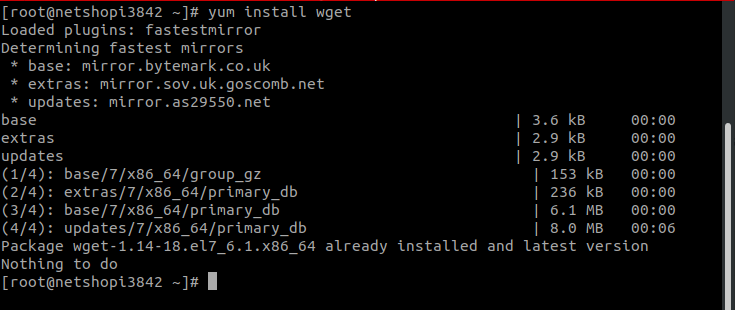
Step 1: Install all necessary packages
yum install wget
Step 2: Download and Run the Plesk Installer
cd /root
wget http://autoinstall.plesk.com/plesk-installer
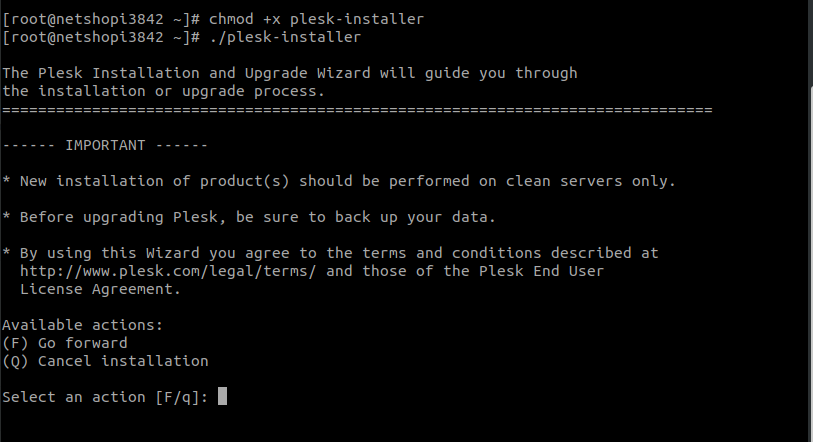
chmod +x plesk-installer
./plesk-installer
At this point you will be prompted with some questions, as shown in the screenshot below. It is safe to proceed with the default options Go Forward (F).
The whole installation process should take 10 – 15 minutes. Grab a coffee and watch the magic!
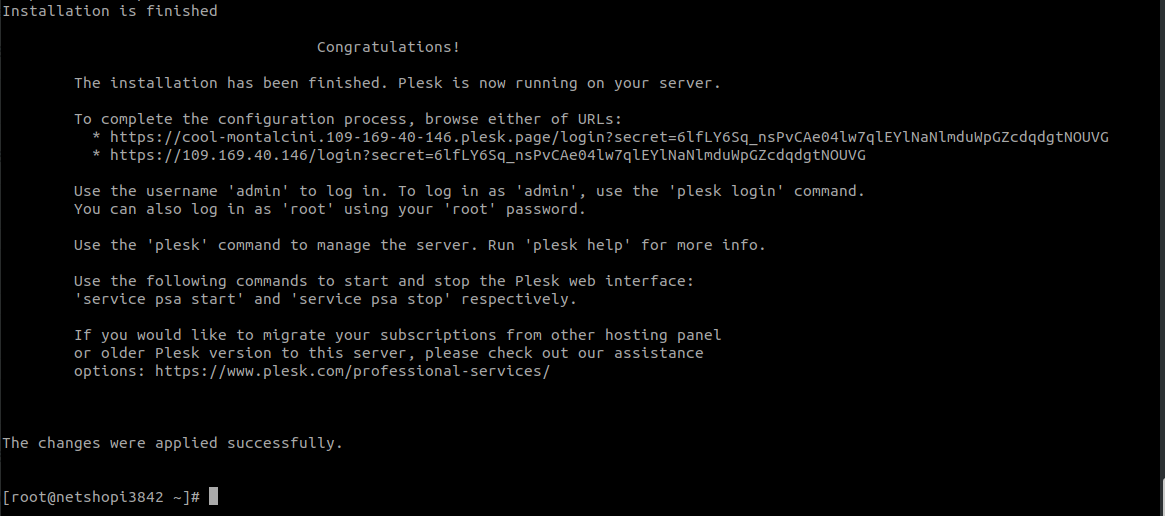
Step 3: Complete the configuration process
As soon as the installation is completed, you will see a message like the one below:
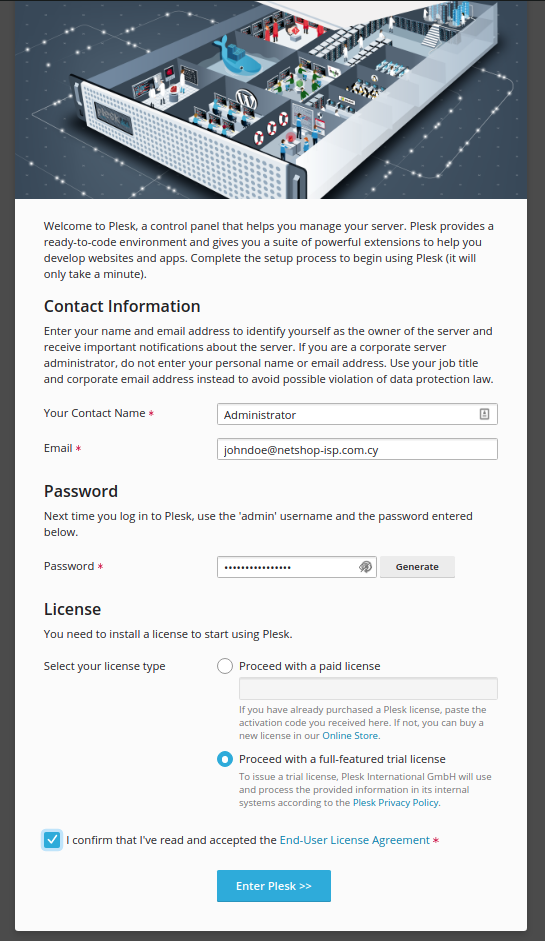
Copy & paste the URL in your browser as per the instructions. In that page you will be asked to enter your e-mail address, a password which you will use to access the Plesk UI, and the type of the license.
Option 2: Automated Plesk Installation via myNetShop Portal
Another option for lazy sysadmins or those who are not comfortable working with CLI, is to proceed with unattended Plesk installation via the myNetShop portal (Not a Customer yet? Sign Up Free).
Step 1: Login to your myNetShop Portal
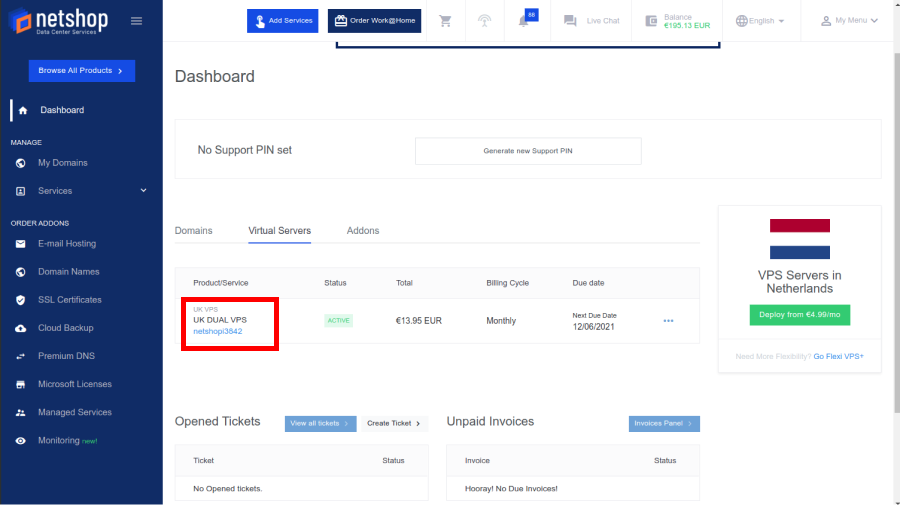
In your browser type https://my.netshop-isp.com.cy and use your credentials to access our self-service portal. Upon login you will be landed in the Dashboard page.
Assuming you have placed an order for a VPS Server, follow the next steps as shown in our screenshots.
Step 2: Access the VPS Management page
Click the hostname of your VPS Server to enter the VPS management page.
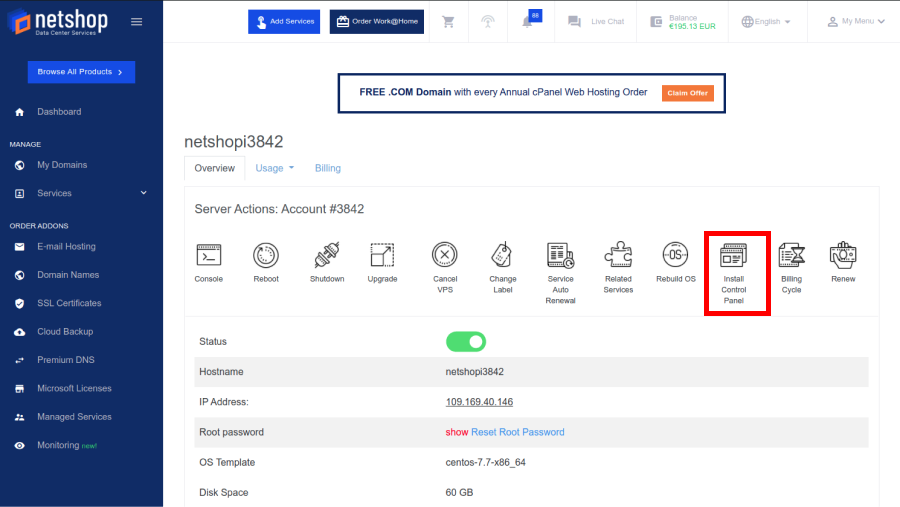
Step 3: Install Plesk Control Panel
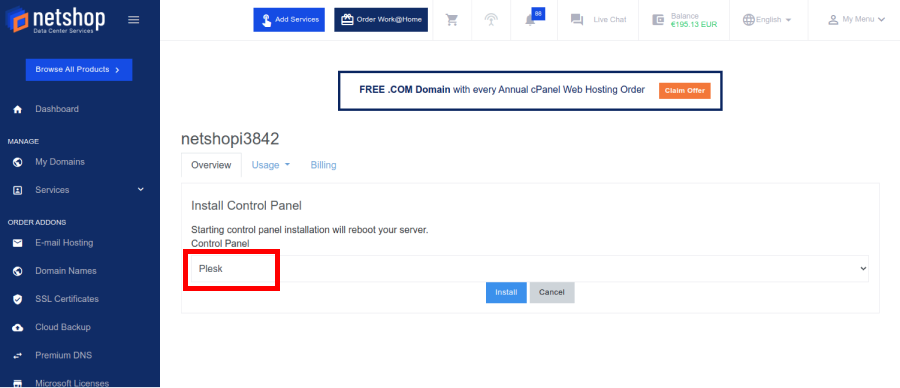
From the VPS management options, click the button “Install Control Panel” and then choose “Plesk” from the drop down list.
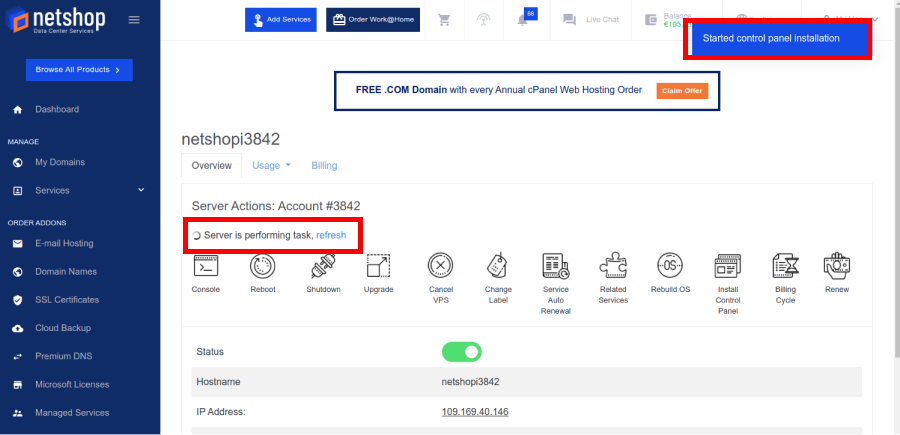
Click “Install” and then you will be redirected back to the VPS management page, where you can monitor the progress of the Plesk installation on your Linux VPS.
Allow 10-20 minutes and then hit refresh. Once the plesk installation is completed, the message “Server is performing task” will disappear and you can access your Plesk control panel as follows:
https://ip_address_of_your_server:8443
How To Prevent Downtime and Protect your Data from all types of Disasters
How entrepreneurs and IT managers can ensure their online business maintains a high uptime and its valuable data is protected from any type of Disasters that may occur in the cyber sphere? In this article we will present a beyond-backup, world-class data protection solution offered by Acronis and NetShop ISP.
In a recent article, we explained how the fire that occurred at OVH’s Data Center caused a massive impact on their hosted customers who suffered from data loss and downtime.
For a business operating online, data is not just numbers used for generating reports and statistics. Data include customer information stored in a company’s Database, digital products presented in an e-commerce website where customers can buy them, as well as more critical information such as payment transaction details and credit card details processed by merchants and online stores.
A recent report by statista.com indicated that retail e-commerce sales worldwide amounted to 4.28 trillion US dollars in 2020 and e-retail revenues are projected to grow to 5.4 trillion US dollars in 2022.
How entrepreneurs and IT managers can ensure their online business maintains a high uptime and its valuable data is protected from any type of Disasters that may occur in the cyber sphere? In this article we will present a beyond-backup, world-class data protection solution offered by Acronis and NetShop ISP.
Common Causes of Outages & Disaster Types
Accidental data deletion
Natural disasters
Software update
Hardware failure
Power loss
How to Prepare for Data Recovery
Acronis offers a beyond backup with flip-of-a-switch disaster recovery solution, integrated with all the backup functionalities you need. Along with a proper design of a Business Continuity and Disaster Recovery plan that you can prepare in-house, or with the help of a Service Provider like NetShop ISP, you can ensure that your business is setup in a way that whatever disaster occurs, your online business and data will not be at risk.
Features of Acronis Cyber Disaster Recovery
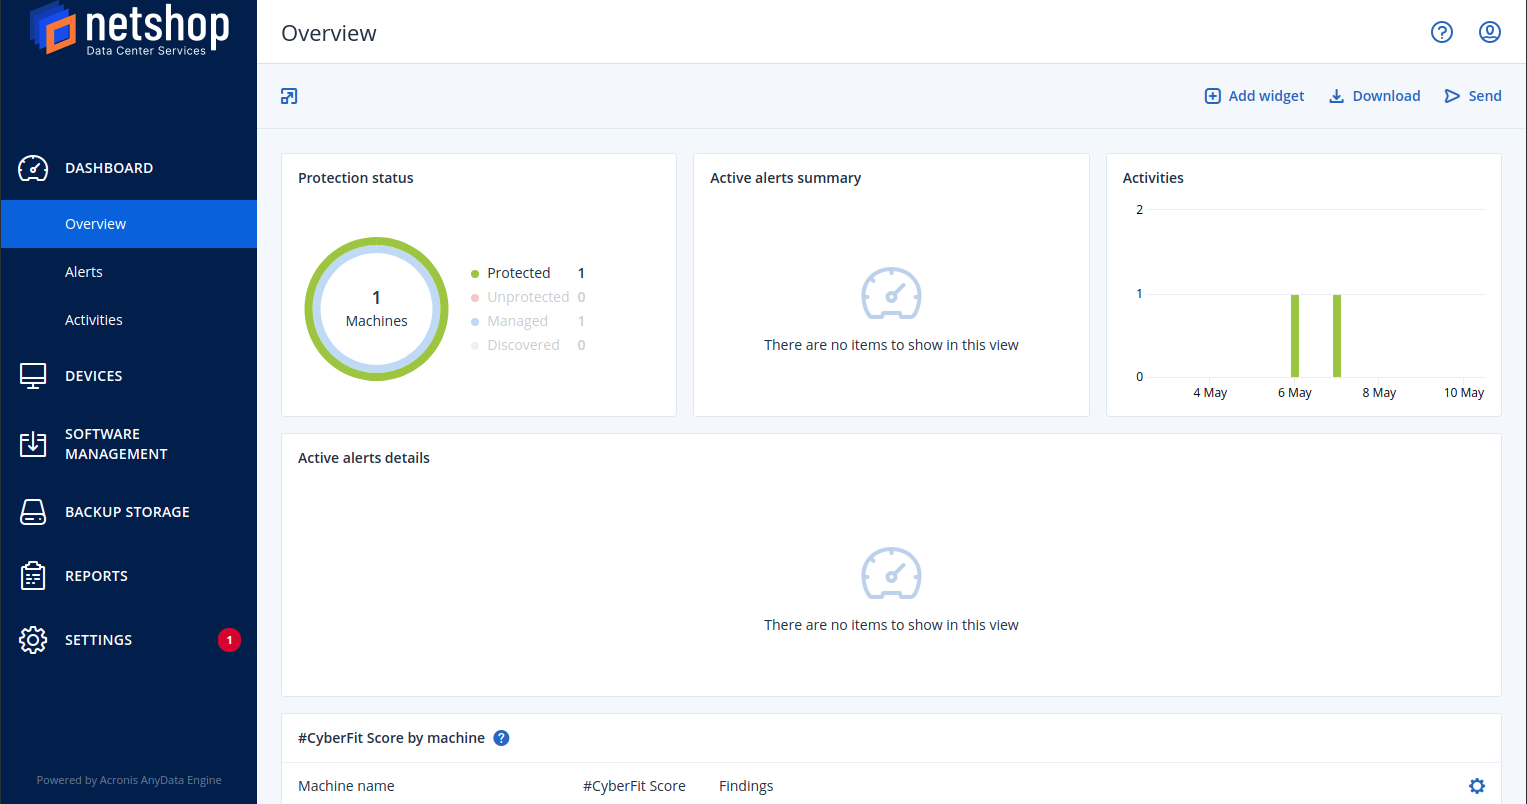
Acronis Cyber Cloud Protect Dashboard
1. Easy, scalable management of your organization
Whether you are managing a single business entity, or a complex organization with multiple subsidiaries and departments, Acronis intuitive Web interface helps IT managers to manage 1 or more organizations and users with role-based access levels.
2. Disaster recovery orchestration with runbooks
Automate critical disaster recovery scenarios and ensure your systems recover in the correct order to address inter-dependencies between applications.
3. Under 15-minute RPOs and RTOs
Achieve both RPOs and RTOs shorter than 15 minutes. Acronis enables best-in-class production and test failover speed, while flexible backup frequency policies lead to tighter RPOs.
4. Automated testing of all key disaster recovery scenarios
Verify the integrity of your disaster recovery plans by executing runbooks in test-mode and isolating testing from the production network.
5. Disaster recovery for virtual and physical workloads
Support all popular workloads, including Windows and Linux physical servers and VMs, major hypervisors, and Microsoft business applications.
Awarded, Industry-leading Software
Acronis Industry’s Recognitions & Awards
Acronis Cyber Security Solutions in Cyprus, Malta and the United Kingdom
NetShop ISP is an Authorized Service Provider of Acronis, providing cloud backup, cyber protection and disaster recovery solutions to private organizations and Governmental institutions in Cyprus, Malta and the United Kingdom.
With a team of more than 10 dedicated Acronis Certified professionals within the Company, NetShop ISP can help you for IT audits, disaster recovery plans and implementation of the best strategy that fits your business model and budget in order to ensure your data is secure and your infrastructure maintains the highest uptime.
How to Create an Email Account in cPanel in 3 Easy Steps
In this article you will learn how to create an e-mail account in cPanel and how to manage it via a Webmail client in 3 easy steps.
cPanel is the most popular and easiest to use control panel for hosting your website, installing and managing SSL certificates, accessing your website’s files and creating Databases.
Additionally, through cPanel’s graphical interface you can easily manage your e-mail accounts which you can then quickly access via Web-based email clients such as Roundcube and Horde, or configure in Microsoft Outlook, your mobile device etc.
In this article we will show you how to create an email account in cPanel in 3 simple steps, and how to access your e-mails via the Webmail clients that cPanel offers.
1. Login to cPanel and navigate to the E-mails Section
Depending on how your hosting provider gives you access to your cPanel account, you can login to cPanel by typing either an IP address or a domain name in your browser, followed by 2083 port:
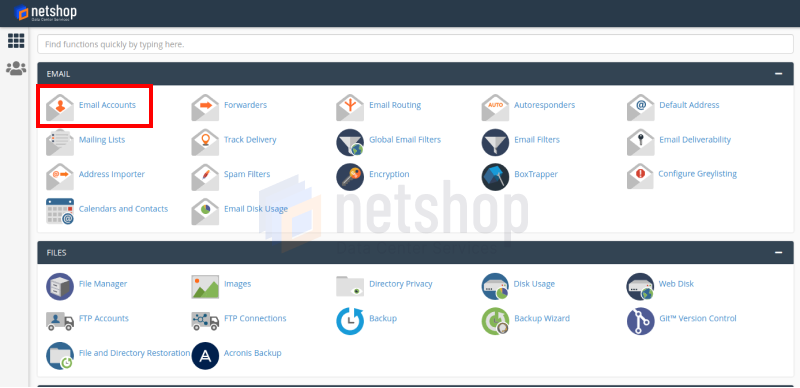
Navigate to the E-mails section and click E-mail Accounts as shown below.
Create Email Account in cPanel: Step 1
2. Create your new E-mail Account
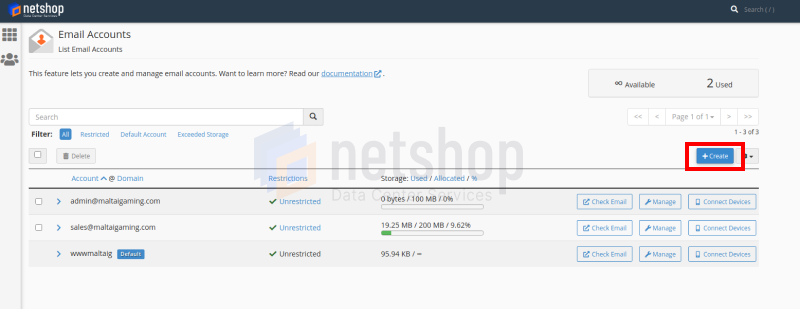
Click the Create button that appears on the left side of the screen in order to proceed with your new e-mail account creation.
Create E-mail Account in cPanel: Step 2
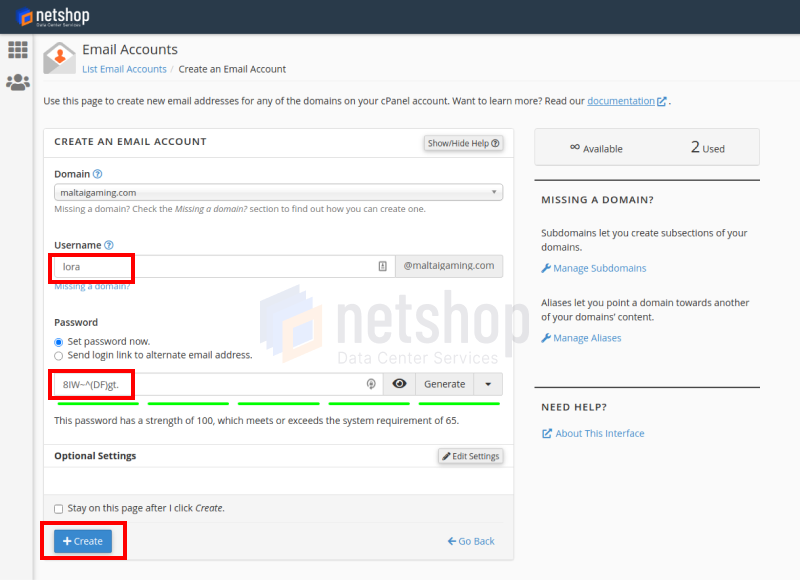
Now you need to enter your desired username for the newly created e-mail acccount, then set your password and click the Create button as shown below.
How to Create an E-mail Account in cPanel: Enter your Detials
Your E-mail account has been successfully created! Easy, right?
Now follow this final step to access your new e-mail account via Roundcube or Horde Webmail clients.
3. Access your E-mail with a Webmail Client
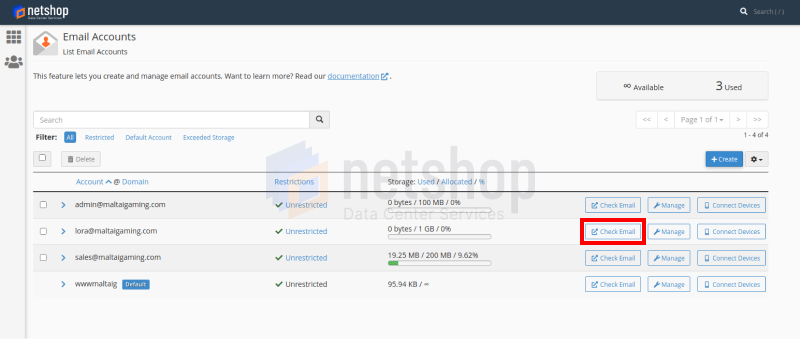
Upon the creation of your new e-mail account, you will see a list of all the email address your cPanel account has. Click on the Check Email button as shown below.
How to Create E-mail Account in cPanel: Step 3
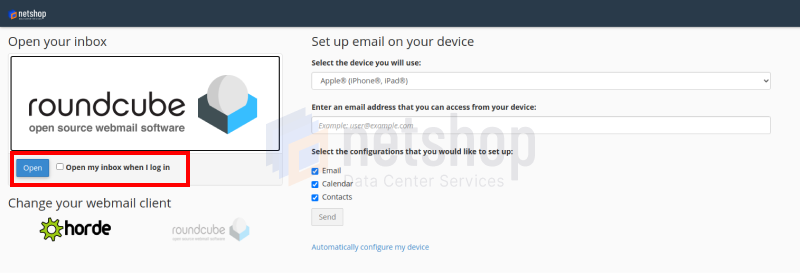
Once you click “Check Email” for the first time, you will be prompted to a page where you can configure your favorite Webmail client. In this example we will choose Roundcube.
Roundcube Webmail Client for cPanel Email Accounts
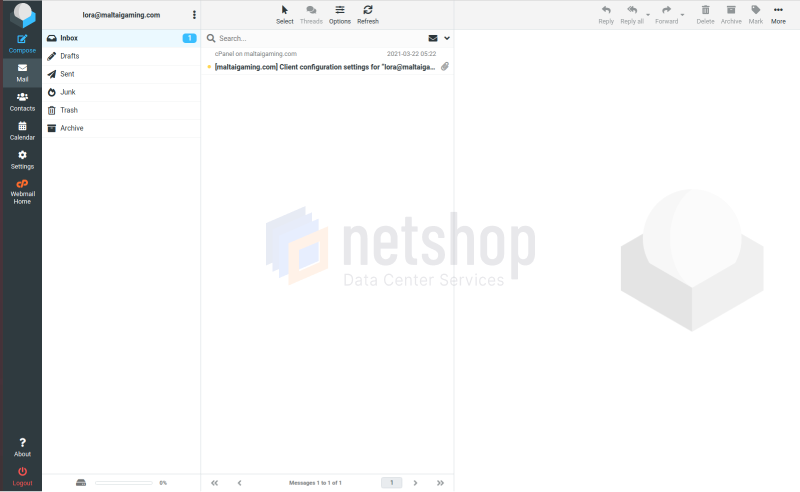
Click the Open button and you will be redirected to the Inbox of your newly created e-mail, as shown below.
View your E-mails with Roundcube Web-based Email Client
Success! You can now start sending and viewing received e-mails from Roundcube Webmail client!
If your provider’s cpanel hosting is configured to use IMAP, then you can also configure your e-mail account in iMail, Thunderbird, Microsoft Outlook and your mobile device. With IMAP protocol, e-mails sent & received will appear in all devices and e-mail clients.
How to Buy Cheap E-mail Hosting
All our cPanel web hosting plans come with the E-mail hosting service. Whether you want to combine website hosting and e-mail accounts, or just looking for a cheap e-mail hosting service, NetShop ISP can offer that with plans starting from €5 per month.
In addition to the Free cPanel control panel provided with all web hosting accounts, we offer 24×7 Free technical support for all of your website and e-mail administration needs.
Where to host a gambling website?
Things you need to consider when choosing where to host your gambling website, and some of the most popular iGaming hosting locations too.
‘Where is the best place to host a gambling website?’ is one of the most common questions amongst those starting out with their new online gambling business – and rightly so. Where you choose to host your gambling website will directly impact its potential performance and success. With iGaming still being a relatively new industry, rules and regulations change per jurisdiction, so finding the right hosting location is essential.
In this article we’ll look at what things you need to consider when choosing where to host your gambling website, and some of the most popular iGaming hosting locations too.
Choosing a gambling website hosting location
Here are the top three things to consider when choosing a hosting location for your gambling website.
Gambling-friendly jurisdiction
As we mentioned, online gambling isn’t legal everywhere so the first thing you need to make sure of is that you choose a hosting location where online gambling is permitted. You would preferably want to host your website somewhere where it’s relatively easy to obtain a gambling license too. Bear in mind that every jurisdiction has different requirements when it comes to getting a license, so make sure you do a little research and attain all the necessary documents.
Tax System
Choosing to host your gambling website somewhere with a comprehensive taxation system is also ideal. In a nutshell, it’s beneficial to opt to host your gambling website somewhere with a low tax rate, so make sure to assess a country’s taxation policy first.
Infrastructure
Finally, guaranteeing your players a smooth experience is the key to the success of your online gambling business, so you need to host your website somewhere with strong infrastructure and network connectivity in place for optimal performance.
Best places to host a gambling website
Malta
Malta is amongst the ultimate locations to host your gambling website for a multitude of reasons. The small European country leads the gambling industry with innovation and has done for the last 20 years. Malta has become a hub for online gaming businesses, with many big industry names’ headquarters located there. Malta’s access to European trade treaties and rather complex taxation system that means corporate tax can be as little as just 5%, makes it an extremely popular location to host iGaming websites.
Curacao
Another hugely popular place to host a gambling website is Curacao, the Caribbean country that’s part of the Netherlands. Obtaining a Curacao gambling license is really quite easy and cost effective, making it one of the most frequent jurisdictions to host a gambling website. The Netherlands is also set to make some big changes in their gambling legislation, which will most likely see them soar in the iGaming industry.
United Kingdom
The UK is actually one of the biggest online gambling operators, and is extremely well established within the iGaming sector. Although the process of obtaining a UK gambling license is trickier and legislation is a lot stricter, getting a gambling license and hosting your gambling website in the UK will help you build a strong, trustworthy reputation in the industry.
iGaming Solutions with NetShop ISP
With over 10 years’ experience and multiple awards in the iGaming industry, we’re proud to offer a range of comprehensive and affordable solutions for betting, lotteries, casino-style games and much more.
We host premium industry customers in the United Kingdom, Cyprus and Malta at data centres that comply with all local iGaming regulations.
For more information on our iGaming services, please don’t hesitate to get in touch.
Launching new Webinar Series for the Forex industry
The first Forex webinar will address a hot topic that interests both Forex brokers and traders: How Trading with low-latency can help Traders, and how that can be achieved. 6th of May 2021 at 15:00 CET (Registration is Free)
NetShop ISP, a globally established Cloud & Infrastructure provider, announces the launch of a brand new Webinar Series with interesting topics for the Forex industry professionals; brokers, traders & suppliers.
“Along with the successful launch of the “InsightS iGaming Webinar Series” intended for the iGaming and Gambling sector, the new Forex Webinar Series will cover technology topics in a non-technical way. Our goal is to educate the Forex industry professionals about new technology tools and services and their adoption within the Forex ecosystem.”
said Katerina Burtsava, Head of Sales at NetShop ISP
First Webinar: Understand the Benefits of Low Latency Trading in Forex Trading
The first webinar will address a hot topic that interests both Forex brokers and traders: How Trading with low-latency can help Traders, and how that can be achieved.
Registration is Free and the number of participants is limited, so grab your seat today from the event’s registration page: https://events.netshop-isp.com.cy
Server in the Netherlands vs. Germany: Comparison of the 2 Popular Hosting Locations
In this article we’ll look at two of the most popular hosting locations, the Netherlands and Germany, and compare the two to see which one is the best hosting location for your virtual or dedicated servers.
Choosing the right website host is a lot more than just finding the cheapest deal, there’s a bunch of things that you need to consider – one of those being their datacenter and server locations. A great hosting provider and the right hosting location are essential when it comes to the success of your website, but with so many popular hosting locations, which one is right for you?
In this article we’ll look at two of the most popular hosting locations, the Netherlands and Germany, and compare the two to see which one is the best hosting location for you.
What makes a popular hosting location
Whether you’re opting for a dedicated server or VPS, there are many aspects that make a good hosting location; like network infrastructure, connections to internet exchanges, risk of natural disasters and so on. A reliable, well-established hosting location with strong infrastructure in place really will make all the difference to your website’s performance.
The Netherlands vs. Germany
Generally speaking, Germany and the Netherlands have quite a lot of similarities, so it comes as no surprise that both countries are really popular web hosting locations. Both places are amongst the most sought after hosting locations in Europe – so let’s look at why and compare their similarities and differences.
Geographic location
When choosing a server location, proximity to your user-base is at the top of the list of things to consider. With the Netherlands and Germany actually sharing a border, both countries are great choices to ensure fast loading speeds and optimal performance for European users.
Privacy
No matter what kind of content you’re hosting, you want to be certain that your data is protected. The Netherlands is renowned for its commitment to freedom of speech and therefore has strong privacy laws in place to protect confidentiality, making it the ideal offshore hosting location for individuals seeking to host controversial data – without any concern of receiving a DMCA notice. Although Germany generally has comprehensive privacy laws, the Netherlands is definitely ahead in terms of discretion.
Connectivity
Another reason these countries are popular hosting locations is that both the Netherlands and Germany are home to two of the biggest internet exchanges in the world, AMS-IX in Amsterdam and DE-CIX in Frankfurt. So high speed connectivity and access to a multitude of networks is guaranteed at both of these locations.
Cost
As global leaders in sustainability development and renewable energy, Germany and the Netherlands are both cost effective hosting locations as energy prices are substantially lower, meaning the cost of server upkeep, and therefore hosting plans, are relatively less.
Overall, as two of the leading hosting locations in Europe, both countries offer an optimal hosting environment at affordable prices. The two are pretty much on par, although the Netherlands definitely wins in terms of privacy and discretion.
Hosting in the Netherlands with NetShop
Enjoy up to 10Gbps network speed and 100% data privacy with a Netherlands dedicated server or VPS. Deploy your server today with NetShop and get an extra 8% discount when you opt to pay annually and benefit from a dedicated Netherlands IP address, 24/7 support and much more.
For more information, please get in touch with a member of our team here.
[Video] How to Upgrade your VPS Server using the myNetShop Self-service Portal
Watch our latest video tutorial to learn how you can easily upgrade your VPS within myNetShop; our intuitive self-service hosting management portal.
A Virtual Private Server (VPS) offers greater flexibility than a physical bare-metal dedicated server, when it comes to scaling and upgrading. Watch our latest video tutorial to learn how you can easily upgrade your VPS within myNetShop; our intuitive self-service hosting management portal.
How to Upgrade your VPS Server
About myNetShop Self-service Portal
myNetShop is an intuitive, purpose-built, self-service portal to manage your Web Hosting, VPS and Dedicated Servers, communicate with our 24/7 customer service team and pay for your Invoices.
Why VPS Hosting?
Virtual Private Server Hosting is a great option if you are looking to host your website or application with the minimum resources at the lowest possible cost. NetShop ISP’s private cloud infrastructure allows you to scale up your Virtual Server at any time you need more resources.
NetShop ISP will Showcase Forex VPS Solution at iFX EXPO Dubai 2021
The leading Infrastructure Hosting provider will be attending the iFX EXPO in Dubai (19-20 May 2021) to showcase its world-class Forex VPS solution.
The leading Infrastructure Hosting provider will be attending the iFX EXPO in Dubai to showcase its world-class Forex VPS solution.
The largest global B2B Fintech Conference will be held at the exclusive 5-star Grand Hyatt Hotel in Dubai on the 19th and 20th of May 2021. This year’s expo is set to connect top-level executives from the most prominent firms worldwide.
“We really missed attending physical events in 2020. After our exhibition and presence at several virtual events in the last 12 months, we are excited for our upcoming tour in Dubai to meet existing customers and partners, as well as for the opportunity to present our successful Forex infrastructure solutions to our industry peers.”
Stefano Sordini, NetShop ISP CEO
The NetShop ISP team is eager to present its Forex VPS solution to Brokers, as well as bespoke infrastructure services for liquidity providers, CRM & Software development agencies and Payment institutions.
The Forex VPS solution was first launched in 2010, where NetShop ISP was among very few hosting providers to offer Virtual servers for Forex trading purposes. Following several months of research & development, NetShop ISP announced the availability of a new version of its Forex VPS service that includes a powerful API for seamless white-label integration with any Forex Broker’s CRM.
Meet your Infrastructure Specialists at the Dubai Forex Expo
NetShop ISP will be represented by Katerina Burtsava (Head of Sales) and Kateryna Nechaieva (Product Specialist). Both are deeply involved in the Forex industry, totaling numerous consulting hours with Forex brokers and CRM development agencies.
For more information and to book a meeting with our company representative during the event, visit our iFX EXPO Dubai 2021 page.
An SSL Certificate helps your website to allow secure transactions and also increases the reputation of the domain which helps in search engine rankings. Read how you can get a Free Let’s Encrypt SSL Certificate with NetShop ISP
If you’re reading this you’ve probably realized that your website needs an SSL certificate, but are just not quite ready to add another expense to your list. So keep reading to find out how to secure your website with a free SSL certificate.
What is SSL?
SSL stands for Secure Sockets Layer and is used to create a secure connection between the web browser and the server. It’s often thought that a website only needs an SSL if it’s requesting sensitive information like credit card details, but actually that’s not the case.
An SSL is essential for data integrity and privacy, and should be at the top of your priorities when starting out with your new website. Having an SSL indicates that your website is using the protocol of encrypting data that’s being transferred between the client and the server, making it unreadable if intercepted.
What does SSL do?
An SSL certificate is needed in order to convert http to https. Hypertext Transfer Protocol Secure (https) is the secure version of http and ultimately protects users and website owners from hackers.
Although now some browsers give you a ‘not secure’ warning when a website doesn’t have an SSL, you can also check the URL bar for a little padlock icon which you can click on to see the certificate details. Of course, you can also check that the URL begins with https.
Why do you need SSL?
Obviously, protecting yourself and your users online is paramount so let’s take a closer look at some of the other benefits of having an SSL certificate.
SSL protects data
Shopping, subscribing and selling online is now the new normal, so it comes as no surprise that sensitive information being stolen has become more common. As we’ve mentioned, installing an SSL ensures that all data shared on your website is encrypted, eliminating the chance of third-party interference.
It’s especially important to have an SSL if your website is eCommerce but sensitive information isn’t just limited to credit card details, it also means passwords, IDs and addresses which can cause a lot of trouble if they get into the wrong hands. For example, if you have a WordPress website that isn’t secured with an SSL, your login credentials could be at risk.
SSL makes you more reputable
Of course due to the rise in phishing and online fraud, people have become a lot more cautious when sharing their personal information online. Users are a lot less likely to engage with your website if they can see it’s not safe, and this will ultimately cost you a lot of potential customers.
Having an SSL certificate installed on your website will increase consumer trust as it validates that you are who you say you are and authenticates your website and business – thus improving your sales!
SSL improves SEO
Put simply, Google wants to keep its users safe and so it ranks websites with an SSL certificate higher than their counterpart without. If Google is telling you to get an SSL certificate, it’s about time you did right?
Overall, having an SSL in 2021 is deemed best practice and will definitely have a positive impact on your website.
Secure your website for FREE with NetShop ISP
We are pleased to offer our clients a FREE LetsEncrypt SSL Certificate with all of our cPanel Web Hosting Plans! Simply visit our website here, choose from our Cyprus, Malta or UK cPanel hosting to get a free SSL and more benefits!
Install Free Lets Encrypt SSL in cPanel
We also offer Wildcard SSL certificates, Multi-domain and EV SSL certificates at cheap prices!
For more information and queries, please feel free to contact our SSL Specialists.
How to change your WordPress Website Domain
In this article we will explain in easy steps how to clone / duplicate your Wordpress website to use under a new domain, with the use of cPanel and PhpMyAdmin.
Your domain name gives a first impression to your users and as we all know, first impressions count. Whether you’re rebranding or just want more SEO friendly URLs, you may find yourself needing to change your WordPress domain name. If that’s the case, you want to make sure you do everything right to avoid causing any issues to your website.
The following process will allow you to successfully duplicate your WordPress site to use under a new domain name. Keep reading to follow our simple step by step guide on how to do it.
Changing your WordPress domain name
Before we get started, it’s important to stress that although the process is relatively simple, any small mistake could potentially disrupt the running of your WordPress site. Make sure you have a full backup of your website on your server before you get started with the following steps. If you’re unsure on how to do this, we’d advise contacting your web hosting provider.
Step 1. Add the new domain
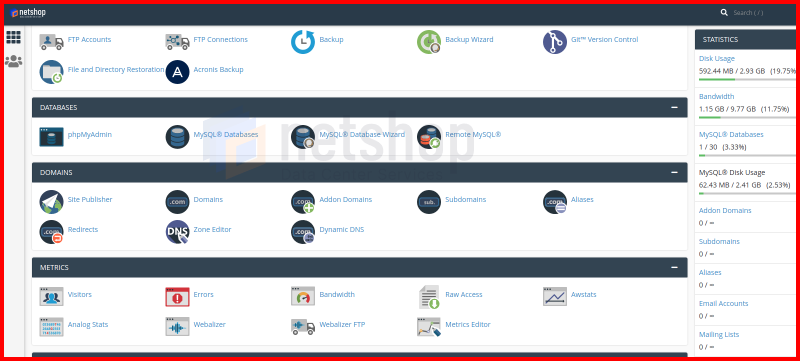
1. Log in to cPanel.
2. Under Domains, click on Addon Domains.
3. In the New Domain area, enter your new domain name and a password. The other fields will be automatically filled out.
4. Click Add Domain.
How to add new domain in cPanel
Step 2. Copy files to the new domain
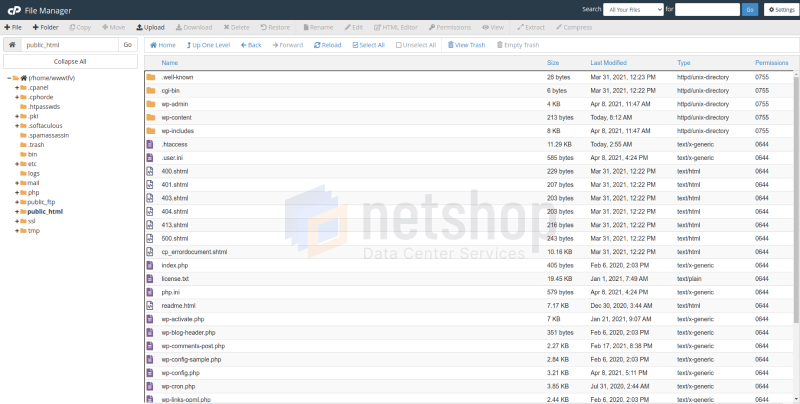
1. Open File Manager, under Files, in cPanel.
2. Open your website’s root directory, public_html.
3. Click Select All located at the top of the page.
4. Deselect the following files in public_html; cgi-bin, .qidb and addon domain directory.
5. In the top menu, click Copy and wait for a pop-up to appear.
6. In the pop-up, after /public_html type in another forward stroke (/) and then the new domain where you’re copying the files to.
7. Click Copy Files.
How to edit files under public_html via cPanel’s File Manager
Step 3. Create a new MySQL database
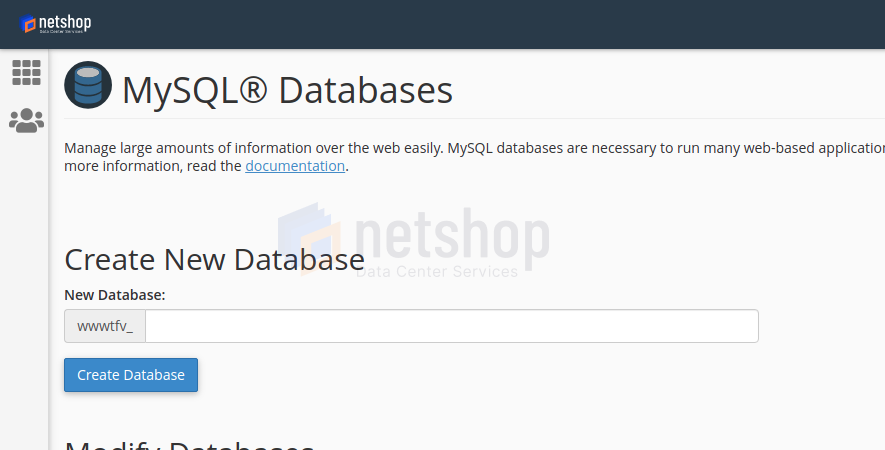
1. In cPanel, under the Databases section, select MySQL Databases.
2. Under the Create New Database section, type in the name of the new database that you’re creating in the New Database field.
3. Click Create Database.
4. You’ll now be able to find and manage the new database that you created under Current Databases.
How to create new databases in cPanel
Step 4. Edit the wp-config.php File
1. Open File Manager under the Files section in cPanel.
2. Open the root folder, public_html, and locate wp-config.php.
3. Right click and select Edit.
4. The file will be opened in the File Manager editor, where you need to update your database settings with the ones that were created in step 3.
DB_NAME (Database name) – Replace database name with the new database name created in Step 3.
DB_USER (Database username) – Change username to the new username created in Step 3.
DB_PASSWORD (Database password) – Update password with the password created for your new database in Step 3.
5. Click Save Changes.
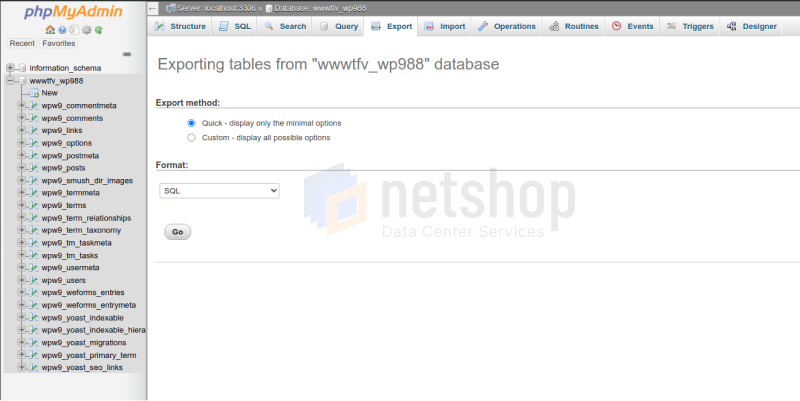
Step 5. Export MySQL Database
1. In cPanel, under the Database section, select phpMyAdmin.
2. In the phpMyAdmin window, select the database you wish to export from the left menu.
3. Click the Export tab on the top menu bar.
4. Under Export Method, the Quick option will already be selected for you. You do not need to change this.
5. Under Format, SQL will already be selected for you from the dropdown, you do not need to change this either.
6. Click Go at the bottom of the page.
7. You will be prompted to either open or save the .sql file. Click Save.
How to export a database via PhpMyAdmin
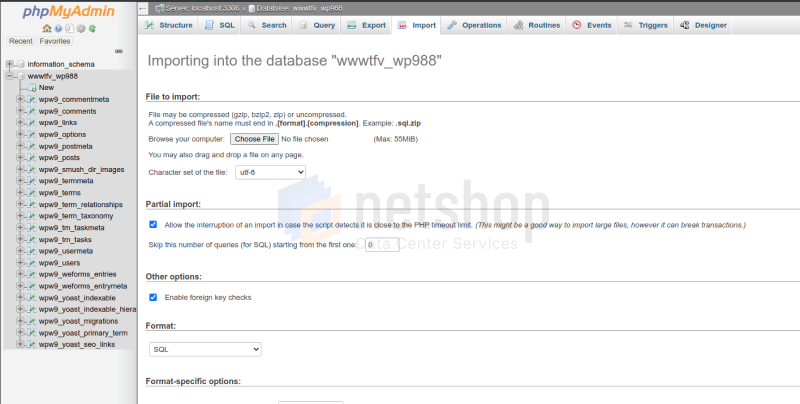
Step 6. Import MySQL Database
1. Again, select phpMyAdmin from the Database section of cPanel.
2. In the phpMyAdmin window, select the database you’ll be working with from the left menu.
3. Click the Import tab on the top menu bar.
4. Under File to import, click Choose File and select the .sql file previously saved in step 5.
5. Click Go at the bottom of the page to import the file.
6. Once the database has been successfully imported, a message will appear notifying you.
How to Import a Database via phpMyAdmin
Step 7. Update Database settings
1. In cPanel, select phpMyAdmin under the Database heading.
2. From the left menu, click on the database that was created in step 6.
3. Now select wp_options.
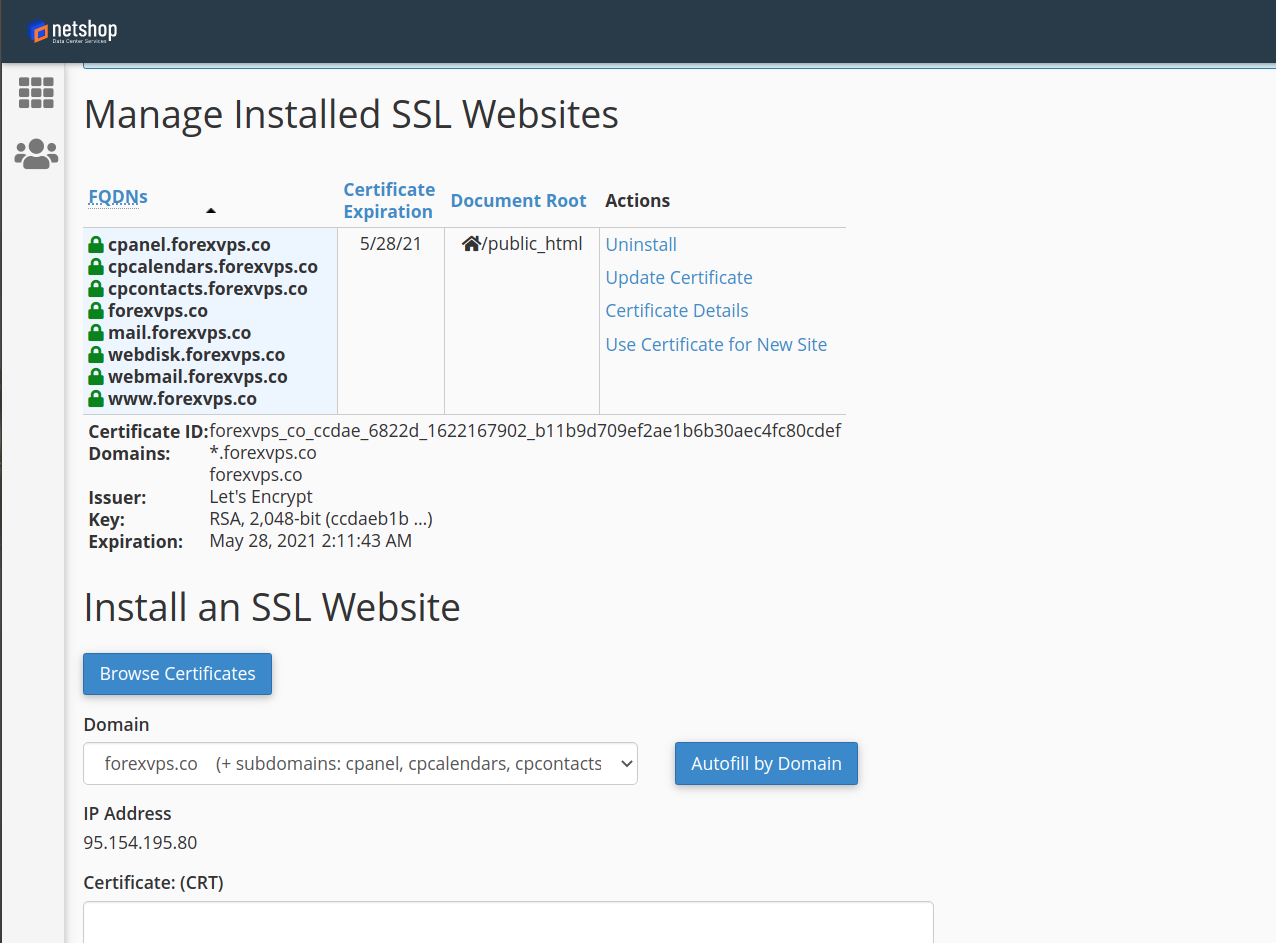
4. Find the siteurl row (under option_name) and click the Edit button next to it (pencil icon).
5. Find option_value under Column and replace the existing URL with your new domain.
Update WordPress siteurl in database via phpMyAdmin
6. Click the Go button to save the changes.
7. Locate the home row and repeat the exact same steps (4-7).
8. Find the blog name row and select the pencil icon to edit.
9. Update the blog name and select Go.
10. Follow the same step for the blog description row too.
11. On the left menu select wp_users.
12. Locate the user_login row and click Edit.
13. Update the username with a new one of your choice.
14. Follow the same steps for the user_nicename row too.
15. Finally, locate the user_pass row to update your password. Delete the existing password and create a new one.
16. Select MD5 from the Variable Character Field and click Go.
By this point, you’ll now be able to log into your WordPress dashboard with your new URL followed by /wp-login.php and your new login details.
Step 8. Update remaining URLs
1. Login to your WordPress dashboard.
2. Find Plugins on the left menu.
3. Select Add New.
4. Search for a migration plugin to replace all existing URLs with the new URL. We recommend the free Better Search Replace plugin.
5. Click Install Now and then click Activate.
6. You can then find the plugin on the left menu under Tools to execute the search and replace.
Step 9. Check WordPress
1. In WordPress, select Settings from the left menu.
2. Click General.
3. Locate the WordPress Address and Site Address and ensure that both are your new domain name.
Voilà – you’ve changed your WordPress website domain name!
WordPress Web Hosting with NetShop ISP
Host your WordPress website with NetShop ISP and get cPanel completely free – making it a whole lot easier for you to maintain your website. Benefit from a free .com domain name and 24/7 customer support too.