XConnect: Ultra‑Low Latency Connectivity Now Delivered Globally
In this article, we’ll explore how NetShop’s XConnect solution enables ultra‑low latency connectivity, what makes it ideal for latency‑sensitive ecosystems, and how it empowers financial and technology players to gain competitive edge.
High-performance cross connect services are increasingly vital for forex brokers, fintech platforms, cloud-native applications, and technology providers.
In this article, we’ll explore how NetShop’s XConnect solution enables ultra‑low latency connectivity, what makes it ideal for latency‑sensitive ecosystems, and how it empowers financial and technology players to gain competitive edge.
Why Latency Matters in Forex and Fintech
In the forex and fintech world, microseconds make a difference. Trading platforms exchange tick data, liquidity feeds, and settlement orders in real time—meaning every millisecond counts.
Traditional public‑internet routing introduces unpredictable delays and packet loss, potentially impacting trade execution, price validation, and overall reliability.
By contrast, a private cross‑connect like XConnect minimizes hops, removes the unpredictability of public internet, and provides deterministic, high-throughput performance. This ensures consistently low latency, deterministic throughput, and higher SLA stability—all critical for mission‑critical financial systems.
NetShop ISP’s XConnect Service: Overview
NetShop’s XConnect service enables you to establish direct fibre connections within data centres, linking your infrastructure with cloud platforms, liquidity providers, and technology partners with minimal delay.
The Four Pillars of XConnect
- Top Security
Direct physical fibre is much more secure than public‑internet links, eliminating exposure to public routing vulnerabilities. - Ecosystem Direct Access
Seamless connection to carriers, cloud providers, liquidity institutions, and other technology providers in Equinix IBX ecosystems via private links. - Data Center Resilience
Enables redundant, high-availability designs without consuming public bandwidth, improving uptime and reliability. - Network Stability
Eliminates packet loss and latency variability associated with public Internet routing—delivering deterministic performance.
How Cross‑Connect Works in Practice
Consider a forex brokerage firm with servers hosted in a data centre that interacts with a bridge technology provider. Sharing real-time price feeds or trading data over public Internet introduces latency and instability. But with XConnect, both parties connect to the same facility using a private fibre link.
This cross‑connect ensures data flows directly between environments over a secure, dedicated channel. The result: near-instantaneous data exchange, consistent low latency, and elevated reliability for trading systems where timing is everything.
NetShop’s XConnect Product Portfolio
NetShop ISP offers four distinct XConnect solutions, each tailored to the needs of different workloads.
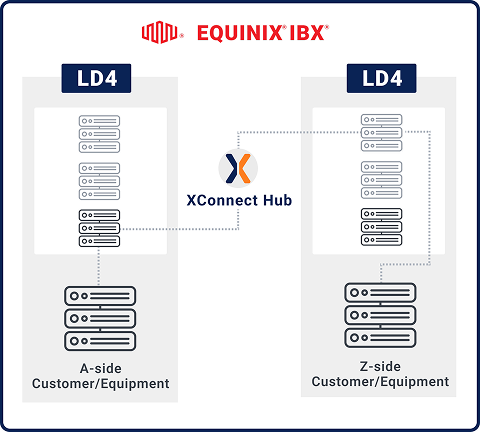
1. Metro Direct XConnect
This solution provides direct point-to-point connections between two customers within the same Equinix data centre or campus. Ideal for:
- Forex brokers accessing bridge providers or liquidity feeds within the same facility
- Fintech partners collaborating securely in close proximity
- High-throughput applications that require ultra-low latency
Metro Direct XConnect is your fastest and most efficient option when both parties operate under the same IBX roof.
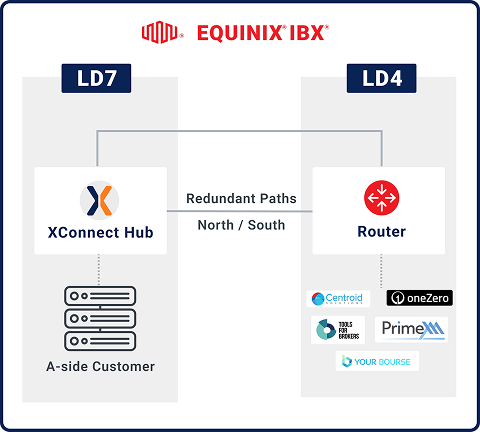
2. Intra-Metro XConnect (Layer 2)
The Intra-Metro XConnect enables private connectivity between different Equinix facilities within the same metro area (e.g., between LD4, LD6, and LD7 in London).
It offers Layer 2 VLAN-based connectivity, making it ideal for:
- Redundant or high-availability forex systems spanning multiple data centres
- Fintech companies running multi-zone architecture within a metro hub
- Institutions needing ultra-fast data synchronization across sites
This solution provides the low latency benefits of local links with the flexibility of geographic diversity.
3. Cloud Fabric XConnect
NetShop’s Cloud Fabric XConnect integrates your on-prem or co-located infrastructure directly with leading cloud platforms like AWS, Google Cloud, Azure, Alibaba Cloud, and Oracle Cloud.
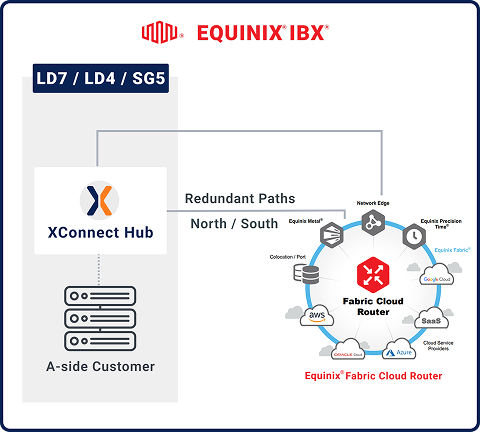
Perfect for fintech developers, SaaS providers, and brokers needing:
- Multi-cloud and hybrid-cloud setups
- Secure, direct access to cloud APIs and services
- Avoidance of public internet bottlenecks or security risks
Provisioned over Equinix Fabric, this service brings low-latency, scalable access to the cloud without routing traffic over the internet.
4. Global XConnect
Global XConnect extends private connectivity beyond a single metro or country, enabling dedicated point-to-point or multipoint connectivity across continents.
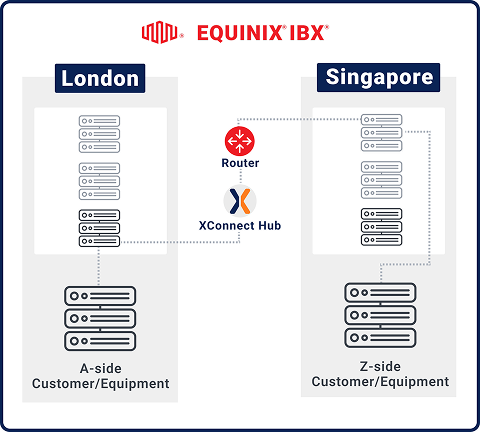
Ideal for:
- Brokers serving traders in multiple regions (e.g., London to Hong Kong or New York)
- Fintech enterprises synchronizing data centers globally
- Applications with high sensitivity to jitter and packet loss
NetShop’s Global XConnect provides international reach while retaining the performance and security of a local private circuit.
Benefits for Forex & Fintech Providers
Ultra‑Low Latency
By eliminating public routing, xconnect cuts latency significantly—crucial for algorithmic or high-frequency forex trading.
High Security & Compliance
Private fibre avoids public exposure, minimizing risk—an important consideration given the regulatory demands in fintech.
Flexible Ecosystem Access
Quickly join cloud networks or access liquidity/bridge providers already present in major data centers.
Cost‑Effective Redundancy
Design dual‑path architecture without relying on public internet bandwidth, lowering cost and improving uptime resilience.
Use Cases for XConnect
- Forex trading platforms needing ultra‑fast execution and direct liquidity access
- Fintech firms deploying in multi-cloud or multi-datacenter environments
- Technology providers and bridges seeking secure cross-connectivity within colocation facilities
- Media streaming, blockchain, and latency-sensitive applications benefiting from dedicated infrastructure
Why Choose NetShop ISP for XConnect?
NetShop ISP provides industry-aligned, high-availability solutions tailored to forex, fintech, and cloud-native use cases. As a trusted partner within Equinix IBX data centers and major financial hubs, we offer:
- Low connectivity costs
- Fast provisioning
- 24/7 NOC support
- Local, regional and global fibre reach
- Strategic location presence in LD4, LD7, SG5, AM2, and more
Get in touch with NetShop ISP today and explore the most suitable XConnect solution for your business.