How To Change Document Root of Main Domain in cPanel
This article guides you through changing the Document Root Path of cPanel’s Main Domain.
Often webmasters and cPanel server admins need to change the document root of the domain which is associated with the main cPanel account. Whilst changing the document root of an addon or sub-domain is a straightforward process, there is no official guideline from cPanel on how to change the document root of an account’s main domain.
NetShop ISP’s Support team have helped numerous customers who requested to change the document root of their main cPanel account, and so we have decided to publish in this article a 100% working solution.
Steps to Change Document Root of Main cPanel Domain
Just follow the next steps for a successful document root change of your account’s main domain name.
Step 1: Take Backup
It’s crucial that before you proceed to the next steps you take a full backup of your cPanel account.
You may do so by copying your home directory somewhere safe within the same server (assuming you have root access) as follows:
root@cpanel:~$ cp -r /home/myuserdir /root/
The above command will copy the entire “myuserdir” directory under /root/ folder.
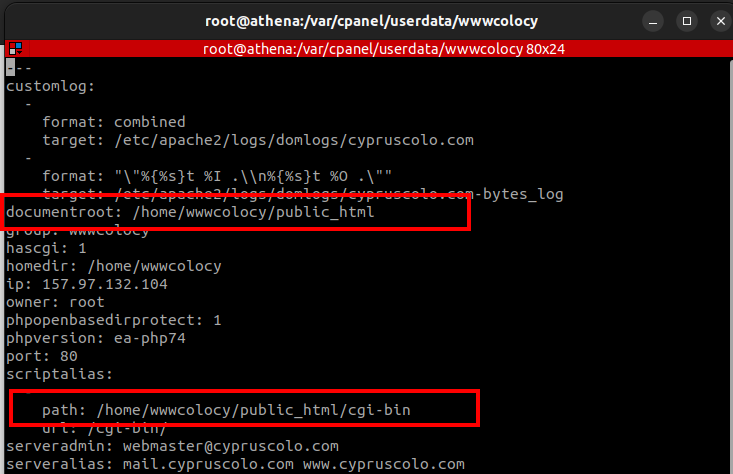
Step 2: Edit files under /var/cpanel/userdata/$USERNAME
The second step requires to edit two files under /var/cpanel/userdata/$username , where $username is the username of your account in concern. In our example the username is wwwcolocy.
There are two files to edit; the base domain and the SSL one. In our example, the domain in concern is cypruscolo.com so we will edit the two files as follows (we use “vi” as our text editor, you may use your own preferred editor):
root@localhost:~$ vi /var/cpanel/userdata/wwwcolocy/cypruscolo.com
Change the paths as indicated in the screenshot below, then save and exit the file.
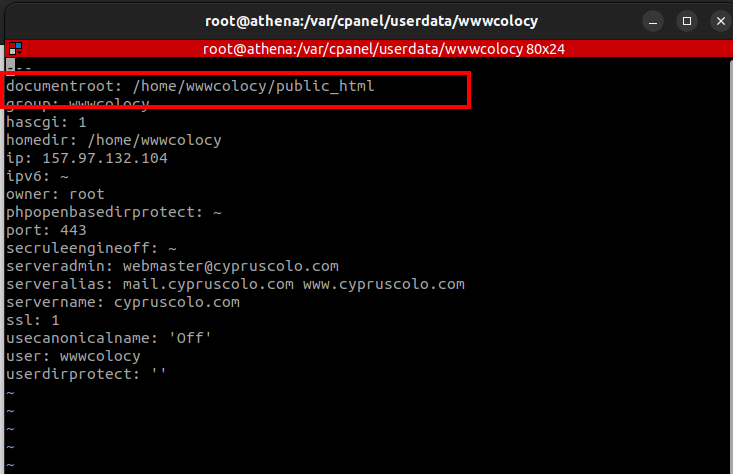
Then follow the same process by editing the “documentroot” variable in the corresponding SSL file:
root@localhost:~$ vi /var/cpanel/userdata/wwwcolocy/cypruscolo.com_SSL
Step 3: Delete cache files
As you are in the same directory, there are two cache files as indicated by the screenshot below.
Step 4: Update userdatacache and re-build httpd config
You are almost ready. At this point we need to execute the following commands so our changes are applied in the system.
root@localhost:~$ /scripts/updateuserdatacache
Then, execute the following command to re-build apache’s configuration:
root@localhost:~$ /scripts/rebuildhttpdconf
Step 5: Restart Apache
The final step is to restart Apache. Do so by executing the following command:
root@localhost:~$ service httpd restart
You are all set! Congratulations, you have edited the document root of your cPanel’s primary domain name!
How To Create OpenVPN User in pfSense
In this article we will demonstrate how you can create OpenVPN users using the pfSense® User Interface.
OpenVPN is a service which allows you to setup remote access for mobile clients through the VPN service protocol. The pfSense® software offers a super convenient way of installing OpenVPN and further create accounts for your organization’s users.
In a previous article we discussed about the pros and cons of installing pfSense on a virtual or dedicated server. Read the article >>
About pfSense®
pfSense is a popular software which comes with advanced capabilities compared to a typical router, and less complexity than other common firewalls. Through an intuitive GUI, pfSense® makes it easy to configure and manage firewall rules, NAT, Site-to-site tunnel, OpenVPN and many more.
In this article we will demonstrate how you can create OpenVPN users using the pfSense® User Interface.
Guide to Setup OpenVPN Users in pfSense®
Check out the following easy steps on how to create an OpenVPN user in pfSense® software.
Pre-requisites
Admin-level access in pfSense® GUI
OpenVPN software installed and running
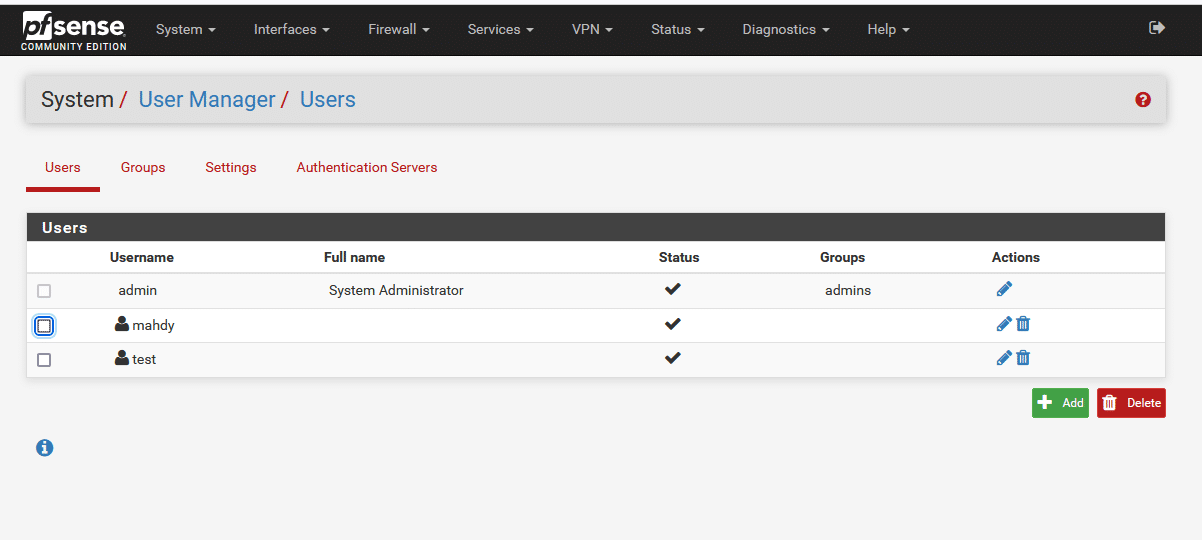
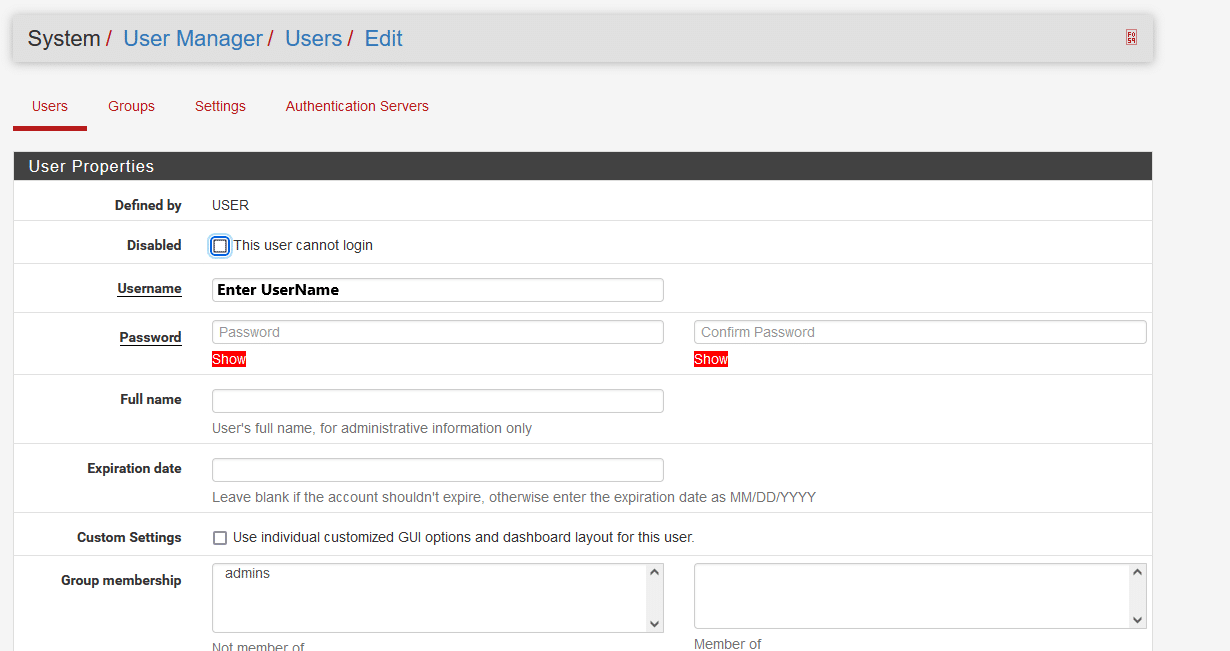
Step 1: Create User
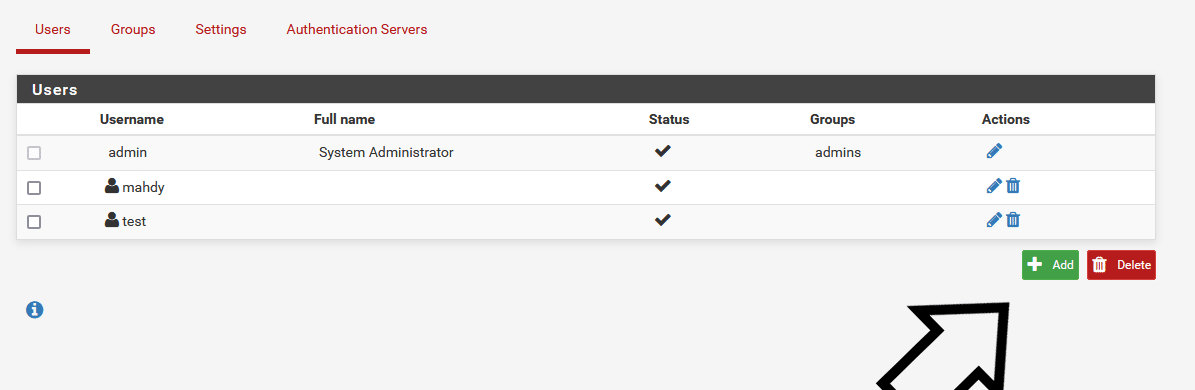
From pfSense top menu go to “System” > “User Manager“
Then click “Add” to create a new user
Enter a Username, Password, and password confirmation
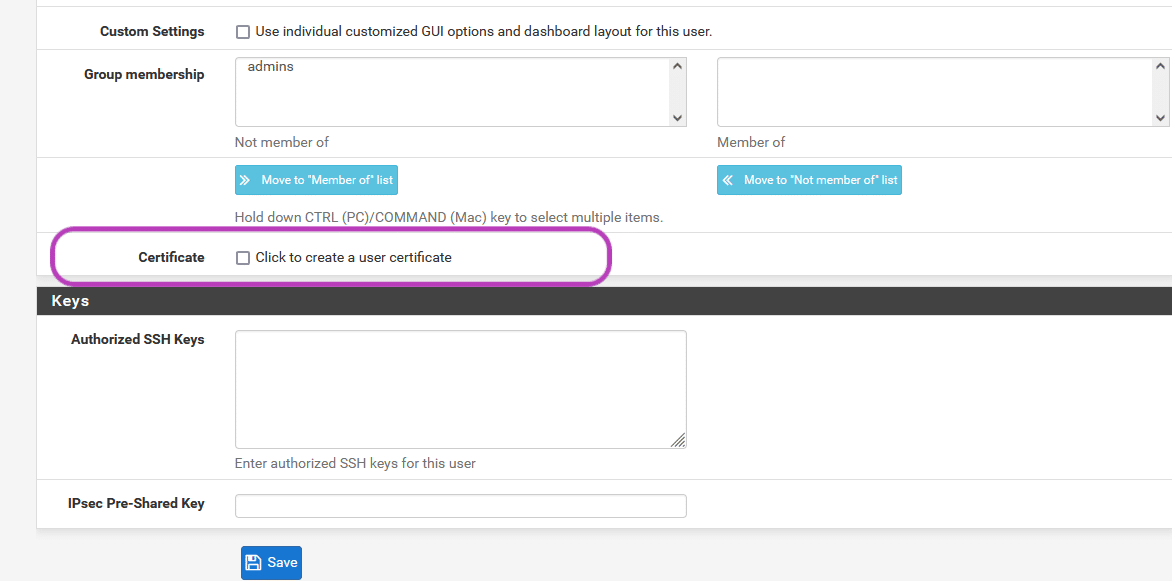
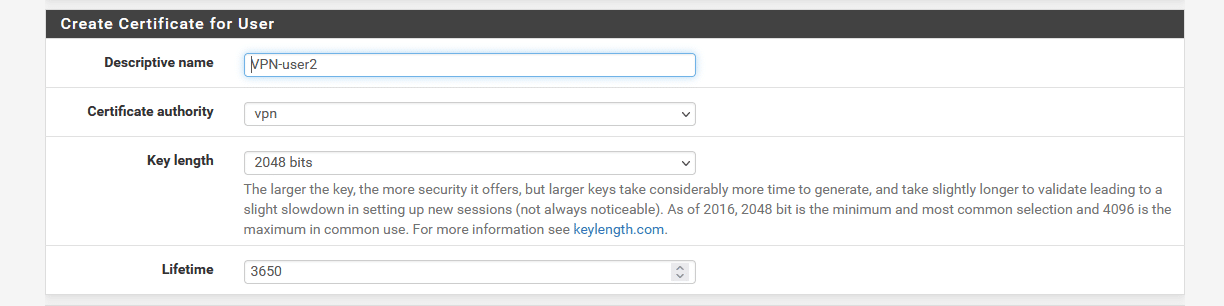
Then check “Click to create a user certificate”, which will open the certificate options panel
Enter the user’s name or some other pertinent information into the Descriptive Name field
Choose the same Certificate Authority used on the OpenVPN server
Choose a Key Length (may be left at the default)
Enter a Lifetime (may be left at the default)
Click “Save”
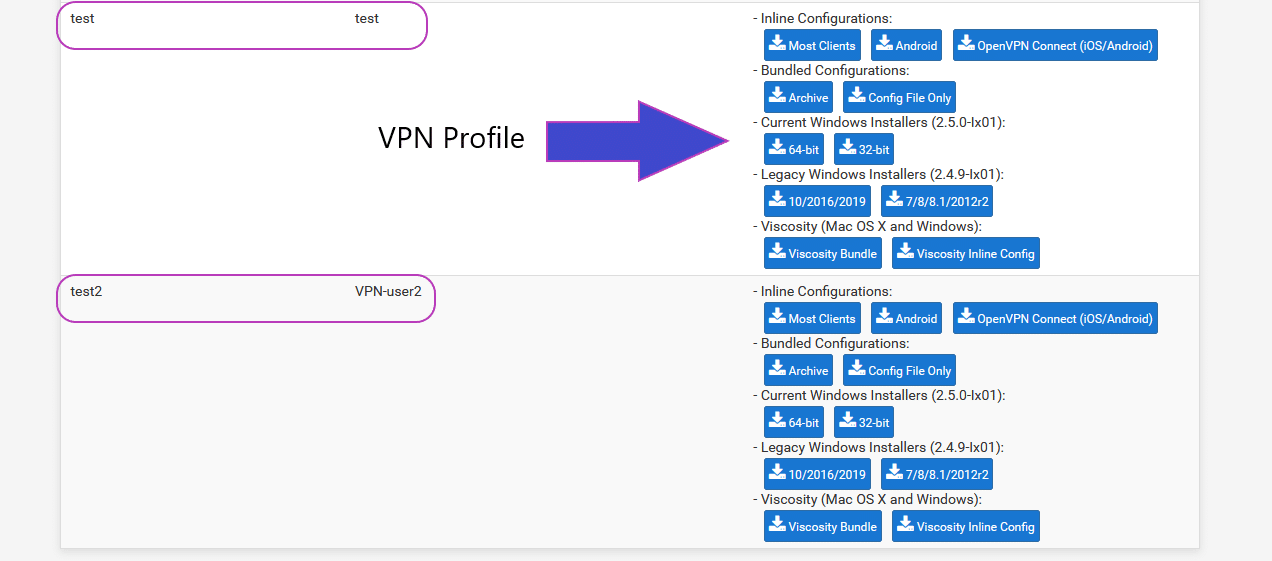
Step 2: Export OpenVPN Certificate
After creating a new user, go to the following path: “VPN” > “OpenVPN” > “Client Export” Go to the bottom of the page in this section, if you have done the steps of creating a new user correctly, you will find the user you created here. Then you can find the VPN profile of the user you want.
After downloading the profile, import it into OpenVPN Client and voila! If you did everything as per this guide, you have successfully connected to OpenVPN from your computer.
MT5 Access Server for Forex Brokers: Virtual vs. Dedicated
In this article we will take a closer look at Dedicated and Virtual servers, and which one should be preferred for hosting an MT5 Access server.
MetaTrader 5 (MT5) is a popular multi-asset trading platform that helps traders automate Forex and stock trades. Whilst MetaTrader 4 (MT4) was designed solely for Forex trading, MT5 was developed with extended functionality, offering traders the ability to trade in almost all financial markets, including cryptocurrencies.
With that being said, in order for MT5 to run efficiently a reliable server with robust infrastructure is crucial. For Forex Brokers, choosing the right server is essential for seamless trading operations.
In this article we will take a closer look at Dedicated and Virtual servers, and which one should be preferred for hosting an MT5 Access server.
What is MT5
Developed by MetaQuotes, MT5 is a trading platform used by traders and brokers in the financial markets. The platform provides advanced trading tools and technical analysis, and is popular due to its user-friendly interface and ease of implementing automated trading strategies.
In a previous article we explained what an MT5 Access (or Proxy) Server is doing and why it is a crucial component of a Broker’s MT5 infrastructure.
A dedicated server is a type of hosting solution where a client leases an entire physical server, and its resources are not shared with anyone else. A dedicated server offers enhanced performance and security, as well as complete control over resources and configurations.
What is a Virtual Server
A virtual private server (VPS) is a hosting method where one physical server is partitioned to create multiple virtual machines. Each virtual server replicates the same functionality as a dedicated server, and operates as an independent, virtualized system.
Dedicated server vs. Virtual server
For FX brokers operating MT5 access servers, choosing between dedicated and virtual servers requires some consideration. Whilst both are viable options, the decision ultimately comes down to the broker’s specific needs regarding deployment time, performance, security, and scalability.
Faster Deployment Time
When it comes to deployment time, virtual server is the winner. A good strategy Brokers should use is to deploy several MT5 Access Servers, in different regions around the world, so they cover as many locations where their traders reside.
That being said, a virtual server is usually preferred due to its very short (even instant) deployment time versus a longer deployment time that a dedicated server will need.
Performance
A dedicated server provides FX Brokers with complete control over its resources and exclusive access to its hardware. All things being equal, a dedicated server will always outperform a virtual server, but that doesn’t go to say that a virtual server isn’t a highly efficient solution for FX Brokers.
Security
In terms of security, both dedicated and virtual servers have their advantages. Since dedicated servers offer exclusive access to hardware, the risk of security breaches caused by shared resources is diminished.
On the other hand, virtual servers come with extensive security features and can be protected through proper configuration. Both are secure choices for FX Brokers, as long as they are maintained with stringent security practices.
Scalability
Virtual servers often allow for easier scalability since they’re designed to allow the instantaneous adjustment of resources. This in itself is a huge advantage for FX Brokers who experience fluctuating trading volumes or wish to expand their operations, as physical hardware upgrades are not necessary.
Of course, dedicated servers can still be scaled up, although it will take a lot longer to do so when compared to a virtual server.
NetShop ISP MT5 Access Servers
Whether you’re considering a dedicated server or a virtual server, NetShop ISP can provide you with low-latency network infrastructure, so that you can deliver uninterrupted financial services to your customers.
If you’re still unsure on which server to opt for, speak to one of our Forex specialists here for some extra advice based on your requirements.
How To Extend Root Partition using Home Partition space in CentOS
After popular demand by existing customers using CentOS 7 servers, we have prepared this tutorial on how to resize root partition after deleting the default /home partition.
After popular demand by existing customers using CentOS 7 servers, we have prepared this tutorial on how to resize root partition after deleting the default /home partition.
In graphical installation of CentOS 7, unless specified otherwise, the installer will create the following partitions: /centos-root , /centos-home and /swap.
This happens usually when system admins forget to customize the partitioning layout during the installation process. There is a solution though which does not require you to re-install the server.
Steps to Resize Root Partition in CentOS and Deleting Home Partition
Pre-requisites:
SSH Access on CentOS 7 Server with root or sudo privileged user
XFS Filesystem with LVM
Ensure you have taken all necessary backups – any disk related operations are high risk!
Step 1: Copy contents of /home directory
Regardless if you already took backup of your entire server, do another quick backup of the /home directory in a location within the server. After the completion of the resize operation, you will be able to quickly transfer back the contents to the /home directory.
root@localhost:~$ mkdir /temp && cp -a /home /temp/
Step 2: Unmount /home
The following command will unmount /home directory. This is a crucial step as without unmounting you cannot proceed to the next steps.
root@localhost:~$ umount -fl /home
Once done, execute the lvs command to display the attributes of the LVM volumes (you will need these in Step 3).
root@localhost:~$ lvs
Step 3: Remove the Home LVM Volume
Run the following command to remove the LVM volume for home.
root@localhost:~$ lvremove /dev/centos/home
Important: We used …/centos/… because of the “VG” attribute from Step 2. If yours is different please adjust your command in Step 3 accordingly.
Step 4: Resize/Extend the Root LVM Volume
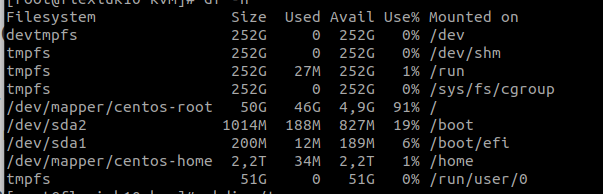
From Step 2, we see (in our example) that the LSize of home volume is ~2,13T. Therefore, it is safe to extend our root LVM by 2 TB.
root@localhost:~$ lvextend -L+2T /dev/centos/root
Then run the following command to finalize the resizing of root partition:
Step 5: Copy contents of /home back to original directory
root@localhost:~$ cp -a /temp/home /
Confirm that you see all of your directories and files in /home by executing the command ls /home/.
If you are happy with what you see, proceed and delete the temporary directory you created in Step 1 as follows:
root@localhost:~$ rm -rf /temp
Step 6: Update /etc/fstab and Sync systemd with all changes
At this point we have resized the root partition successfully but we need to ensure that the system will not look to mount the /home partition on its next boot. For this reason you need to remove the line for /dev/mapper/centos-home from file /etc/fstab. Do so using your favorite editor (nano, vi, etc).
Finally, run the following command to sync systems with all changes above.
root@localhost:~$ dracut --regenerate-all --force
You are all set! Enjoy your newly resized Root partition in CentOS!
NetShop ISP to Attend iFX EXPO International 2024 and Announce Global Infrastructure Expansion
NetShop ISP to Attend iFX EXPO International 2024 and Announce Global Infrastructure Expansion.
NetShop ISP, a leading server hosting provider, is excited to announce its participation in the upcoming iFX EXPO International 2024. The event, scheduled to take place from June 18-20 at the City of Dreams Mediterranean Integrated Resort in Limassol, Cyprus, is one of the most prestigious gatherings in the financial services sector, bringing together industry professionals from around the globe.
NetShop ISP’s presence at the iFX EXPO International 2024 will highlight its commitment to delivering top-tier hosting solutions tailored to the needs of the forex and fintech sectors. A key highlight of NetShop ISP’s participation will be the announcement of its significant global infrastructure expansion.
Book a Meeting with NetShop ISP @ iFX EXPO International 2024
In a strategic move to enhance its service offerings and meet growing demand, NetShop ISP is expanding its infrastructure within the Equinix data centers located in London and Singapore. This expansion aims to provide customers with even lower latency, improved connectivity, and enhanced reliability, crucial for high-frequency trading and other latency-sensitive applications.
In addition to the infrastructure expansion, NetShop ISP will showcase its diverse portfolio of services, including:
Forex VPS Hosting: An API-enabled service that enables Forex brokers to integrate and offer ultra-low latency VPS servers to traders.
Dedicated Servers: Offering high-performance dedicated servers and customizable configurations to meet specific requires for their trading platform, liquidity bridge and CRM software.
Low-Latency Connectivity Services: Ensuring minimal latency and fast execution speeds, critical for high-frequency trading environments.
TNFX Broker Partners with NetShop ISP to Offer Low-Latency Forex VPS to Traders
TNFX, a leading Forex broker, is proud to announce its partnership with NetShop ISP, a top-rated provider of server hosting and Forex VPS solutions.
TNFX, a leading Forex broker, is proud to announce its partnership with NetShop ISP, a top-rated provider of server hosting and Forex VPS solutions. This collaboration brings forth an innovative offering: low-latency Forex VPS services tailored exclusively for TNFX traders.
In the fast-paced world of forex trading, every second counts. Traders need lightning-fast execution and stable connectivity to capitalize on market opportunities. With an API integration of NetShop ISP’s Forex Broker VPS, TNFX traders can now enjoy enhanced performance and reliability like never before.
What is Forex VPS, and Why is it Important?
Forex VPS is a specialized hosting solution designed for forex traders. It provides traders with a virtual server environment optimized for running trading platforms and applications. The key advantage of Forex VPS lies in its low-latency connectivity, ensuring that trade orders are executed swiftly and accurately.
By hosting their trading platforms on NetShop ISP’s high-performance servers, TNFX traders benefit from:
Low-Latency Execution: Trades are executed with minimal delay, giving TNFX traders a competitive edge in fast-moving markets.
Reliable Connectivity: NetShop ISP’s VPS solutions offer high uptime rates, ensuring uninterrupted access to trading accounts.
Security and Stability: With state-of-the-art security measures and redundant infrastructure, NetShop ISP’s VPS services provide a secure and stable trading environment.
24/7 Support: TNFX traders receive round-the-clock customer support from NetShop ISP, ensuring assistance whenever needed.
“We are excited to partner with NetShop ISP to offer low-latency Forex VPS to our traders. This collaboration underscores our commitment to providing the best possible trading experience for our clients.”
said Toufic M, Head of Business Development at TNFX
Stefano Sordini, CEO at NetShop ISP, adds “We are excited to partner with TNFX to offer our high-performance VPS solutions to their traders. By combining our expertise in hosting with TNFX’s reputation in forex trading, we aim to empower traders with the tools they need to succeed.”
About TNFX:
TNFX is a leading Forex broker, offering a wide range of trading products and services to clients worldwide. With a focus on transparency, reliability, and innovation, TNFX strives to provide traders with the best possible trading experience. Learn more about TNFX VPS Service.
About NetShop ISP:
NetShop ISP is a leading provider of hosting and infrastructure solutions, specializing in VPS, dedicated servers, and cloud hosting services. With a global presence and a commitment to excellence, NetShop ISP empowers businesses with reliable and scalable hosting solutions. Learn more about NetShop ISP’s Forex VPS solution.
How to Install Nginx, MySQL, PHP on Ubuntu 22.04 (LEMP)
In this article we will provide a step-by-step guide to installing LEMP Stack (Linux, Nginx, MariaDB, PHP-FPM) on a Ubuntu 22.04 Server.
The LEMP stack is a popular web development stack consisting of four key components: Linux, Nginx, MySQL and PHP, each of which play a crucial role in web application development and hosting. In this article we will provide a step-by-step guide to installing LEMP on your Ubuntu 22.04 Server.
Prerequisites
Server with Ubuntu 22.04 OS installed
SSH Access with root or sudo-privileged user
Steps to Install LEMP on Ubuntu Server
Step 1. Switch to Root user
First, switch to the root user using the following command. Unless stated otherwise, all subsequent commands must be executed as the root user.
john@localhost:~$ sudo –i
Step 2. Install Nginx
Nginx is a powerful web server software designed to handle a high volume of simultaneous requests. It offers faster loading times and better performance than most of other webservers.
root@localhost:~$ apt update -y
Once updates are installed run the following command:
root@localhost:~$ apt install nginx -y
Step 3. Start Nginx and Enable Autostart
Start nginx using the following command:
root@localhost:~$ systemctl start nginx
Now, lets make Nginx to automatically start on boot.
root@localhost:~$ systemctl enable --now nginx
If everything is okay, Nginx should be running. Check this by executing the following command:
root@localhost:~$ systemctl status nginx
Sample Output:
● nginx.service - A high performance web server and a reverse proxy server
      Loaded: loaded (/lib/systemd/system/nginx.service; enabled; vendor preset: enabled)
     Active: active (running) since Sun 2023-09-10 16:27:18 UTC; 23s ago
       Docs: man:nginx(8)
   Main PID: 2079 (nginx)
      Tasks: 3 (limit: 1588)
     Memory: 5.2M
        CPU: 30ms
     CGroup: /system.slice/nginx.service
             ├─2079 "nginx: master process /usr/sbin/nginx -g daemon on; master_process on;"
             ├─2082 "nginx: worker process" "" "" "" "" "" "" "" "" "" "" "" "" "" "" "" "" "" "" "" "" "" "" "" "" "" "" ""
             └─2083 "nginx: worker process" "" "" "" "" "" "" "" "" "" "" "" "" "" "" "" "" "" "" "" "" "" "" "" "" "" "" ""

Sep 10 16:27:18 ubuntu systemd[1]: Starting A high performance web server and a reverse proxy server...
Sep 10 16:27:18 ubuntu systemd[1]: Started A high performance web server and a reverse proxy server.
Step 5. Install MariaDB Server
MariaDB Server is one of the most popular open source relational databases. It’s made by the original developers of MySQL and guaranteed to stay open source. It is part of most cloud offerings and the default in most Linux distributions.
root@localhost:~$ apt install mariadb-server -y
Step 6. Start MariaDB and Enable Autostart
Similar to the procedure we followed with Nginx, we need to ensure it will automatically start on server boot.
root@localhost:~$ systemctl enable –now mariadb
Now, check the status of MariaDB to ensure it’s running properly:
root@localhost:~$ systemctl status mariadb
The previous command should output something that resembles the following.
Sample Output:
● mariadb.service - MariaDB 10.6.12 database server
  Loaded: loaded (/lib/systemd/system/mariadb.service; enabled; vendor preset: enabled)
  Active: active (running) since Sun 2023-09-10 16:29:46 UTC; 18s ago
  Docs: man:mariadbd(8)
  Main PID: 3405 (mariadbd)
  Status: "Taking your SQL requests now..."
  Tasks: 14 (limit: 1588)
  Memory: 62.6M
     CPU: 268ms
Sep 10 16:29:46 ubuntu mariadbd[3405]: Version: '10.6.12-MariaDB-0ubuntu0.22.04.1'  socket: '/run/mysqld/mysqld.sock'  port: 3306  Ubunt>
Sep 10 16:29:46 ubuntu systemd[1]: Started MariaDB 10.6.12 database server.
Sep 10 16:29:46 ubuntu /etc/mysql/debian-start[3422]: Upgrading MySQL tables if necessary.
Sep 10 16:29:46 ubuntu /etc/mysql/debian-start[3425]: Looking for 'mariadb' as: /usr/bin/mariadb
Sep 10 16:29:46 ubuntu /etc/mysql/debian-start[3425]: Looking for 'mariadb-check' as: /usr/bin/mariadb-check
Sep 10 16:29:46 ubuntu /etc/mysql/debian-start[3425]: This installation of MariaDB is already upgraded to 10.6.12-MariaDB.
Sep 10 16:29:46 ubuntu /etc/mysql/debian-start[3425]: There is no need to run mysql_upgrade again for 10.6.12-MariaDB.
Sep 10 16:29:46 ubuntu /etc/mysql/debian-start[3425]: You can use --force if you still want to run mysql_upgrade
Sep 10 16:29:46 ubuntu /etc/mysql/debian-start[3433]: Checking for insecure root accounts.
Sep 10 16:29:46 ubuntu /etc/mysql/debian-start[3437]: Triggering myisam-recover for all MyISAM tables and aria-recover for all Aria tabl>
Step 8. Finalize & Secure MariaDB Installation
When installing MariaDB, it is recommended that you run the mysql_secure_installation script.
The script can increase the security of the MariaDB server depending on the answers given to a few yes/no questions. The exact answers to the questions will vary depending on your exact needs.
For the purposes of this tutorial, we show you the script’s output alongside our answers to the questions. Please note that if this is your first time running the script, for the first question (current password for root), you just need to press Enter. The rest of the answers are shown in bold.
root@localhost:~$ mysql_secure_installation
Sample Output (letters in bold are user inputs upon prompt):
NOTE: RUNNING ALL PARTS OF THIS SCRIPT IS RECOMMENDED FOR ALL MariaDB
      SERVERS IN PRODUCTION USE!  PLEASE READ EACH STEP CAREFULLY!

In order to log into MariaDB to secure it, we'll need the current
password for the root user. If you've just installed MariaDB, and
haven't set the root password yet, you should just press enter here.

Enter current password for root (enter for none):
OK, successfully used password, moving on...

Setting the root password or using the unix_socket ensures that nobody
can log into the MariaDB root user without the proper authorisation.

You already have your root account protected, so you can safely answer 'n'.

Switch to unix_socket authentication [Y/n] y
 Enabled successfully!
Reloading privilege tables..
 ... Success!


You already have your root account protected, so you can safely answer 'n'.

Change the root password? [Y/n] n
  ... skipping.

By default, a MariaDB installation has an anonymous user, allowing anyone
to log into MariaDB without having to have a user account created for
them.  This is intended only for testing, and to make the installation
go a bit smoother.  You should remove them before moving into a
production environment.

Remove anonymous users? [Y/n] y
  ... Success!

Normally, root should only be allowed to connect from 'localhost'.  This
ensures that someone cannot guess at the root password from the network.

Disallow root login remotely? [Y/n] y
  ... Success!

By default, MariaDB comes with a database named 'test' that anyone can
access.  This is also intended only for testing, and should be removed
before moving into a production environment.

Remove test database and access to it? [Y/n] y
  - Dropping test database...
 ... Success!
 - Removing privileges on test database...
 ... Success!

Reloading the privilege tables will ensure that all changes made so far
will take effect immediately.

Reload privilege tables now? [Y/n] y
  ... Success!

Cleaning up...

All done!  If you've completed all of the above steps, your MariaDB
installation should now be secure.

Thanks for using MariaDB!
Step 9. Next Install PHP FastCGI Process Manager (PHP-FPM)
root@localhost:~$ apt install php-fpm
Step 10. Enable PHP-FPM to Autostart
Ensure that PHP FastCGI Process Manager is automatically started on server boot by executing the following command:
Sep 10 16:33:51 ubuntu systemd[1]: Starting The PHP 8.1 FastCGI Process Manager... Sep 10 16:33:51 ubuntu systemd[1]: Started The PHP 8.1 FastCGI Process Manager.
Step 12. Enable FastCGI within Nginx Config
Now that PHP-FPM is installed along with Nginx, we need to modify Nginx’s configuration file and do some adjustments.
Edit the following file using your favourite editor. In this example we are using the ‘vi’ editor.
root@localhost:~$ vi /etc/nginx/sites-available/default
Scroll down until you find the following:
# pass PHP scripts to FastCGI server
#
#location ~ \.php$ {
#       include snippets/fastcgi-php.conf;
#
#       # With php-fpm (or other unix sockets):
#       fastcgi_pass unix:/run/php/php7.4-fpm.sock;
#       # With php-cgi (or other tcp sockets):
#       fastcgi_pass 127.0.0.1:9000;
#}
That section is inactive in its current state as the directives are commented out.
Delete it and replace with the following block of code:
location ~ \.php$ {
  include snippets/fastcgi-php.conf;
  fastcgi_pass unix:/run/php/php8.1-fpm.sock;
}
Save the file and exit.
Step 13. Verify Nginx Syntax and Apply Changes
Before restarting the Nginx server after making configuration changes, it is a good idea to test the Nginx configuration for syntax errors. To do that, run nginx -t which should give you output similar to the following:
root@localhost:~$ nginx -t
nginx: the configuration file /etc/nginx/nginx.conf syntax is ok
nginx: configuration file /etc/nginx/nginx.conf test is successful
If any errors are reported, you need to go back to the previous step and correct them by editing the Nginx configuration file.
You are now ready to restart the nginx server, using the following command:
root@localhost:~$ systemctl restart nginx
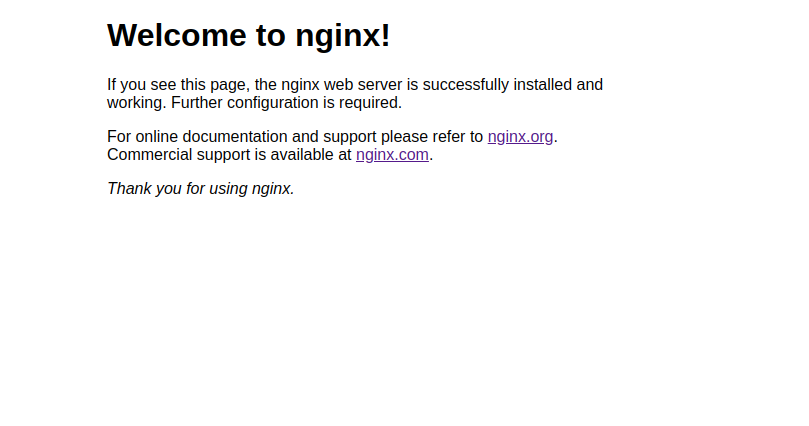
All set! You can verify a successful Nginx installation by browsing to your server’s IP Address. You should be seeing Nginx’s default welcome page as per the following screenshot.
How To Migrate from MongoDB Atlas to self-hosted Ubuntu 22.04 Server
In this article we will demonstrate how to install latest MongoDB on Ubuntu 22.04 server, migrate databases from MongoDB Atlas and further secure your MongoDB environment.
MongoDB is a popular open-source NoSQL database management system. It is designed for flexibility, scalability, and performance in handling a variety of data types; structured and unstructured.
The same people who built and manage MongoDB have launched MongoDB Atlas in 2016. Atlas is a fully-managed cloud database that can run on the cloud service provider of a user’s choice (AWS , Azure, and Google Cloud). It offers a convenient way to deploy, manage, and scale MongoDB databases in the cloud without the operational overhead of managing database infrastructure.
Despite the many advantages MongoDB has to offer, maintaining such service in AWS or Azure is expensive. Therefore developers and DBA’s turn to alternative, cheaper yet reliable hosting providers for their MongoDB hosting needs.
In this article we will demonstrate how to install latest MongoDB on Ubuntu 22.04 server, migrate databases from MongoDB Atlas and further secure your MongoDB environment.
Prerequisites
SSH access with root privileges on destination ubuntu server
Access to the source Mongodb Atlas Database
Step 1: Update system & Install Mongodb
Execute the following command to update you Ubuntu system with the latest packages:
root@localhost:~$ apt update -y
Then, install mongodb with the following command:
root@localhost:~$ apt install mongodb -y
Step 2: Create MongoDB user on Destination Server
This step is important as we will create a user which will be used for the migration process.
Use the following command to enter the mongo shell.
root@localhost:~$ mongo
Now use the following commands within the mongo shell:
When handling database migration tasks, you must always have a fresh copy of the working database. Migrating an database from an old backup is not a good idea as you will be missing, probably, a lot of new data!
So, use the following command to take a full backup of the database in source mongodb server:
Replace <source_host> with the IP or hostname of the source mongodb server, migrationUser and migrationPassword with the credentials used in Step 2, and <source_db> with the database name you are about to migrate.
Step 4: Transfer mongodb database to new server
We use the popular “scp” utility to transfer our database copy from the old server to the new one. Always remember that the first part of rsync syntax refers to the path on the source server and the last one to the path of the destination server.
Assuming we execute this command from our new server, the first part of the command should include the connection details to the source server. We will transfer the database to the root folder of our new Ubuntu server.
Important: If your database is on MongoDB Atlas, then you can use the mongodump command from Step 3 directly on your new Ubuntu server. In this case, you can skip the entire Step 4.
Step 5: Restore MondoDB Database
Now that you have your database on your destination server, use the following command to restore it:
Make sure to replace <db_name> with the name of your database and <source_db> with the name as transferred from the source server. In our example we transferred it in /root/ folder so in your case this may also need to be changed.
Step 6: Create User with Privileges on New Database
Use mongo command to enter the mongo shell:
root@localhost:~$ mongod
Create the user with the appropriate privileges for the database you just migrated:
Make sure to replace <destination_db> with the name of your newly migrated database.
Type exit to leave the mongo shell.
That’s it! We hope that this article helped you to migrate your MongoDB Atlas to your new self-hosted Ubuntu Server.
How NetShop ISP Improves Trading Infrastructure Resilience through Equinix LD7 Data Center Hosting
NetShop ISP launches purpose-built cloud & dedicated servers infrastructure within Equinix’s LD7 Data center for improving trading infrastructure resilience for Fintech companies and Forex brokers.
In the fast-paced world of forex trading, having reliable and high-performance servers is essential for success. Equinix LD7 Data Center stands out as a premier choice for businesses operating in these industries, offering a range of benefits that can significantly enhance performance, security, and scalability.
Check out how Equinix LD7 Data Center, combined with virtual or dedicated servers, can empower customers in the forex and fintech sectors.
Introduction to Equinix LD7 Data Center
Equinix LD7 Data Center, located in London, UK, is renowned for its state-of-the-art infrastructure and unparalleled connectivity. As one of the leading data center providers globally, Equinix ensures optimal reliability, security, and performance for businesses of all sizes.
Benefits of Equinix LD7 Data Center for Forex and Fintech
Proximity to Financial Markets Equinix LD7 Data Center is strategically located in close proximity to major financial markets, including the London Stock Exchange and key forex trading hubs. This geographic advantage ensures minimal latency and faster trade execution, giving traders a competitive edge.
Robust Connectivity Ecosystem Equinix LD7 Data Center boasts a diverse ecosystem of network service providers, cloud platforms, and financial exchanges. This interconnected environment enables direct access to a wide range of counterparties, liquidity providers, and trading platforms, facilitating faster data exchange and reducing latency.
Enhanced Security and Compliance Security is paramount in forex trading and fintech operations, where sensitive financial data must be protected from cyber threats and regulatory compliance requirements must be met. Equinix LD7 Data Center offers advanced security measures, including biometric access controls, video surveillance, and compliance certifications such as PCI DSS and ISO 27001.
Scalability and Flexibility Whether you’re a growing fintech startup or an established forex brokerage, scalability is essential to accommodate fluctuating demand and future expansion. Equinix LD7 Data Center provides scalable infrastructure solutions, allowing businesses to easily upgrade resources such as CPU, RAM, and storage capacity to meet evolving requirements.
Virtual vs. Dedicated Servers: Choosing the Right Solution
When it comes to hosting your forex trading platform or fintech applications in Equinix LD7 Data Center, you have the option to deploy virtual servers or dedicated servers.
Virtual Servers – VPS
Virtual servers, also known as virtual private servers (VPS), offer cost-effective and scalable hosting solutions. By leveraging virtualization technology, NetShop ISP provides Virtual servers which are deployed on a multi-node infrastructure for greater redundancy and scalability purposes.
Through NetShop ISP’s infrastructure in LD7, London we provide Virtual Servers for Forex brokers which are ideal for CRM hosting, Trading platform cloud instances and Access/Proxy servers.
Dedicated servers provide maximum performance, security, and control for mission-critical applications and high-traffic websites. With a dedicated server hosted in Equinix LD7 Data Center, you have exclusive access to the entire physical server, eliminating resource contention and ensuring consistent performance.
In conclusion, Equinix LD7 Data Center serves as a strategic partner for businesses operating in the forex and fintech industries, offering a robust infrastructure platform and a wide range of hosting solutions tailored to their specific needs. Whether you choose virtual servers or dedicated servers, Equinix LD7 Data Center provides the reliability, performance, and scalability required to thrive in today’s competitive landscape.
Contact a hosting specialist today for a free consultation or view more details about our Equinix LD7 Data Center here.
Introducing New Cutting-Edge VPS Plans: OKTAPLUS, HYPER, and TITAN Enhanced with NVMe Technology
NetShop ISP Announce New, NVMe-powered VPS Plans: OKTAPLUS, HYPER, and TITAN, offering increased performance and greater scalability.
In the dynamic realm of the e-commerce sector and digital ventures, the significance of high-performing virtual server hosting solutions cannot be overstated. As demands soar and technology evolves, NetShop ISP is thrilled to announce the launch of three new VPS plans: OKTAPLUS, HYPER, and TITAN.
These plans are designed to cater to the evolving needs of businesses, providing increased performance and greater scalability.
Key Features of OKTAPLUS, HYPER, and TITAN VPS Plans
Unmatched Performance: With up to 16 vCPU Cores, 32 GB RAM, and 1 TB Storage, our OKTAPLUS, HYPER, and TITAN VPS Plans deliver unparalleled performance for all types of software and applications.
Enhanced Cloud Infrastructure: Our upgraded cloud infrastructure empowers us to offer VPS servers with high-performance NVMe storage. Say goodbye to latency and slow loading times as our NVMe-powered servers ensure lightning-fast data access, giving your website or application a competitive advantage.
Scalability: Whether you’re experiencing sudden spikes in traffic or planning for long-term growth, our VPS plans are designed to scale effortlessly. Enjoy the flexibility to upgrade your resources on-demand, ensuring that your server always meets the demands of your evolving business.
Unlimited scalability is available when switching from fixed-specs plans to FlexiVPS+.
Global Reach: The three new VPS plans are currently offered in our UK Cloud region, and will soon be available in the rest of our global data center locations.
Unlock the Power of VPS Hosting Today
Ready to experience the next level of VPS hosting? Don’t miss out on the opportunity to elevate your online presence with NetShop ISP’s OKTAPLUS, HYPER, and TITAN plans.
Get started today and discover the difference that high-performance VPS hosting can make for your business. If you are not sure which plan suits your business needs, contact one of our hosting specialists via Skype (netshopisp) or drop us a message from here.
How To Install Let’s Encrypt SSL on Ubuntu Server 22.04 for Apache or Nginx
In this tutorial we will demonstrate the way to install LetsEncrypt on your Ubuntu server using certbot – an open-source tool for installing Let’s Encrypt certificates.
Let’s Encrypt is an open, automated certificate authority (CA) provided by Internet Security Research Group (ISRG) so that users can enable secure connection (https) on their websites for free, without hassle.
In this tutorial we will demonstrate the way to install LetsEncrypt on your Ubuntu server using certbot – an open-source tool for installing Let’s Encrypt certificates.
Pre-requisites to Install Certbot and Let’s Encrypt on Linux Server
The only prerequisite is to have ssh access with a root-privileged account on Ubuntu server with public internet access.
5 Easy Steps to Install Let’s Encrypt Certificate on Ubuntu Server 22.04 using Certbot
Step 1: Update System
Execute the following command to update your ubuntu server with the most updated packages.
root@localhost:~$ apt update -y
Step 2: Install Certbot
The following command will install certbot on your system.
root@localhost:~$ apt install certbot -y
Step 3: Install Certbot plugin for Apache or Nginx
If you are using Apache webserver then use the following command to install the respective certbot plugin for Apache.
root@localhost:~$ certbot --apache -d mydev.netshop-isp.com.cy
Saving debug log to /var/log/letsencrypt/letsencrypt.log
Requesting a certificate for mydev.netshop-isp.com.cy

Successfully received certificate.
Certificate is saved at: /etc/letsencrypt/live/my.netshop-isp.com.cy/fullchain.pem
Key is saved at:         /etc/letsencrypt/live/my.netshop-isp.com.cy/privkey.pem
This certificate expires on 2024-06-01.
These files will be updated when the certificate renews.
Certbot has set up a scheduled task to automatically renew this certificate in the background.

Deploying certificate
Successfully deployed certificate for admin.digibot.trade to /etc/apache2/sites-enabled/000-default-le-ssl.conf
Congratulations! You have successfully enabled HTTPS on https://my.netshop-isp.com.cy
We were unable to subscribe you the EFF mailing list because your e-mail address appears to be invalid. You can try again later by visiting https://act.eff.org.

- - - - - - - - - - - - - - - - - - - - - - - - - - - - - - - - - - - - - - - -
If you like Certbot, please consider supporting our work by:
 * Donating to ISRG / Let's Encrypt:   https://letsencrypt.org/donate
 * Donating to EFF:                    https://eff.org/donate-le
- - - - - - - - - - - - - - - - - - - - - - - - - - - - - - - - - - - - - - -
Step 5. Restart Web Server
Last step is to restart our web server so that the new configuration with SSL enabled are applied.
If you are using Apache then use this command:
root@localhost:~$ systemctl restart apache2
or the following command for Nginx web server:
root@localhost:~$ systemctl restart nginx
Congratulations! Your website is now secure with Free Let’s Encrypt SSL!
Navigating Forex Server Hosting: Key Distinctions from Conventional Providers
In this article we will outline the main differences between regular hosting providers and forex hosting providers, and why it can have such a huge impact on the success of an FX Broker’s operations.
Forex hosting providers specialize in offering hosting solutions that are tailored specifically for forex traders and brokers. The dynamic and fast-paced nature of the Forex industry requires certain optimizations that general hosting providers might not prioritize.
In this article we will outline the main differences between regular hosting providers and forex hosting providers, and why it can have such a huge impact on the success of an FX Broker’s operations.
Forex Hosting Providers vs. Regular Hosting Providers
Specialist Support
Forex hosting providers offer support teams knowledgeable about forex trading platforms and the technical requirements of traders and brokers. Excellent customer support is always essential, but having a team of industry experts is especially important for those operating in the Forex industry.
Forex hosting providers understand the specific needs of traders and can provide assistance accordingly, and this is a highly valuable asset for traders and brokers, ensuring that industry specific issues are handled efficiently.
Low Latency Infrastructure
Forex hosting providers will prioritise ultra-low latency connections to trading servers, so oftentimes they will have data centres situated within close proximity to major financial hubs around the globe. This is especially important for forex brokers and traders since it ensures minimal delays in order execution.
By opting for a Forex hosting provider you are also more likely to have greater network stability which reduces the risk of connectivity issues or interruptions, ensuring a more reliable trading experience.
Hardware Compatibility with Trading Platform Requirements
Oftentimes Forex hosting providers will tailor their hosting environments to facilitate popular trading platforms like MetaTrader 4 (MT4), MetaTrader 5 (MT5) and the XValley Exchanger. Since most traders are reliant on these platforms, opting for a hosting provider that adapts their servers to ensure the seamless functionality of these platforms is essential for performance and stability.
Maintenance Windows
In the Forex industry, disruptions can result in significant financial losses. Forex hosting providers are committed to maintaining a high uptime guarantee to ensure uninterrupted trading activities. Uninterrupted access to trading platforms is crucial for brokers and traders, so opting for a forex hosting provider who understands and prioritises the importance of this is essential for mitigating potential downtime.
Specialized Forex Hosting with NetShop ISP
Ensure reliable, fast and secure hosting for your MT4 or MT5 trading platforms with NetShop ISP Forex hosting solutions. With years of industry experience, NetShop ISP has perfected tailored hosting solutions specifically designed to meet the intricate demands of traders and brokers.
To speak with a specialist, visit our website here.