How to Update cPanel License Key on VPS/Dedicated Server
In this article we will show how to easily update a cPanel License on a VPS or Dedicated Server. This is needed in cases when you are switching from a trial cPanel license to a paid one, switching from one license provider to another, or when you are dealing with the renewal of an expired license.
In this article we will show how to easily update your server’s cPanel License. This is needed in cases when you are switching from a trial cPanel license to a paid one, switching from one license provider to another, or when you are dealing with the renewal of an expired license.
Pre-requisites / What You Need To Have
Root or root-privileged account on server
SSH Access
A valid cPanel license
Step 1. Verify cPanel License
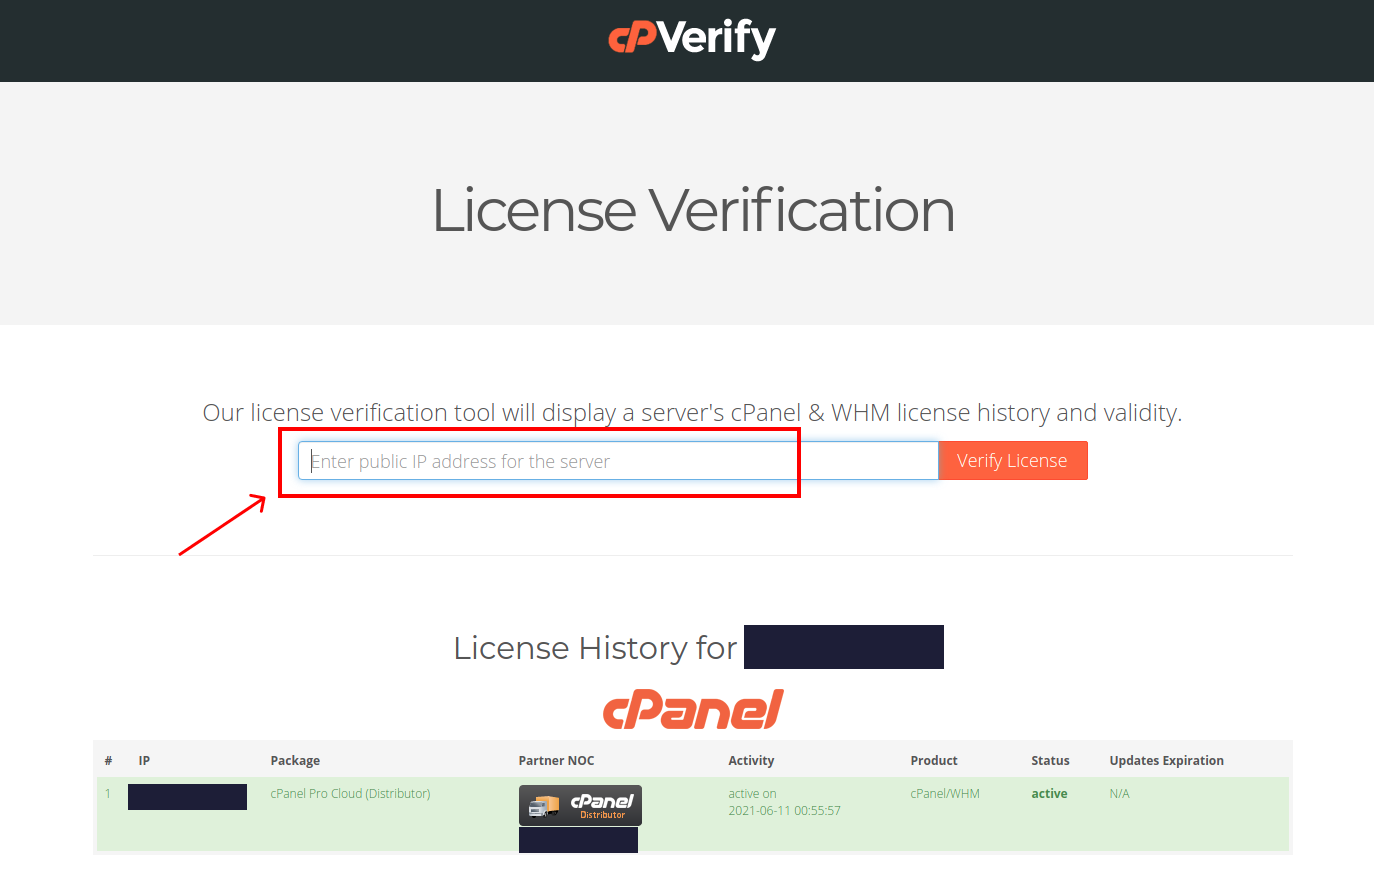
Firstly, you need to check if your VPS/Dedicated Server has a valid cPanel License. To do so, follow these steps:
Enter your Server’s IP Address in the corresponding text box and click the “Verify License” button
How to verify your cPanel License
If you have a valid cPanel license (Status Active as shown in the above screenshot) then you can proceed with the following steps in this tutorial.
Step 2. Run the cPanel License Key Update Script
cPanel offers a script which checks the status of the license and updates the server’s license accordingly. To run this script follow the steps below:
Login to your Server as root e.g. ssh root@server_ip_address
Execute this command: /usr/local/cpanel/cpkeyclt
Allow a few seconds and then you should see the following message:
Success! Your cPanel license has been updated on server and you can now login to WHM/cPanel.
Fully Managed cPanel Web Hosting in Cyprus, Malta and UK
Now you can host your website and e-mails in our fast and optimized cloud hosting environment with Free cPanel.
Our web hosting plans start from €5 per month and are available in Cyprus, Malta and the United Kingdom.
If you are interested for VPS or Dedicated Servers, cPanel Control Panel can be purchased as an addon service/license.
Ultimate FinTech Awards 2021 – Winners Announced
Today, 10th of June 2021, Ultimate FinTech Awards announced the Winners of the 2021 Awards.
The 2021 FinTech Awards included 3 main categories; Global Awards, Regional and Country-level Awards.
Today, 10th of June 2021, Ultimate FinTech Awards announced the Winners of the 2021 Awards.
The 2021 FinTech Awards included 3 main categories; Global Awards, Regional and Country-level Awards.
Among the winning entries, industry-leading firms appear in the spotlight:
FXCM – Broker of the Year, Best Customer Service, Best Trading Platform
Ultimate FinTech is a Marketing & PR Agency with 10+ years of experience in events planning and marketing solutions, with a deep specialisation in the fintech sphere. Ultimate Fintech is the producer of the renowned iFX EXPO, a well-established Forex and Fintech event that is held in Europe and Asia.
How to convert Windows 2016 Server Evaluation edition to Standard licensed
If you have a paid license of Windows Server 2016 Standard, you may have already tried to activate it using the product key unsuccessfully. This is because you need to convert the Evaluation license into Licensed, and then activate the Standard edition with your paid product key. In this tutorial we show you how to activate the Evaluation edition in 2 simple steps.
Windows Server 2016 is available for download and usage under a 180-day trial period. Whilst this is useful for system administrators who want to use it for a short period of time for testing purposes, the server will stop working properly when the evaluation period expires.
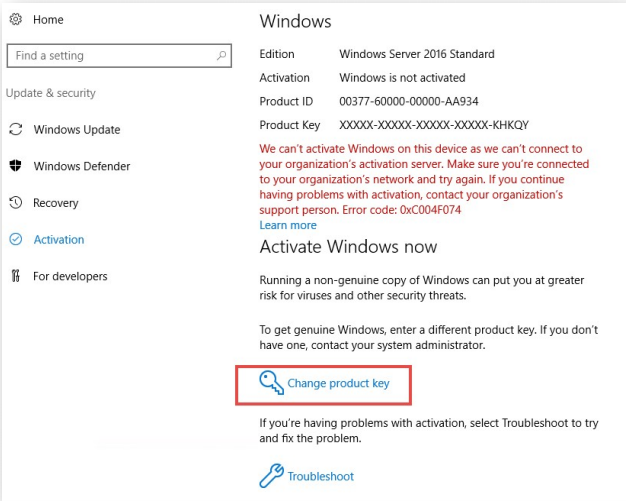
If you have a paid license of Windows Server 2016 Standard, you may have already tried to activate it using the product key unsuccessfully. This is because you need to convert the Evaluation license into Licensed, and then activate the Standard edition with your paid product key.
Activating Windows Server 2016 Evaluation editionUnsuccessful activation of Windows Server 2016 Evaluation into Standard
In this article we will show you, step-by-step, how to convert & activate your Windows Server 2016 Evaluation into Standard.
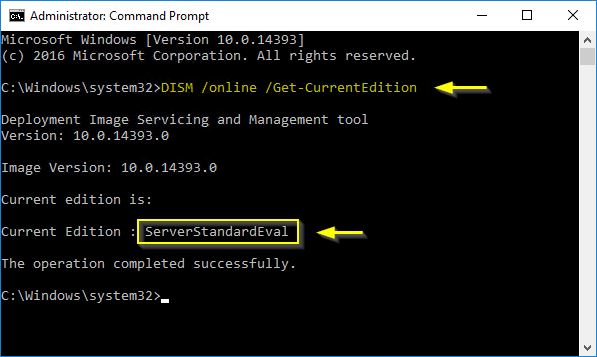
Step 1: Verify current version
Using command prompt or Powershell terminal, type the following command:
DISM /online /Get-CurrentEdition
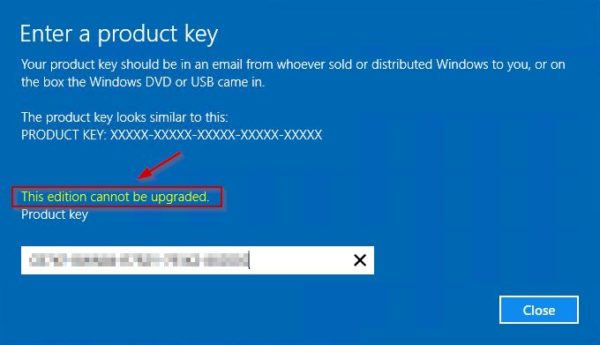
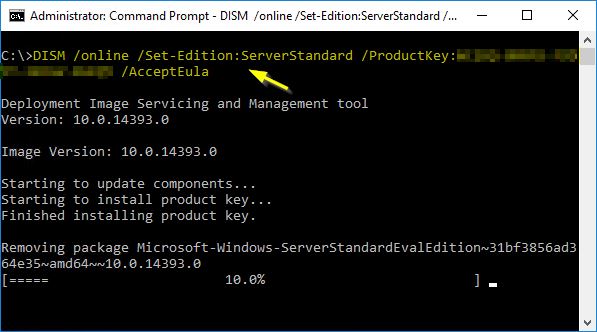
Step 2: Convert Evaluation edition to Licensed
At this step we need to convert our Windows Server 2016 Evaluation Edition into Licensed, so we can then proceed with activation. In your command prompt or Powershell terminal type the following command (where XXXXX please use your paid product key):
Upon completion, you will be prompted to restart your computer, type Y to restart your Windows Server.
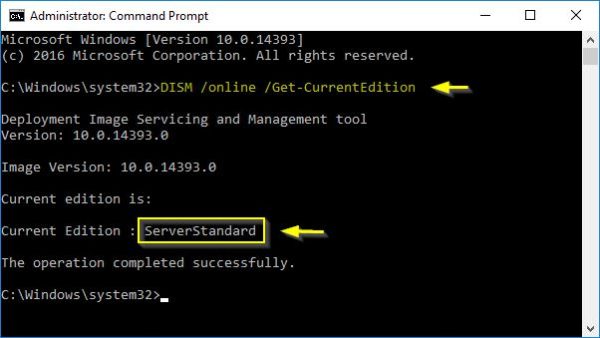
Step 3. Verify your new Windows Server Edition
Once your Windows Server is back online, verify that it is now running on Standard licensed edition. To do so, open a command prompt or Powershell and type the following command:
DISM /online /Get-CurrentEdition
Your Windows Server 2016 has now been successfully activated!
Pay Monthly for Windows Server Licenses
NetShop ISP offers a wide-range of Microsoft Licenses under SPLA, which means you no longer need to pay for expensive, perpetual licenses.
Contact our Sales team with your desired Microsoft license which you can pay month-to-month, without a long-term commitment. All our Licenses can be combined with Dedicated Servers, Colocation and Cloud/VPS Hosting plans.
How to Choose the Best VPS for Forex Trading
In this article we’ll look at the benefits of using a VPS for Forex trading with cTrader, MT4 and MT5, and how to choose the best Forex VPS plan that suits your needs.
‘Where do I begin with Forex Trading?’ is one of the most common questions amongst those just starting out. Whilst there are many elements that come into play when it comes to trading Forex successfully, a key component is utilizing a Forex VPS. In this article we’ll look at the benefits of using a VPS for Forex trading, and how to choose the best one.
What is a VPS
A Virtual Private Server (VPS) is now extremely common amongst Forex Traders, with it being a key factor in successfully implementing automated trading strategies. In terms of resources and performance, a VPS somewhat replicates a dedicated server environment, at a more affordable price. A VPS operates with the use of hypervisor technology, which partitions one physical server into many individual virtual servers, each of which are highly-secure and unaffected by each other.
Why use a VPS for Forex Trading
Generally speaking, a VPS can help you trade Forex smarter, faster and without interruptions. Let’s break it down slightly.
Automated trading
One of the best things about Forex trading is the ability to literally make money in your sleep – but that’s not possible without the necessary resources. Opting for a Forex VPS provides a stable environment that’s always available, allowing you to continue trading when your personal computer is turned off or in the event of a power outage.
High performance
In order to achieve the quotes you want, you need to act fast. A VPS provides fast, reliable connectivity and minimal downtime, which prevents delayed execution and losses due to slippage. In a nutshell, by utilizing a VPS you can effectively increase your profits.
Robust Security
Keeping your data secure when trading Forex should be amongst your biggest priorities. A VPS offers high-level security with monitoring systems in place to ensure your data is protected. Not to mention the additional comfort of having customer support available to assist you when you need it.
Choose the right Forex VPS
Server locations
Opting for a VPS within close proximity of prime financial locations guarantees low latency that is essential when trading Forex. NetShop ISP has state-of-the-art data centers strategically situated in key financial centers like the Netherlands, Singapore and the United Kingdom.
Trading platforms
Choosing a VPS hosting provider with a clear understanding of the Forex industry will be greatly beneficial to you. In this case, it’s likely that your VPS will be fully optimized with Forex terminals like cTrader, MT4 and MT5 preinstalled and fine-tuned to work seamlessly with any Expert Advisor (EA).
Customer support
Following on from that point, a VPS hosting provider that is experienced in the Forex industry will also be able to offer you a higher level of support. Make sure to opt for a provider who offers 24×7 technical support and is easy to reach through a variety of communication methods.
The Best Forex VPS with NetShop
With over a decade of experience in the Forex industry, we know exactly what works for Traders. Our Forex VPS offers super low latency trading with plans starting from as little as €9.99 per month, and an added discount when you opt to pay annually!
For questions about our Forex VPS or any other service, please get in touch with our team.
How to Buy Web Hosting with Free cPanel
cPanel is a great tool to manage your web hosting account and websites easily. Learn more on how to get Free cPanel with your web hosting service.
If you’re just getting your website up and running, you’re going to need reliable web hosting to make your site available online. In addition to that, you’re also going to need some other tools that will make maintaining and managing your website and web hosting account easy and straightforward – that’s where cPanel comes in. So keep reading to find out how to buy web hosting with free cPanel.
What is web hosting
Let’s start with the basics. You need some form of web hosting in order for your website to be accessible online. Put simply, web hosting is allocated space on a server where all of the files that make up your website are stored, and therefore available for users to access.
What is cPanel
cPanel is an online control panel that is specifically designed to simplify server and website management. cPanel is amongst the most popular control panels due to its user-friendly, intuitive dashboard that makes completing a huge range of tasks extremely simple.
Not everyone who has a website necessarily has the knowledge and expertise to carry out complex server management tasks. cPanel is extremely easy to navigate, allows the user to manage all elements of their web hosting account and complete a range of tasks like managing domains and creating email accounts.
Benefits of cPanel
The advantages of cPanel Web Hosting are plenty. Here are our top four.
Ease of use
Simplicity is key and as we mentioned, that’s exactly what cPanel provides. The control panel offers an easy and efficient way to execute a multitude of tasks without having any extensive technical knowledge. The interface is really very simple, and all functions can be easily found on one page. So even if you’re a beginner, it won’t take you long to get the hang of things.
Compatibility
Not only is cPanel really easy to use, it’s also compatible with all web browsers and a variety of plugins. So you can access your cPanel from whichever browser you prefer using, like Google Chrome, Safari or Firefox, to name a few.
Features and functionality
As we mentioned, cPanel offers users a huge range of useful server and website management features that make all the difference in keeping websites running smoothly. Features include easy domain management, file management and backups, simple software installation and much, much more.
Security
cPanel is the ideal solution to managing your website, and it also acts as an additional security measure too. cPanel provides various proactive security tools to ensure your sites and server are safe from breaches, like password protected directories, SSH access and simple SSL installation.
Buy Web Hosting with free cPanel with NetShop ISP
So we’ve covered everything you need to know about web hosting and cPanel, so let’s get to the good stuff. Here’s how to buy web hosting with free cPanel.
Visit our website here and choose from our Malta, Cyprus or UK cPanel web hosting. Once you’ve done that you’ll have a range of plans to choose from, starting from just €5 per month – if you opt to pay yearly you’ll even get a 17% discount on us!
Select order now and make your way through our simple order process. If you have any questions or require any assistance, feel free to get in touch with our team.
With over 16 year’s industry experience, we’re delighted to be able to offer our clients a top of the line service at a reasonable price.
How to choose the best location for a VPS Server in 2021
VPS Hosting is an ideal option if you are seeking for high resources at an affordable price. In this article, we’ll look at what things to consider when choosing the location of your VPS Server in 2021.
If your online business is expanding and you’ve outgrown shared hosting, taking the next step to VPS hosting could definitely be the right choice for you, as it provides a lot more resources at an affordable price. So if you’ve already decided to opt for a VPS, you need to make sure it’s in the best possible location for you, too. In this article, we’ll look at what things to consider when choosing the location of your VPS Server in 2021.
What is a VPS
A Virtual Private Server (VPS) is a form of hosting where one physical server is partitioned with hypervisor technology to create multiple Virtual servers – each with their own set resources, like memory and disk space. A step up from shared hosting, a VPS offers a great middle ground when shared hosting is no longer viable and you’re not quite ready for a dedicated server.
As one of the most popular hosting choices, a VPS is beneficial for many reasons. Let’s take a look at a few of the advantages of a Virtual Server.
Main benefits of a VPS
VPS is reliable
VPS hosting increases reliability and performance by ensuring that your website is not impacted by other websites on the same server. A VPS emulates a dedicated server, meaning other sites cannot affect the uptime or performance of yours.
VPS is cost-effective
You may be surprised to find out that a VPS does not actually cost much more than shared hosting, and with the amount of resources, high level of performance and stability you get, VPS hosting is most definitely a bargain!
VPS is easy to scale
Another great benefit of a VPS is how it allows you to expand without interruptions and downtime. As your business grows, you’re going to need more resources to accommodate more customers and a VPS ensures seamless scalability.
Choosing the best VPS location
Here are our top tips of what to consider when it comes to choosing the location of your VPS.
Safe from natural disasters
When you’re deciding on a location for your VPS, it’s vital that the data centre where your server is located is somewhere that is low risk of natural disasters, and has infrastructure in place to withstand and prevent any power outages or connectivity issues. The safety and security of the physical server should be a huge priority.
Near to your customers
You’ve opted for a VPS to give your customers a smooth and reliable experience, and choosing one closer to your customer-base will enhance this even further with a faster connection and lower latency. Regardless of the quality of your server, physical distance should still be taken into consideration for optimal performance.
At NetShop, we have data centres strategically located in 7 global destinations including Cyprus, the Netherlands, Malta, the UK, the USA, Singapore and Hong Kong.
Privacy
Depending on the type of content you’ll be hosting, picking a VPS location that has strong privacy laws may be beneficial. Where your data is stored impacts the level of privacy and rules and regulations you’ll be subjected to.
VPS Hosting with NetShop ISP
Deploy your Virtual Server with NetShop ISP from as little at €4.90 per month and even get a huge 20% discount when you opt to pay annually!
We guarantee you 99.9% uptime, resources dedicated solely to you and a team of experts on hand 24/7. For a FREE one month VPS trial, please contact our Sales Department.
How to Buy Offshore Hosting with Bitcoin
Despite the popularity surrounding Bitcoin, it’s still relatively new and so many people are left with the question ‘What can I buy with Bitcoin?’ In this article we’ll talk about how you can buy offshore web hosting with Bitcoin, and the benefits of doing so.
Over the last few years, there has been a lot of talk about Bitcoin and other cryptocurrencies, which have rapidly attracted massive attention from investors and financial institutions. Cryptocurrencies have greatly impacted the global market, becoming increasingly valuable and gaining huge traction.
Despite the popularity surrounding Bitcoin, it’s still relatively new and so many people are left with the question ‘What can I buy with Bitcoin?’ In this article we’ll talk about how you can buy offshore web hosting with Bitcoin, and the benefits of doing so.
What is Bitcoin
Released in 2009, Bitcoin became the first cryptocurrency on the market and its influence has quickly grown and inspired – with currently over 4,000 different cryptocurrencies existing, Ethereum and Litecoin being amongst the most recognized. In a nutshell, Bitcoin is a decentralized digital currently which operates through Blockchain technology, meaning that it can function without middlemen – banks and central authorities.
Although many were skeptical at first, Bitcoin is being heavily invested in, hence its current peak value, and is now being accepted as a form of payment by many companies. Bitcoin dominates the cryptocurrency space and its success stems from a variety of different reasons – the cryptocurrency offers transparency, heightened security and little to no fees, especially when using Coinbase.
What is offshore hosting
Offshore hosting is basically hosting your website on a server at a datacenter in any location other than the one that you reside in. There are a number of potential reasons that people opt for offshore web hosting, like wanting to remain anonymous, hosting DMCA content or even just as a way to reduce costs.
Whether you opt for an offshore VPS or dedicated server hosting, there are plenty of benefits that can ultimately improve the performance of your website. If you’re interested in finding the ideal offshore hosting location, you can read more here.
Why buy offshore hosting with Bitcoin
Anonymity
One of the main reasons to opt for offshore hosting is the desire to remain anonymous and increase privacy. Offshore hosting provides a certain level of anonymity and freedom in regards to the content you will be hosting – which is exactly why paying with Bitcoin is ideal. It offers a solution for those seeking a higher level of privacy and discretion when it comes to the payment of their hosting services, and their overall operation.
Convenience
If a large amount of your income is Bitcoin, it would also make sense for you to want to pay your web hosting services with Bitcoin too. For many, it’s a simple solution that takes away the hassle of making transactions through alternative payment methods.
Low Fees
If you’re opting for offshore hosting, your hosting provider will likely not be located in the same country. Using traditional methods for international payments usually means you’ll incur a high fee and exchange costs. Opting to pay with Bitcoin guarantees low transaction fees, if any – ultimately helping you save more.
Buy NetShop ISP Hosting Services with Bitcoin
We’re proud to have led the way as the first web hosting provider in Cyprus and Malta to accept Bitcoin payments. We’ve made it even easier for our customers to buy our services with Bitcoin via Coinbase Commerce.
Simply follow our order process as normal, choose from BitPay or Coinbase Commerce under payment method at the checkout, and proceed with your payment. If you prefer, you can even request an address from our Billing department to complete the crypto payment manually.
If you have any further questions about Bitcoin payments, offshore hosting, or any of our services, please don’t hesitate to get in touch with a member of our team.
NetShop ISP Confirms Multiple Deals in iFX EXPO Dubai
Industry-leading cloud & infrastructure solutions provider, NetShop ISP, has signed multiple deals for private cloud hosting and Managed Colocation services during the iFX EXPO that took place on the 19th and 20th of May in Dubai.
Industry-leading cloud & infrastructure solutions provider, NetShop ISP, has signed multiple deals for private cloud hosting and Managed Colocation services during the iFX EXPO that took place on the 19th and 20th of May in Dubai.
The world’s largest Finance & Technology expo welcomed thousands of participants from the fintech world, including Forex brokers, CRM Development agencies, Affiliates, Liquidity Providers and Technology Providers.
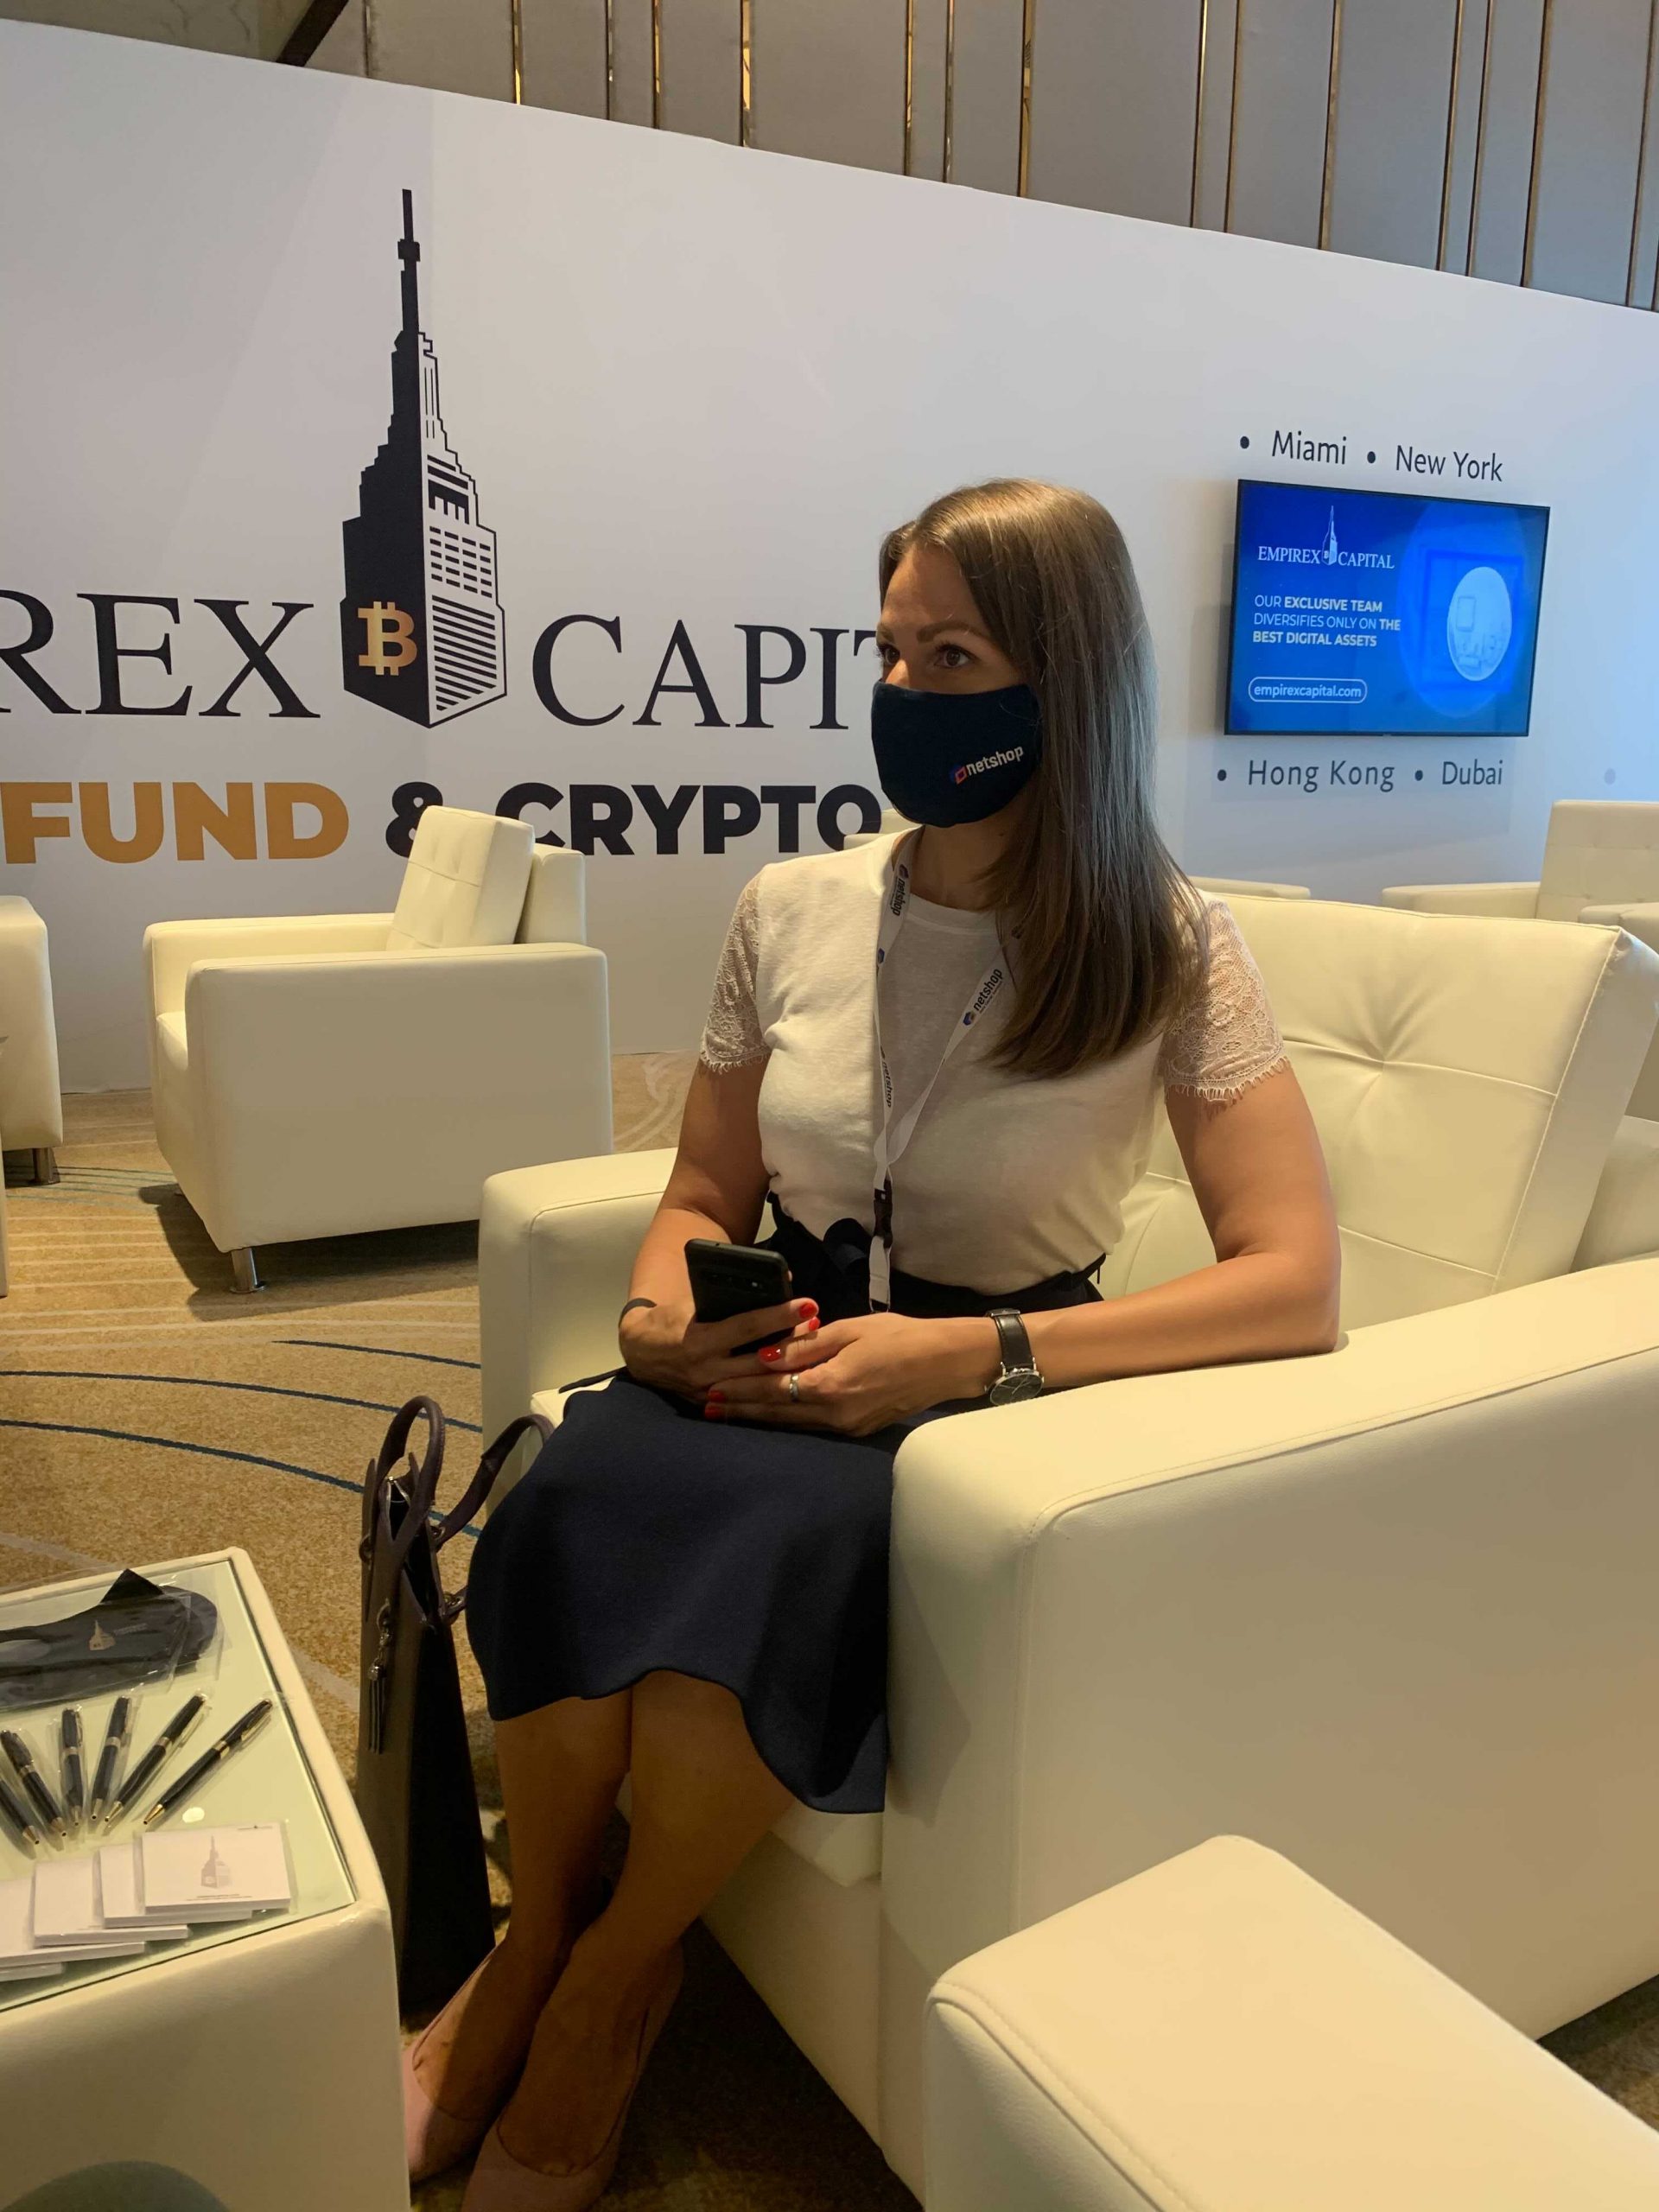
“It was exciting to attend an offline event after such a long time. We have had the opportunity to meet with existing partners and customers in the Forex industry, as well as confirm a lot of new deals mainly for our world-class Forex VPS solution. A lot of Brokers and CRM Development agencies agreed to sign up with us and integrate our solution into their own trading platform and CRMs. It has been a very busy Q1 and Q2, and i am proud to see our hard work paying off with such a game-changing product we have launched”, said Katerina Burtsava, Head of Sales at NetShop ISP.
About NetShop ISP’s Forex VPS Solution
The Forex VPS solution was first launched in 2010, where NetShop ISP was among very few hosting providers to offer Virtual servers for Forex trading purposes. Following several months of research & development, NetShop ISP announced the availability of a new version of its Forex VPS service that includes a powerful API for seamless white-label integration with any Forex Broker’s CRM.
Colocation Hosting is especially popular amongst organizations who wish to grow their in-house IT department, and therefore require a higher level of control over their hardware.
In this article we’ll take a closer look at Colocation Hosting, and in particular, the best Cyprus Colocation Hosting in 2021.
When it comes to choosing the optimal hosting solution for your business, there are various options to choose from and many factors that should be taken into consideration. Colocation Hosting is especially popular amongst organizations who wish to grow their in-house IT department, and therefore require a higher level of control over their hardware.
In this article we’ll take a closer look at Colocation Hosting, and in particular, the best Cyprus Colocation Hosting in 2021.
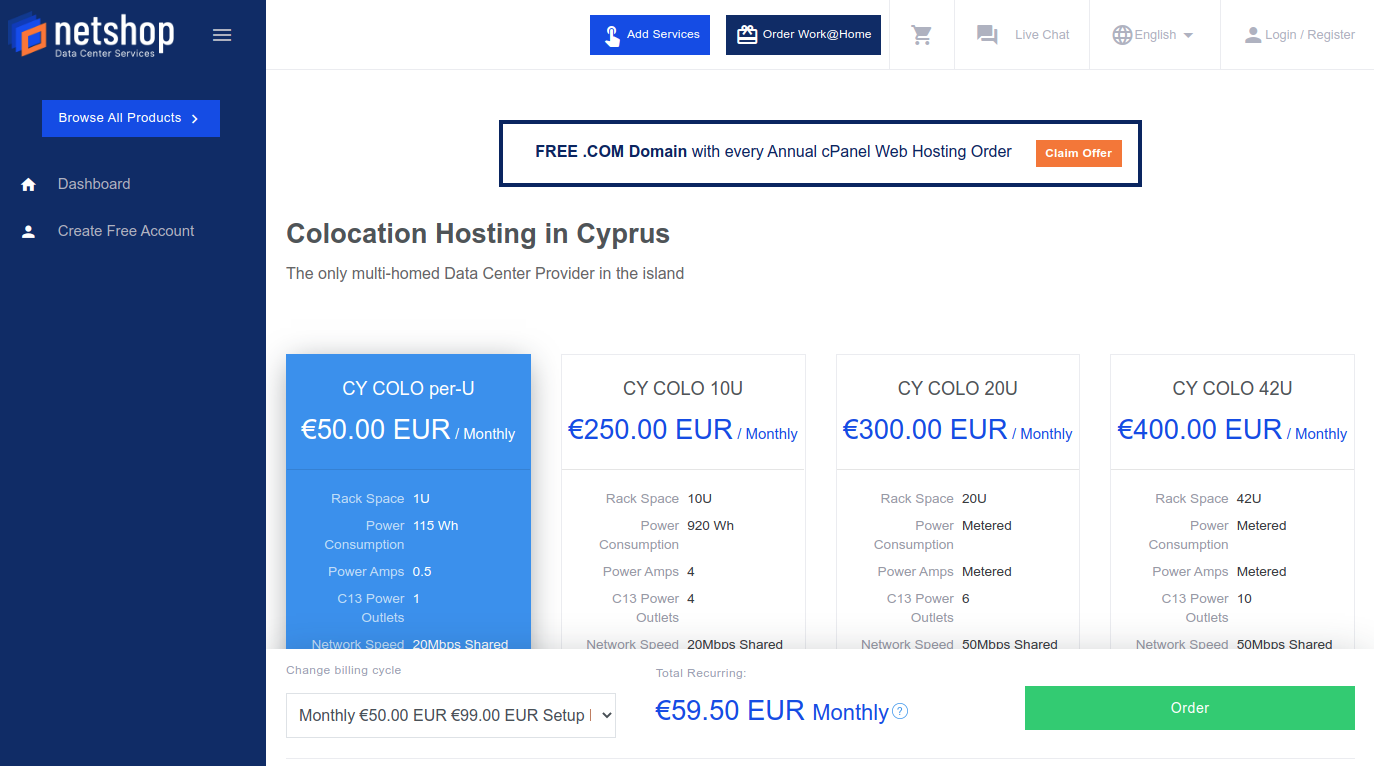
Best Cyprus Colocation Hosting plans 2021
What is Colocation Hosting
Often confused with Dedicated Server Hosting, Colocation Hosting is when companies rent space in data centers to house their own servers and equipment. Simply put, companies who opt for this service already have their own servers and are in charge of maintaining and managing them.
By opting for Colocation instead of keeping their servers internal, companies can take full advantage of the data centre’s benefits whilst keeping their costs down, and still having a very hands-on approach in terms of server control. For many, Colocation Hosting offers the best of both worlds – so let’s weigh up the benefits and take a look at what makes Cyprus great for offshore hosting.
Colocation Hosting in Cyprus
Cyprus is up there with the most popular offshore Colocation Hosting locations for a multitude of reasons. Situated in the heart of the EMEA region, Cyprus’ geographic location makes it ideal for offshore business activities.
The island is also extremely low risk from natural disasters, meaning power and internet connectivity will be the least of your concerns, and you can be rest assured that strong infrastructure is in place to handle any issues if they occur.
Apart from the location and safety, Cyprus is also a global business destination and hub for the Forex and iGaming industries, with an efficient taxation system that makes the country extremely attractive for businesses and investors.
For more information about Cyprus as an offshore hosting location, visit our website here.
Benefits of Colocation Hosting
Security
One of the biggest benefits of Colocation Hosting is the level of security it provides. Data centres have heightened security and precautionary measures in place to safeguard your servers, with strict protocols in place for access authorization – whilst also adhering to all of the necessary compliance regulations.
At NetShop ISP, all four of our state-of-the-art Cyprus data centers are monitored by 24x7x365 CCTV Security and 24/7 On-site Engineers.
Cost effective
The initial setup and operational costs of maintaining servers on your own premises can really add up. Your equipment needs to be stored in an optimal, temperature controlled environment, and the power and networking expenses do not come cheap. Opting for Colocation Hosting not only offers you the peace of mind of knowing that your servers are reliably housed, but also saves you money in the long run.
All of our Cyprus data centers are fully equipped with the latest electricity generators and cooling systems, offering the ideal hosting facilities at a reasonable price.
Performance
Colocation Hosting offers second to none performance and speeds that would not be achievable when hosting servers on-site. Direct connection to a hosting provider’s network guarantees exceptional speeds, low latency and a vaster range of connectivity options.
Our four carrier-neutral data centers in Cyprus offer you complete flexibility, reliability and a variety of bandwidth options – with access to major Internet Exchanges.
Colocation Hosting with NetShop ISP
We offer affordable, secure and reliable Colocation in Cyprus with a range of added benefits that will guarantee you a smooth hosting experience.
Our Colocation plans are scalable to your needs and we also offer various add-on services like Infrastructure Management and Hardware Firewalls. Moreover, we offer a hardware procurement service so that you don’t have to deal with multiple vendors or shipping & logistics on how to deliver your equipment in Cyprus.
For more information on our plans and services, please don’t hesitate to get in touch with our team.
NetShop ISP releases the Greek version of its Website and myNetShop Self-service Portal
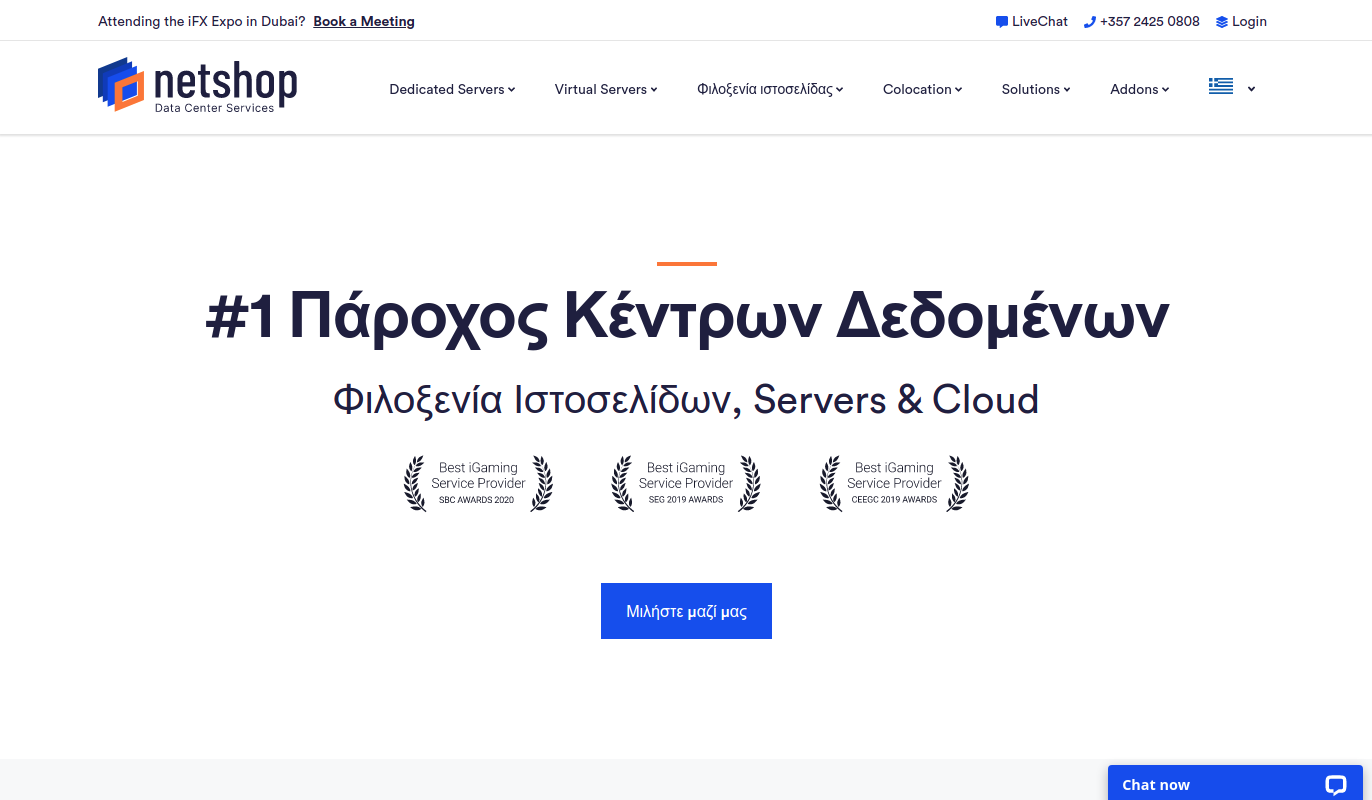
NetShop ISP, a leading Data Center & Web Hosting provider, announces today the launch of the Greek version of its main website (https://netshop-isp.com.cy/el/) and myNetShop Self-service portal (https://my.netshop-isp.com.cy/).
Larnaca, Cyprus (20th May 2021) – NetShop ISP, a leading Data Center & Web Hosting provider, announces today the launch of the Greek version of its main website (https://netshop-isp.com.cy/el/) and myNetShop Self-service portal (https://my.netshop-isp.com.cy/).
Greek version of the NetShop ISP Website
The rebranded website, released in December 2020, offers a holistic user experience, reflecting the commitment of NetShop ISP towards a user-oriented customer service perspective.
“Through our Cyprus and global Data Centers infrastructure, we have been serving Greek customers since the first years of NetShop ISP’s launch. Due to the high demand of our services by businesses in Greece, we have always been providing pre-sales, technical consulting and after-sales support in Greek, through native speakers. The launch of the Greek version of our website and the myNetShop Portal, comes to fulfill a popular demand by existing customers of ours,” said CEO of NetShop ISP, Stefano Sordini.
What’s Next?
As per the recent expansion of its data centers infrastructure in Asia and the United States, NetShop ISP is committed to provide above and beyond cloud, infrastructure and web hosting services, backed by a 24/7 customer service and technical support in multiple languages.
How To Install GNOME Desktop (GUI) on Ubuntu Server 18.04
We show you the easiest way to install GNOME Desktop on your Ubuntu server 18.04, so you can manage it via GUI (Graphical User Interface) as if you are working on your personal computer.
Ubuntu 18.04 is one of the most popular Operating systems when purchasing a VPS or a Dedicated server. If you have purchased a VPS or Dedicated Server from NetShop ISP, or any other hosting company, then most likely the distribution installed is the Ubuntu Server 18.04 which means you will need to manage your server via terminal (CLI).
In this article we will show you the easiest way to install GNOME Desktop on your Ubuntu server, so you can manage it via GUI (Graphical User Interface) as if you are working on your personal computer.
Step 1. Check Pre-requisites
All you need is access on your Ubuntu server and have a user account with sudo privileges, or the root account itself.
Step 2. Update Ubuntu 18.04
Before we proceed with the GNOME Desktop installation, you need to update and upgrade your OS packages, including the kernel. Do it by typing the following commands:
sudo apt-get update -y
sudo apt-get upgrade -y
The “-y” parameter in the end means you will not be prompted to choose Y/n during the updates and upgrades process. It will consider “Yes” automatically and proceed further.
Once the execution of tasks is completed, reboot your server:
shutdown -r now
Step 3. Install GNOME
It’s time to proceed with the GNOME installation. As this will require a lot of packages with dependencies to be installed, we will use a special tool named tasksel. Tasksel is a tool available in Ubuntu and Debian distributions which helps to install multiple related packages with their dependencies, as a coordinated task.
To install Tasksel, login to your server after it has been rebooted and type this command:
sudo apt-get install tasksel -y
Once the installation completes, continue with the following command:
sudo tasksel
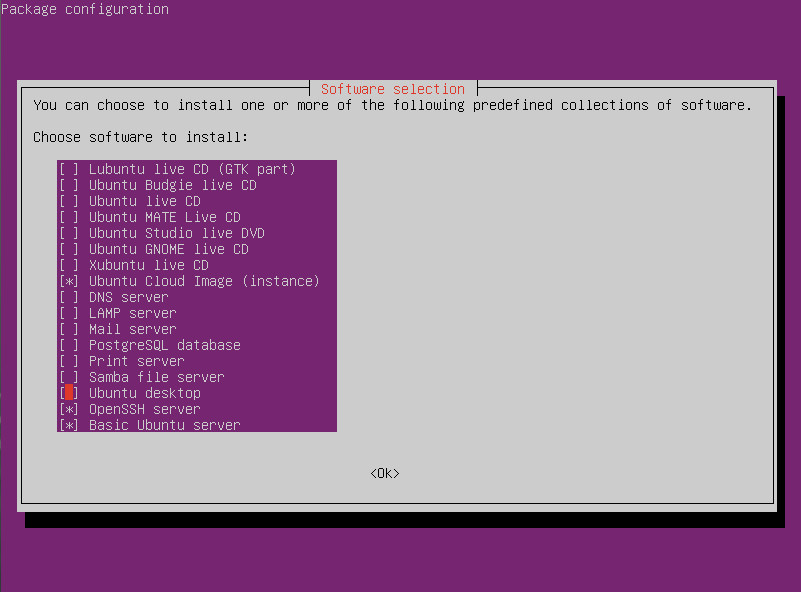
Upon issuing the above command, you will see the following screen. Scroll down in the list and select the “Ubuntu Desktop” option as indicated below.
Selecting Ubuntu Desktop for installation with Tasksel
By clicking “OK”, Tasksel will begin installing all necessary packages for the GNOME Desktop on your Ubuntu server.
Grab a coffee and allow it a couple of minutes until the installation completes. Then reboot your server again.
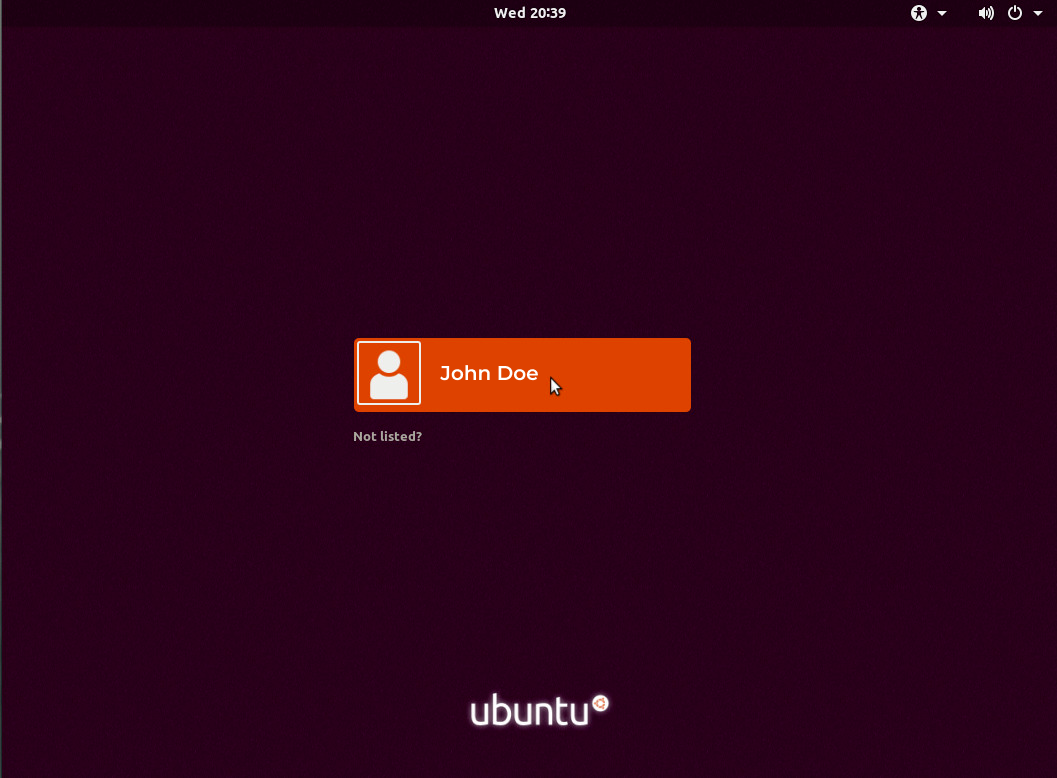
Once it’s up again, you will see the login screen by Ubuntu’s new LightDM Display Manager, as shown below.
LightDM Display Manager of Ubuntu Server GNOME Desktop
Congratulations! You have now GNOME Desktop GUI installed on an Ubuntu server 18.04!
Still Need Help?
If you are a NetShop ISP customer, then we can help further! Simply contact our Technical support team via ticket (https://my.netshop-isp.com.cy) and we can install GNOME Desktop on your Ubuntu server.
Day 1: iFX EXPO Dubai 2021 Opened its Doors to Forex and Fintech professionals
Today, 19th of May 2021, the world’s largest Fintech B2B Exhibition opened its doors to thousands of attendees and exhibitors from the Forex, Fintech and ICT industries. Meet with the NetShop ISP team during the 2 days of the event.
Today, 19th of May 2021, the world’s largest Fintech B2B Exhibition opened its doors to thousands of attendees and exhibitors from the Forex, Fintech and ICT industries.
NetShop ISP, an established Infrastructure and Technology Supplier, is participating at the iFX EXPO to showcase its world-class Forex VPS solution, meet with existing customers and partners, as well as connect with the industry’s professionals.
Let’s Meet!
It’s never too late to arrange a meeting with our team in Dubai.