NetShop ISP is delighted to announce their sponsorship of the fourth edition of FXGathering – a private networking event for C-level executives in the FinTech and Financial sectors.
NetShop ISP is delighted to announce their sponsorship of the fourth edition of FXGathering. The event, set to take place on September 20th 2023 at Captain’s Cabin in Limassol, Cyprus, is a unique networking experience that aims to connect C-level executives and high-profile individuals from the Forex and Fintech sectors.
Since its initial launch in June 2022, FXGathering has quickly become a much anticipated event that takes place during popular FX exhibitions, offering attendees the chance to increase their brand awareness and explore potential collaboration opportunities.
Astounded by the success of past gatherings in Cyprus and Dubai, NetShop ISP is proud to be organizing the upcoming edition of FXGathering in Limassol. NetShop ISP’s CEO, Stefano Sordini, comments “FXGathering embodies our commitment to building valuable connections with our industry peers and empowering other entrepreneurs to form strong partnerships that could potentially shape the future of their businesses.”
The concept of FXGathering is to offer attendees the chance to connect in a more laid-back setting after prominent exhibitions. Thousands of professionals in online trading, fintech and financial services will be in Limassol for the iFX Expo Cyprus 2023, making FXGathering a great opportunity to network and exchange ideas.
NetShop ISP Triumphs as Best Hosting Provider of the Year at SiGMA CIS/Balkans Awards 2023
NetShop ISP, a global hosting and data center solutions provider, has been awarded as Best Hosting Provider of the Year at SiGMA CIS/Balkans 2023.
NetShop ISP, a leading global provider of hosting and data center solutions, is thrilled to announce its outstanding achievement at the prestigious SiGMA CIS/Balkans 2023 event. The company has been honored with the title of “Best Hosting Provider of the Year” – a recognition that underscores NetShop ISP’s commitment to excellence in the hosting industry.
SiGMA CIS/Balkans is renowned as one of the most prestigious events in the iGaming and technology sectors, attracting industry leaders, innovators, and top companies from across the globe. This year’s event, held in [City], brought together visionaries and experts to celebrate the achievements and advancements in various segments of the technology and iGaming landscape.
NetShop ISP’s success in securing the “Best Hosting Provider of the Year” award at SiGMA CIS/Balkans 2023 speaks volumes about the company’s dedication to delivering exceptional hosting services to its igaming and fintech clients. With a track record of providing top-notch hosting solutions tailored to meet the diverse needs of businesses worldwide, NetShop ISP has solidified its position as an industry leader.
“I am extremely proud of our team and the recognition we have received as the Best Hosting Provider of the Year at SiGMA CIS/Balkans 2023” said Stefano Sordini, CEO of NetShop ISP. “This award underscores our unwavering commitment to providing the best hosting solutions to our clients. We are grateful for the trust our customers place in us, and we will continue to innovate and strive for excellence in the hosting industry.“
NetShop ISP’s hosting solutions encompass a wide range of services, including web hosting, dedicated servers, cloud hosting, colocation services and disaster recovery solutions. These offerings are tailored to meet the unique requirements of businesses across different industries, ensuring scalability, performance, and reliability.
How To Install MySQL 8.x on Windows Server 2022
In this article, we will demonstrate the easiest way to install and configure MySQL 8 on Windows Server 2022.
In this article, we will demonstrate the easiest way to install and configure MySQL 8 on Windows Server 2022.
For the purposes of this tutorial, we have used the Community Edition (CE) of MySQL and we installed it on UK DUAL VPS Server (2 Cores, 2 GB RAM, 60 GB SSD).
Pre-requisites
Windows Server 2022 with internet access
Administrator-level account
Steps to Install MySQL 8 on Windows Server 2022
Step 1 – Download MySQL CE
The first step is to download MySQL 8 Community Edition on our Windows Server. The CE edition is free and available for both 32-bit (x86) and 64-bit (x64) operating systems.
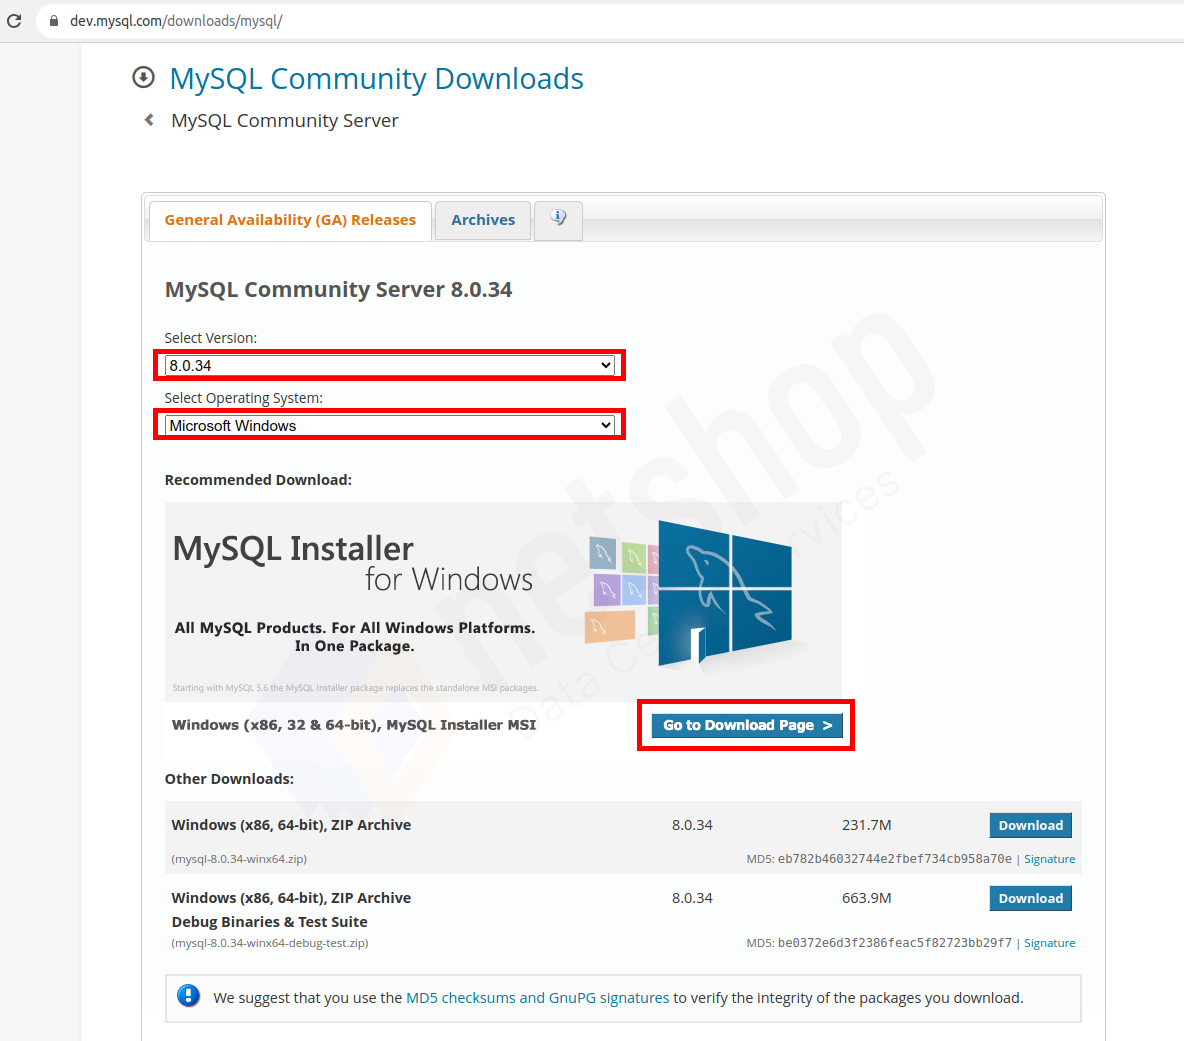
Navigate to https://dev.mysql.com/downloads/mysql
Select MySQL version
Select “Microsoft Windows” as your Operating System
Click the Go to Download Page > button
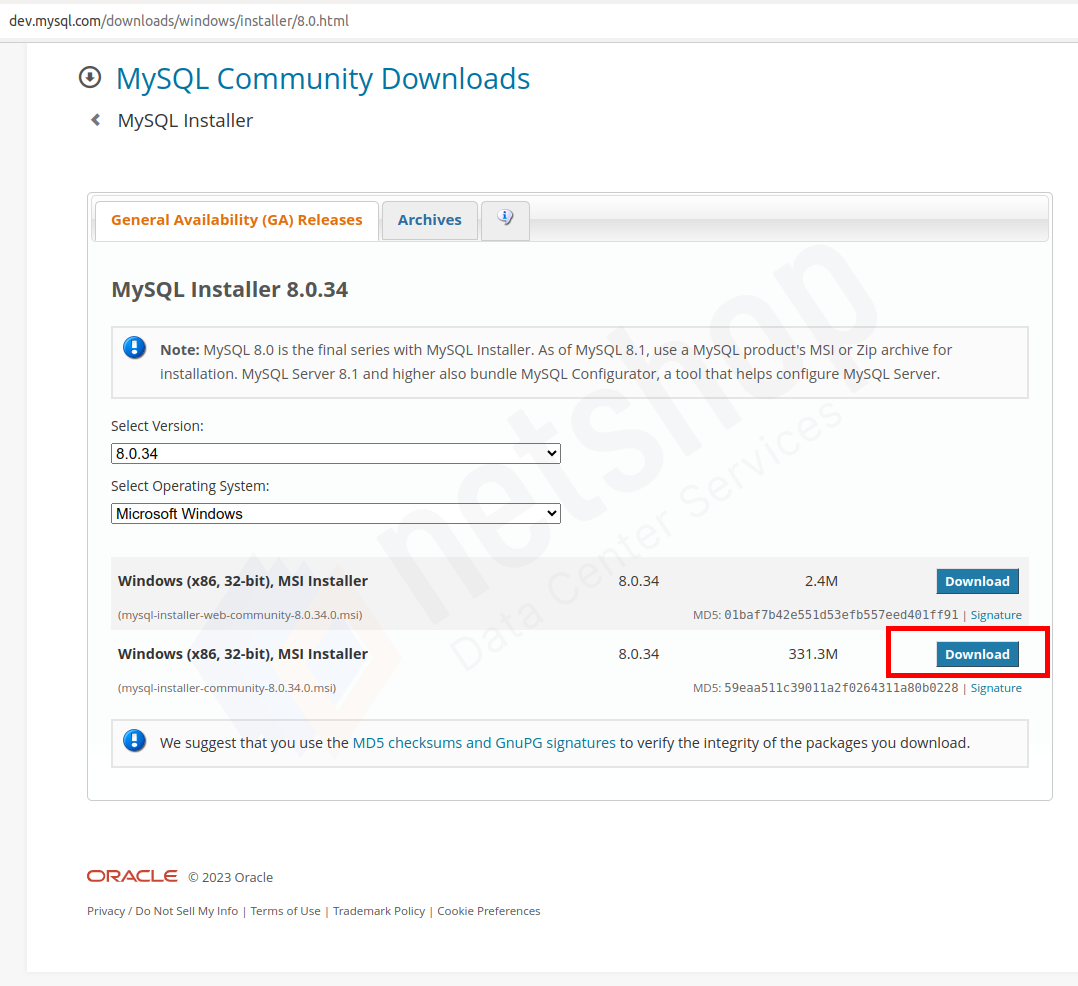
Click Download next to your desired MSI installer version. Please note that the MySQL installer for Windows is 32-bit only.
Download MySQL 8 on Windows Server 2022Download MySQL 8 MSI Installer
As soon as you click Download you will be redirected to a new page asking you to Login or Signup. Skip both options and click the link “No thanks, just start my download”.
Step 2 – Install MySQL CE on your Windows Server
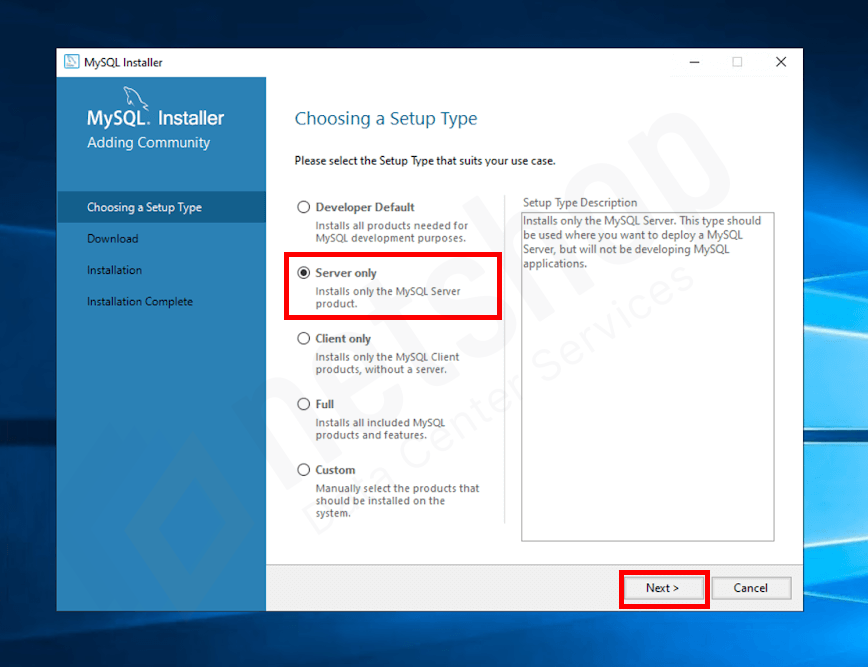
Run the MySQL installer file you have just downloaded to begin the installation of MySQL 8. Read and then accept the agreement that is displayed on the Installer Wizard.
Then, you will be asked to choose Server Type. Choose “Server only” and click “Next“.
Choose Server Type for MySQL 8 on Windows Server 2022
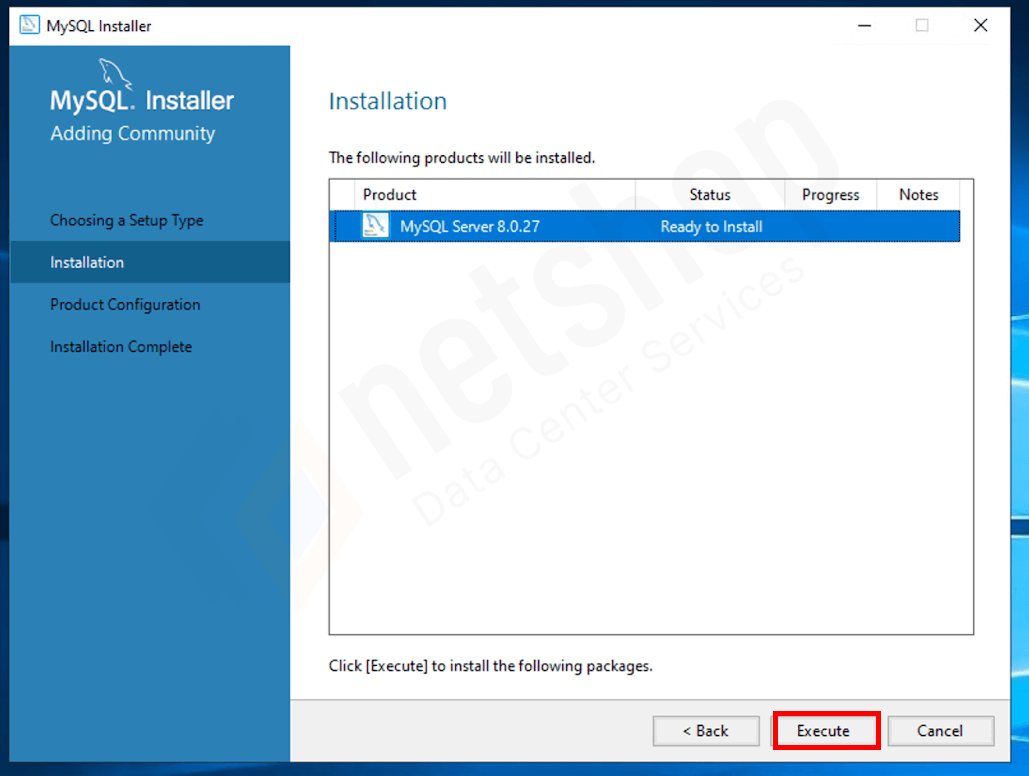
On the next screen, click the “Execute” button to begin the installation process.
Begin MySQL 8 Installation on Windows Server
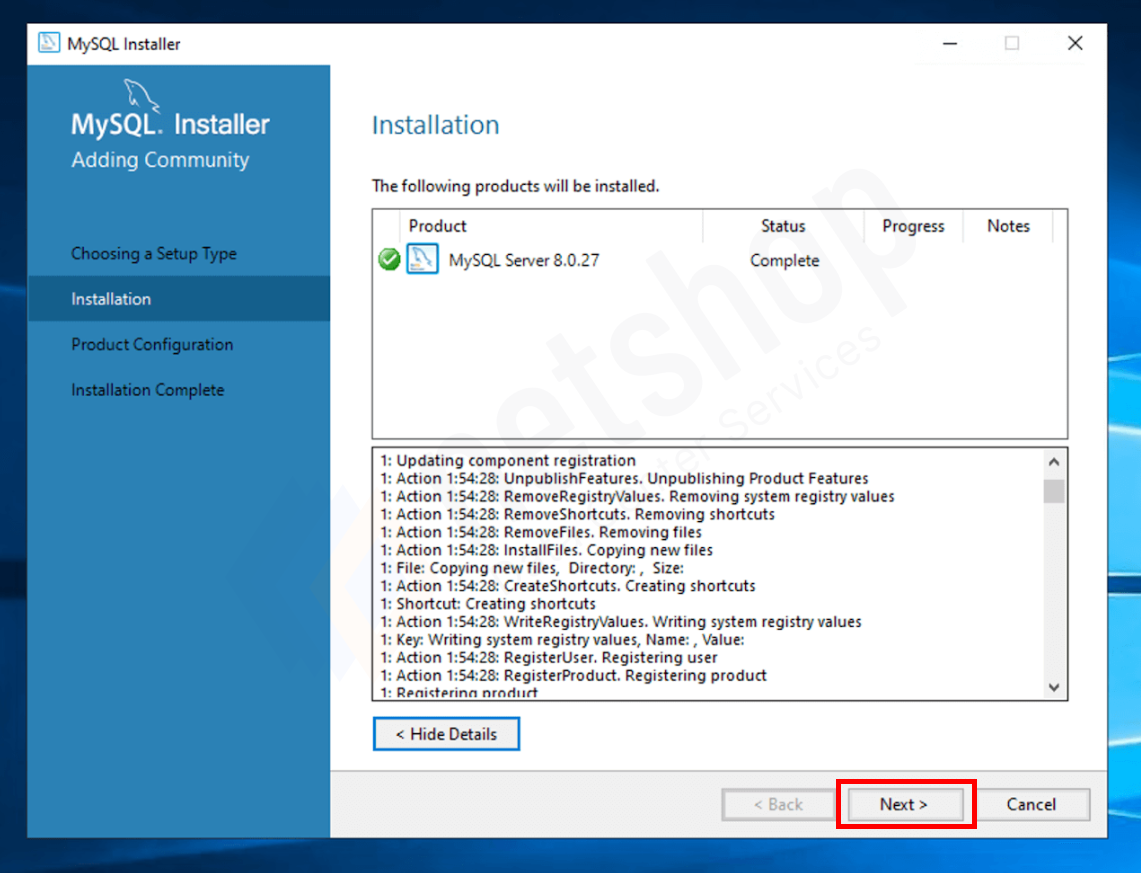
The installer will install all the necessary components required for MySQL 8 to run on your Windows Server. Once all components are installed click “Next >” to proceed to the MySQL configuration wizard.
Finalize MySQL 8 Installation on Windows Server 2022
The installation part of MySQL 8 has been completed. Now let’s move on the configuration part.
How To Configure MySQL 8 on Windows Server 2022
Thanks to the graphical interface that Windows Server offer, configuring MySQL is very easy. In all screenshots below we have highlighted in a red rectangle all those settings which are required for MySQL to run properly. If you are a beginner, we advise that you keep those as you see them in our screenshots. Advanced users can adjust those as desired.
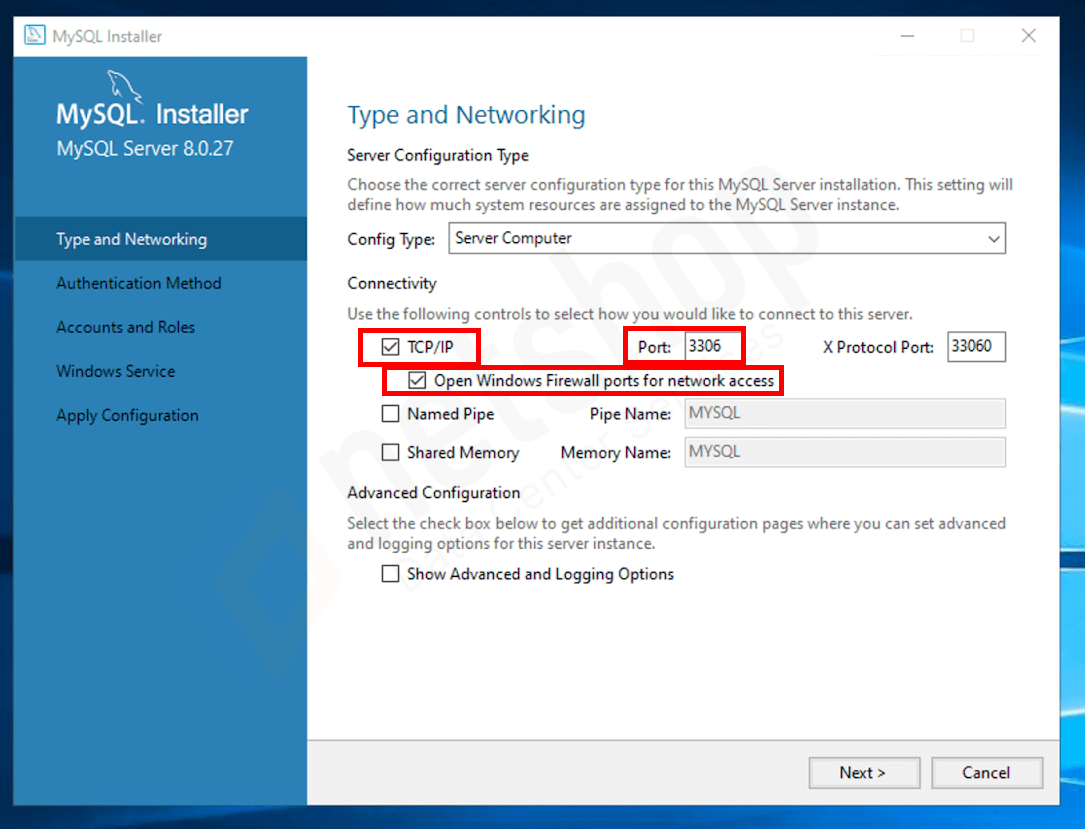
Once you have clicked Next from previous step, you will be taken to the “Type and Networking” step as shown below.
Configure MySQL 8 Networking
Choose “Server Computer” as the Config Type if you are planning to have other software and services running on the same Windows Server. You can also choose “Dedicated Machine” if your server will be used exclusively for MySQL.
Hit the Next button to proceed.
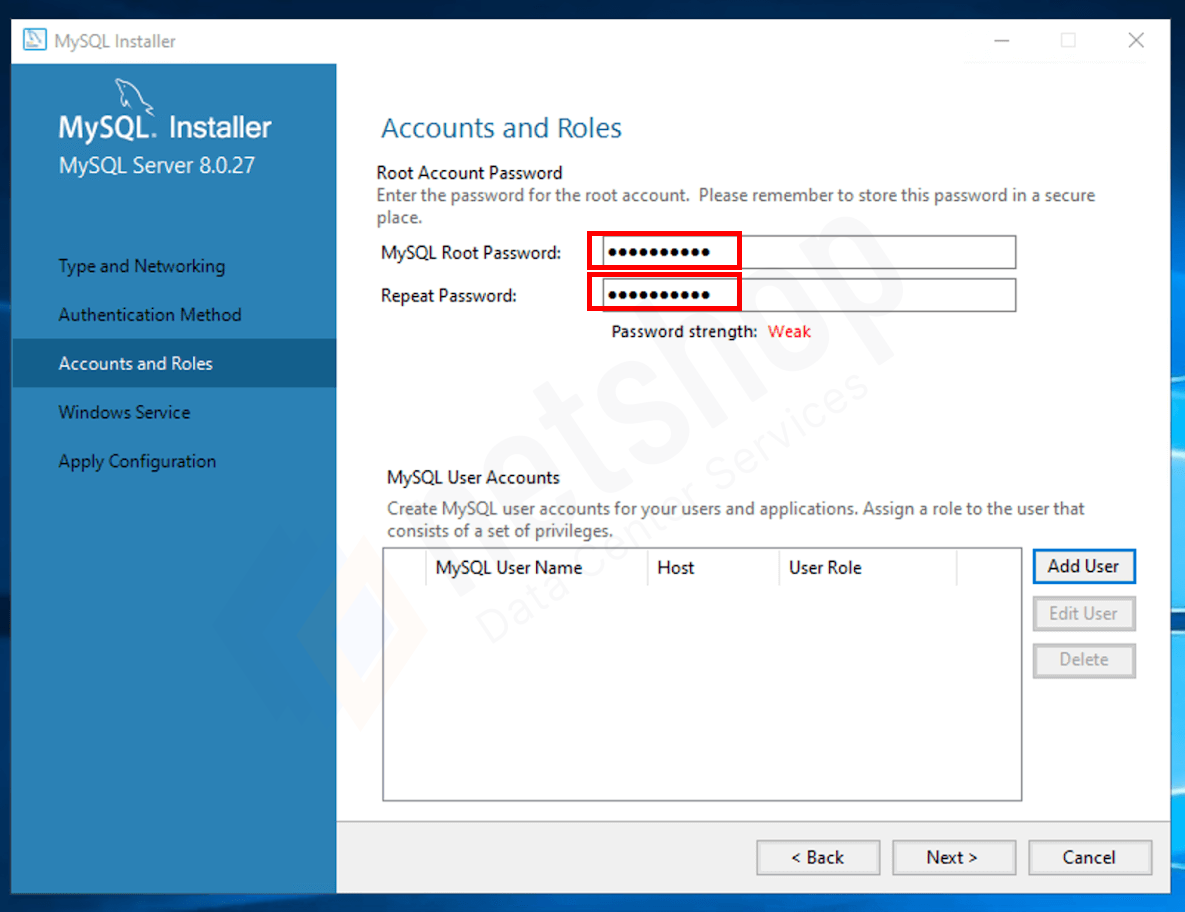
Configure MySQL Root Password
Enter a strong password for your MySQL Root account. Note it down somewhere securely as you will need it later on to connect via Command line or MySQL Workbench.
Then hit the Next button to proceed to the configuration of MySQL as Windows service.
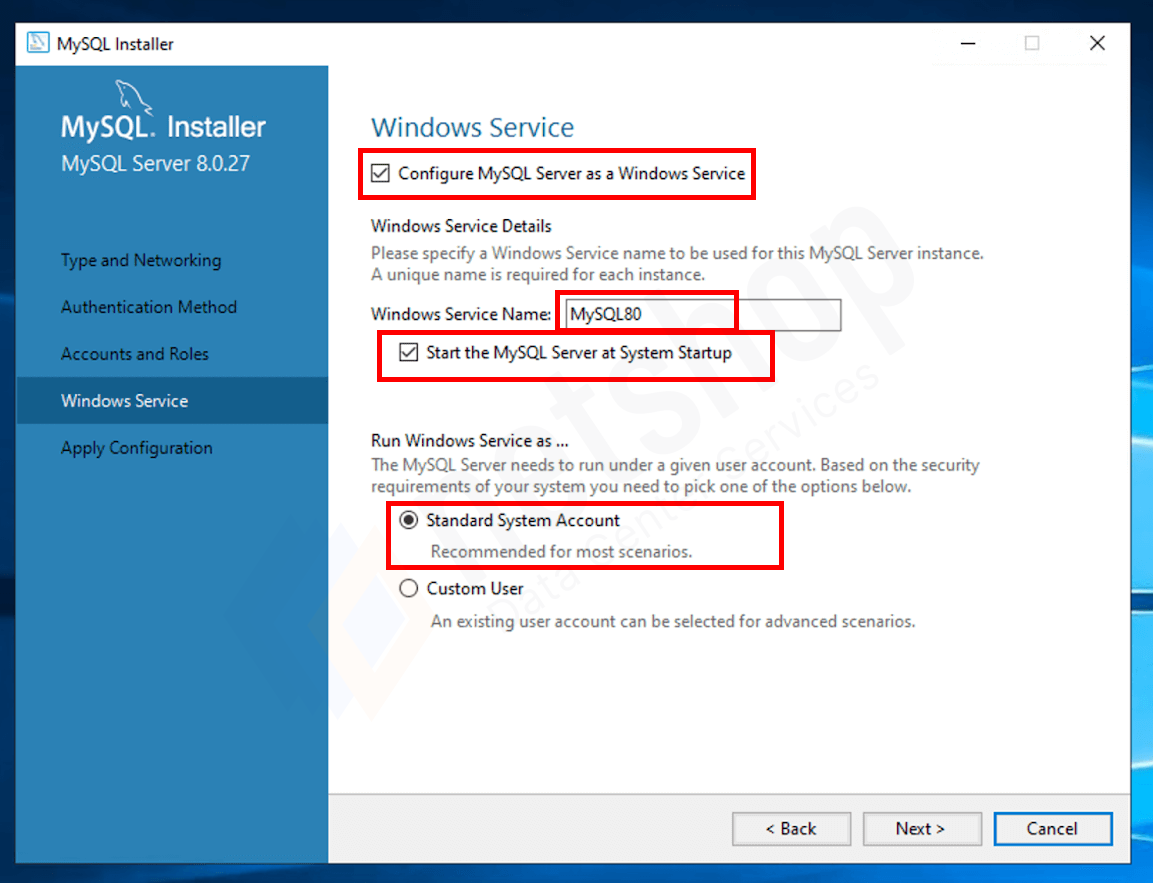
Configure MySQL 8 Windows Service
The settings used in the screenshot above are the recommended ones. Once again, if you are an advanced user you may want to change these according to your preferences.
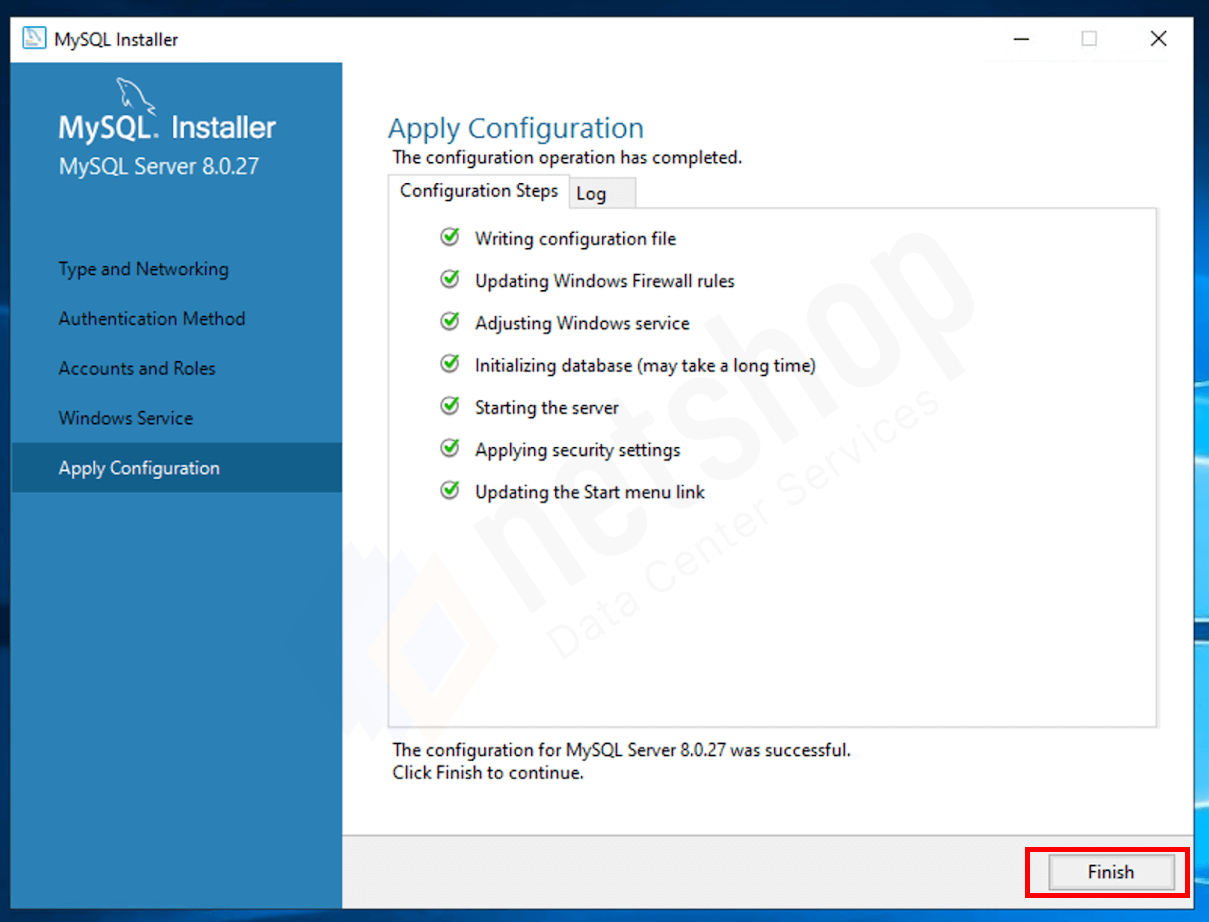
Click Next to apply the configuration of previous steps, and then click Finish.
Finish MySQL Installation on Windows Server 2022
Congratulations! You have successfully installed MySQL 8 on your Windows Server 2022!
NetShop ISP Attend iFX EXPO International 2023 in Cyprus
NetShop ISP is pleased to announce their attendance at the iFX EXPO International from September 19th to 21st 2023.
NetShop ISP is pleased to announce their attendance at the iFX EXPO International from September 19th to 21st 2023. The event, set to take place at the City of Dreams Mediterranean Integrated Resort in Limassol, Cyprus, is the first and largest financial B2B expo.
With over 4000 attendees, the iFX EXPO International is amongst the most prominent industry events, offering an unparalleled networking opportunity. Attendees can expect talks from world-renowned speakers in the field, and gain insight into important updates and the latest industry news.
NetShop ISP is looking forward to reconnecting with valued partners at this year’s iFX EXPO International, as well as creating new connections that could drive mutual growth. The award-winning Infrastructure Hosting Provider has been committed to providing innovative solutions to the financial sector since 2004, and has become a trusted partner to thousands of traders and brokers.
Stefano Sordini, NetShop ISP’s CEO, comments “The iFX EXPO International is always a great chance to exchange ideas with some of the best minds in the industry. We’re excited to hear from industry experts, as well as to offer an insight into our bespoke forex hosting and infrastructure solutions.”
You can find more information on iFX EXPO International and book a meeting with the NetShop ISP team here. We look forward to seeing you there!
NetShop ISP Exhibit at SiGMA Balkans/CIS and SiGMA FX in Cyprus
NetShop ISP is delighted to announce their participation at the SiGMA Balkans/CIS and SiGMA FX Summit (04-07 September 2023)
NetShop ISP is delighted to announce their participation at the SiGMA Balkans/CIS and SiGMA FX Summit, set to take place in Limassol, Cyprus from September 4th to 7th 2023.
SiGMA harnesses its expertise in Gaming and Blockchain to introduce SiGMA FX, an initiative which aims to connect professionals across the online trading, financial services and fintech fields to form an invaluable network.
The SiGMA FX summit will be an opportunity to cultivate collaboration, empowerment and innovation. By bringing together the very best talent in the industry, SiGMA FX presents a chance for entrepreneurs and professionals to build connections and exchange valuable industry insights with their peers.
NetShop ISP will be exhibiting in the FX Hall and showcasing a range of solutions that have proven extremely valuable to our clients within the financial sector. With a global network of data centers located in key financial hubs, NetShop ISP has been successfully providing hosting resources to thousands of traders for over 15 years.
Those attending the event will also get the chance to hear from NetShop ISP’s CEO, Stefano Sordini, as he partakes in a panel discussion about forex trading in the digital age and how leveraging technology can enhance trading strategies. The discussion will be on Tuesday 5th September at 13:50 on the main stage.
You can find more information about the SiGMA Summit 2023 and book a meeting with a NetShop ISP representative here.
Why London is the Best Hosting Location for Forex Brokers
In this article, we will take a closer look at why London is the optimal server hosting location for Forex Brokers and how it can benefit both them and their clients.
For decades London has been recognized as the world’s leading financial centre, with over 40% of all forex transactions taking place in the city. London’s strategic location and time zone provides forex traders with more opportunities to profit due to the increased volatility and higher liquidity during the ‘London session’.
The London session, also referred to as the European trading session, is one of the three trading sessions that are responsible for keeping the forex market open 24 hours a day. As the middle session, it overlaps with the Asian and American sessions, meaning the majority of trades happen within that period. This, along with various other reasons, makes London hosting ideal for Forex Brokers.
In this article, we will take a closer look at why London is the optimal server hosting location for Forex Brokers and how it can benefit both them and their clients.
Benefits of London Hosting for Forex Brokers
Global Financial Hub
London is home to some of the world’s biggest financial institutions like the London Stock Exchange as well as many of the world’s largest banking groups. London’s reputation as a leading and well-connected financial hub has been cemented over hundreds of years, attracting businesses and investors from all over the world. This makes hosting in London ideal for Forex Brokers looking to establish themselves within the industry.
Central Location
London’s geographical location has made it somewhat of a gateway between Europe and the rest of the world. As mentioned above, the London time zone also provides brokers and traders with a significant advantage, as morning in London overlaps with evening trading in Asia, whilst afternoon in London overlaps with the opening of US trading. London is the ideal hosting location for Forex Brokers as it is in close proximity to major liquidity providers, and therefore guarantees low latency, reduced slippage and faster trade execution.
Infrastructure
Another advantage to hosting in London is the city’s robust technological infrastructure. London provides the high-quality, reliable and fast connectivity that is essential for Forex Brokers. NetShop ISP’s latest London Data Center (Equinix LD7) has direct connectivity to the London Internet Exchange (LINX), one of the largest Internet Exchanges in the world. In addition to that, London is attracting a lot of retail Forex brokers as they seek to host their trading platforms in close proximity to Technology and Liquidity Providers who are also hosted in London.
Ultra-low Latency Hosting in London with NetShop ISP
NetShop ISP is an award-winning Data Center Services & Server Hosting Provider, with almost two decades experience within the Financial Markets. NetShop ISP’s state-of-the-art London facilities are ideal for Forex Brokers seeking secure, ultra-low latency VPS or dedicated servers.
As of 1st of May 2023, NetShop ISP offers Dedicated Servers and Cloud VPS through its brand-new infrastructure located at Equinix LD7 in London. Visit our website for more information on our UK Data Centers, VPS hosting and Dedicated Servers at Equinix’s LD7 Data center.
NetShop ISP Support Cyprus FinTech Summit 2023
NetShop ISP is excited to announce their endorsement of Cyprus Fintech Summit 2023 as the official Web Hosting partner.
NetShop ISP is excited to announce their endorsement of Cyprus Fintech Summit 2023 as the official Web Hosting partner. The event, which will take place on September 1st 2023 in Limassol, Cyprus, will bring together distinguished speakers to discuss the future of technological innovation in financial services.
The panel of industry specialists will be giving their valuable insight on the ever-evolving landscape of fintech, crypto and blockchain, as well as the transformative potential of banking and payment institutions. Attendees will have the opportunity to partake in meaningful discussions and exchange knowledge and insights with their industry peers.
As well as supporting CyprusFinTechSummit as their Web Hosting partner, NetShop ISP will also be exhibiting at the event. Having been heavily involved in the financial markets for almost two decades, NetShop ISP has become trusted partners to businesses within the Forex, Banking and Blockchain industries. With infrastructure strategically located in prominent financial regions worldwide, NetShop ISP can guarantee seamless connectivity and performance for businesses of all sizes.
Visit our booth at the CyprusFinTechSummit and have a chat with our hosting experts. Look forward to seeing you all there. You can find more information on the event and book a meeting with NetShop ISP’s team here.
How To Install NodeJS on cPanel/WHM
In this article we will cover all steps you need to do to install NodeJS on cPanel/WHM server using EasyApache4.
In this article we will cover all steps you need to do to install NodeJS on cPanel/WHM server.
About cPanel/WHM
cPanel/WHM is one of the most popular, non-free control panels. It is widely used by web hosting companies, system admins and web developers as it offers an intuitive interface for managing a Linux server, websites, ftp and email accounts.
About NodeJS
Node.js is an open-source Javascript runtime environment that allows developers to create front- and back-end applications. It’s operating system agnostic, meaning that it can be installed on any operating system; Windows, Linux and MacOS.
Steps to Install NodeJS on cPanel
For the installation of NodeJS on cPanel we will use the EasyApache4 tool that you can find on WHM GUI. It’s the fastest way to install NodeJS and does not require experience on linux server commands.
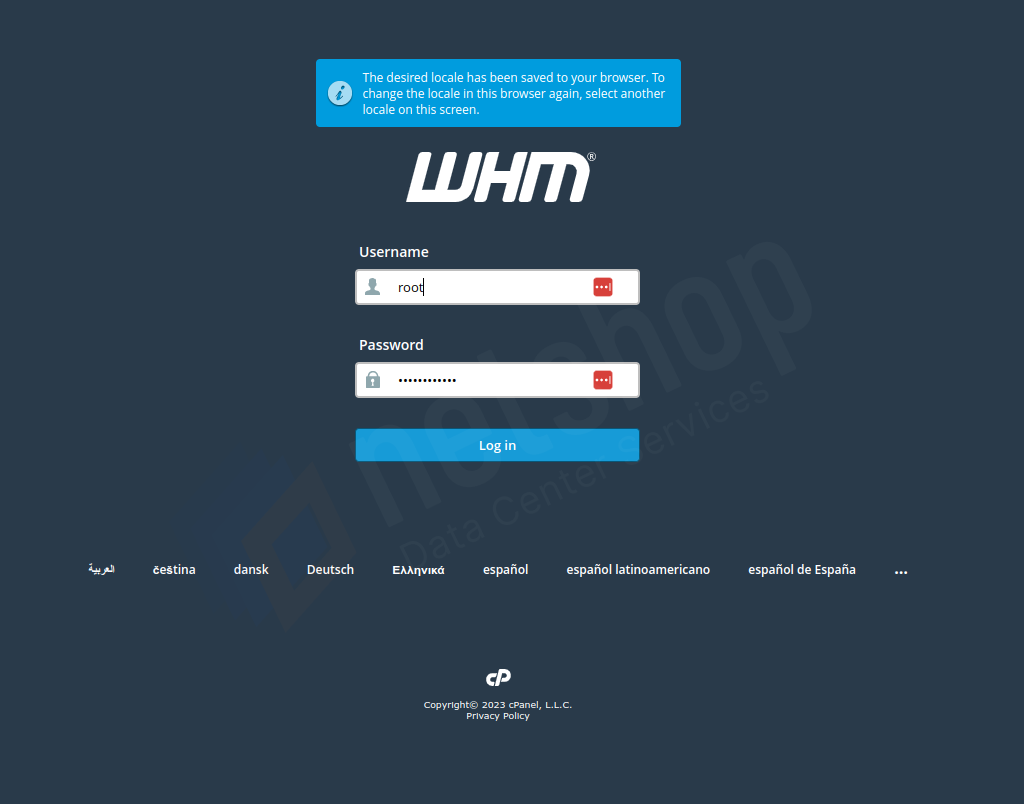
Step 1 – Login to cPanel/WHM
Login to your cPanel/WHM by browsing to your IP address or hostname followed by :2087 or /whm.
Example: https://mydomain.com:2087 or https://IP_ADDRESS/whm
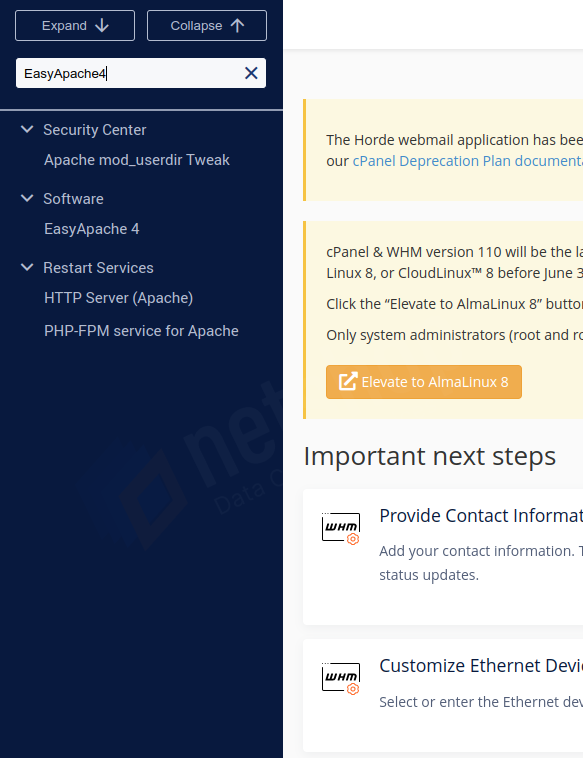
Step 2 – Go to EasyApache4
From the top left search field, search for EasyApache4 and click the related entry.
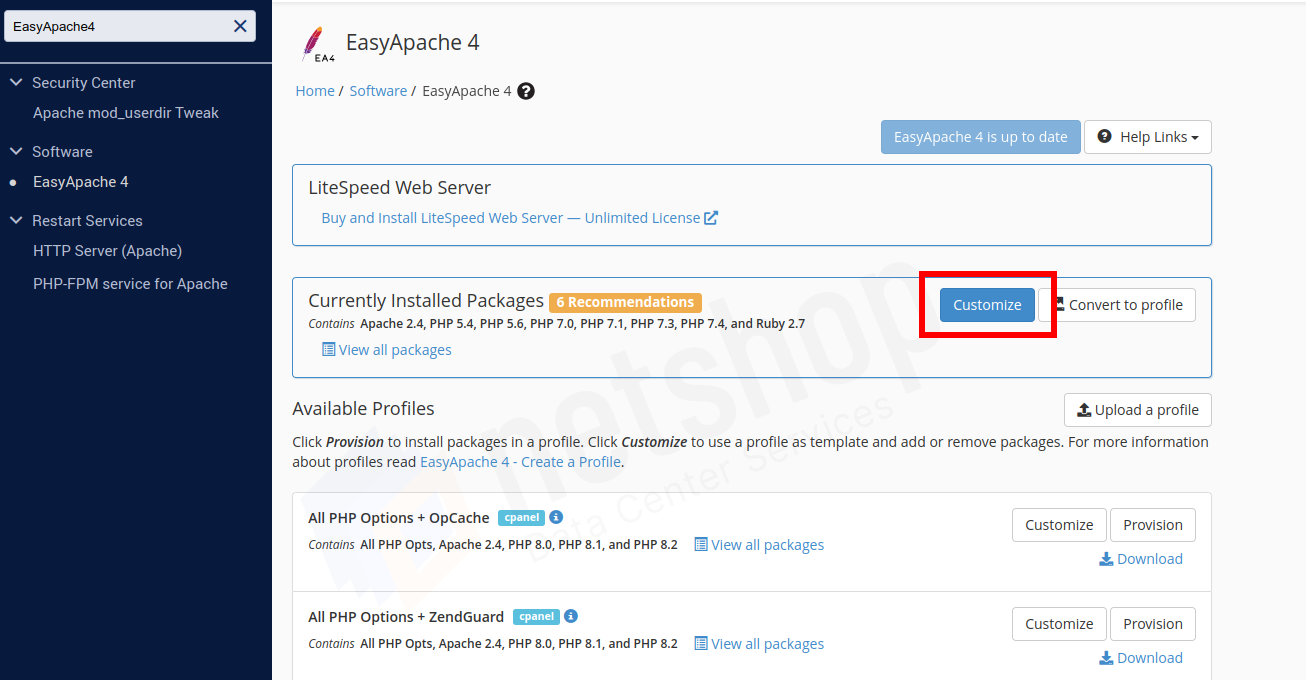
Step 3 – Customize EasyApache4
At the top of the page you will find a section called “Currently Installed Packages”. This is the profile that contains your currently installed packages, which you need to customize in order to install nodejs.
Step 4 – Install NodeJS from Additional Packages
From the left sidebar, click the “Additional Packages” tab, search for NodeJS and toggle the related entry. Then click “Next” to proceed.
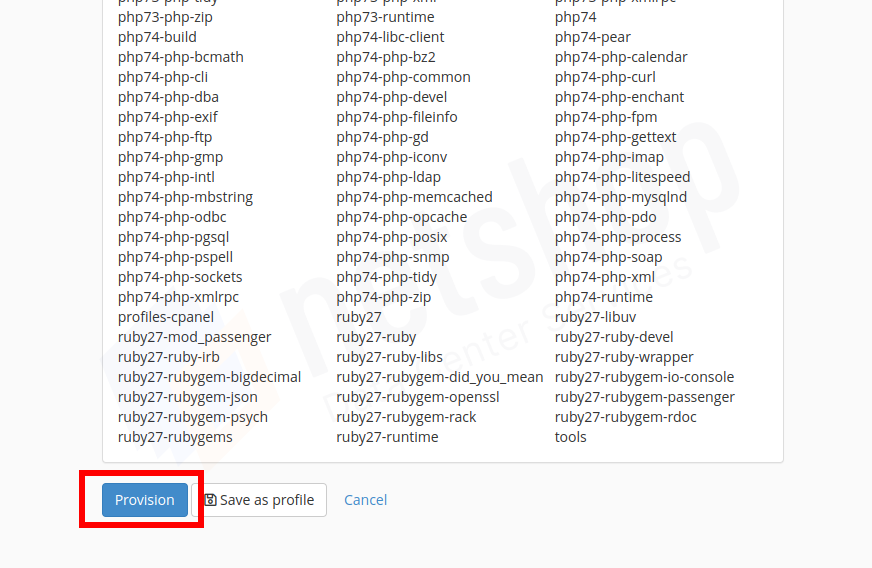
Step 5 – Review & Provision Changes
The last step includes a revision of all existing packages that will be installed upon provisioning. Review them carefully to ensure that no important packages will be added or removed due to dependency reasons.
Final Step – EasyApache4 Provisioning
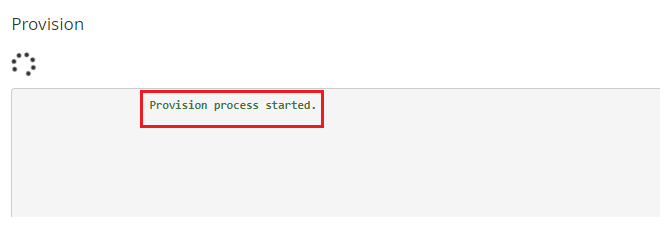
Once you click “Provision” the process will start and you will see something as the following screenshot:
Wait for some time and then you will get a message that the provisioning process has been completed, as shown below.
Click “Done” and you are all set!
How To Generate CSR (Certificate Signing Request) on Linux Server
In this article we will demonstrate the steps to generate a Certificate Signing Request (CSR) on a Linux server.
If you are new to the SSL certificates world, then this guide will help you go through the generation of a CSR, which is the first step towards acquiring a commercial SSL certificate.
A Certificate Signing Request (commonly known as ‘CSR’) contains information that the Certificate Authority (known as ‘CA’) will use to provision your SSL certificate.
What information do I need to provide during CSR generation?
The information required by the CA during a CSR generation is the following:
Country (C)
Two-letter country code where your organization is located.
State/County/Region (S)
The state/region where your organization is located. Type the full name of your state/region – must not be abbreviated.
City/Locality (L)
The city where your organization is located. Type the full name of your city – must not be abbreviated.
Organization (O)
The legal name of your organization. Enter the full legal name of your business, including any suffixes. Example: My Private Company LTD.
For EV and OV SSL Certificates, this information is verified by the CA and included in the certificate.
Organizational Unit (OU)
The division of your organization handling the certificate. For example: IT Department.
Common Name (CN)
This is the most important field. Enter the Fully Qualified Domain Name (FQDN) which you wish to be protected under the SSL certificate.
If you are generating a CSR for a wildcard certificate, then include an asterisk. Example: *.mybusinessdomain.com.
Email Address
Email address used to contact your organization.
Table with information required during CSR generation
How To Create a Certificate Signing Request (CSR) via command line on Linux server
It is important that you generate the CSR on the same machine that you will be installing the SSL Certificate. The CSR generation process will also create your certificate’s key file which must exist on server where the SSL certificate will be installed.
As a root user connect via SSH on your linux server and type the following command (we provide various commands depending on the Linux distribution you are using):
For Debian/Ubuntu:
root@localhost:~$ apt install openssl
For CentOS/AlmaLinux/RHEL:
root@localhost:~$ yum install openssl
Once openssl is installed, proceed with the following command which is the same regardless of what Linux distro you are using:
Make sure you replace “mydomain” with a descriptive name so you can easily identify it in the future.
Upon typing the previous command, you will be prompted to enter the information as described in the Table above.
Sample Output:
CSR Generation Required Information Input
Note: You are not required to enter a “challenge password”, so just hit Enter to skip the question.
Once all information is entered, two files will appear on your working directory; .csr and .key.
The content of the .csr file must be provided during your SSL certificate order. The .key file must remain on server and never share it with anyone!
NetShop ISP Shortlisted as Best Hosting Provider of the Year at SiGMA Balkans/CIS 2023 Awards
NetShop ISP, a leading hosting provider established in 2004, has been selected as a finalist for the prestigious “Best Hosting Provider of the Year” award at the SiGMA Balkans/CIS 2023 Awards.
NetShop ISP, a leading hosting provider established in 2004, has been selected as a finalist for the prestigious “Best Hosting Provider of the Year” award at the SiGMA Balkans/CIS 2023 Awards, showcasing their commitment to delivering top-quality hosting solutions and exceptional customer service.
The SiGMA Balkans/CIS Awards recognize excellence in the iGaming and tech industries within the Balkans and CIS regions. NetShop ISP’s nomination underscores the company’s continuous dedication to providing outstanding performance and innovation.
Stefano Sordini, CEO at NetShop ISP, comments “NetShop ISP stands out for its advanced hosting solutions that cater to the dynamic requirements of modern businesses and especially the fast-paced igaming industry. By leveraging the talent of our people, along with adopting the latest technologies and tools in cloud computing and cyber security, we manage to stay ahead of the competition and deliver unparalleled hosting solutions to b2c and b2b customers.“
The recognition of being shortlisted for the “Best Hosting Provider of the Year” award at the SiGMA Balkans/CIS 2023 Awards highlights NetShop ISP’s commitment to industry leadership. “Looking ahead“, Stefano Sordini continues, “we remain committed to innovation and customer satisfaction. The nomination for this particular award serves as motivation to continue pushing boundaries and raising the bar for hosting excellence.“
The voting window for Balkans/CIS Gaming Awards closes on the 21st of August 2023, followed by the Awards ceremony on the 4th of September.
In this article we will demonstrate how to easily setup HAProxy on a Debian 11 Server with the basic configuration, which you can then optimize or extend as per your bespoke requirements.
HAProxy is a high-performance, open source load balancer and reverse proxy for TCP and HTTP-based applications. Using HAProxy, one can distribute workloads and improve the performance of websites and web-based applications with faster response times, higher availability and increased throughput.
HAProxy, when combined with DNS Geolocation Diversion, can load balance the traffic to your website/application so users from different areas of the world will be served from a regional HAProxy server and the request will then be forwarded to a backend server (e.g. another web server or a database).
The advantage in this kind of setup is that you can avoid the bottleneck of a single web server handling all the requests & traffic by itself. Secondly, by combining a web farm of HAProxy instances with DNS Geolocation is that you can serve different content or rules to specific regions of the world, as per your business requirements.
In this article we will demonstrate how to easily setup HAProxy on a Debian 11 Server with the basic configuration, which you can then optimize or extend as per your bespoke requirements.
Steps to Install HAProxy on Debian 11
HAProxy is pretty useless when used in one server. So in this example we will install it on two Debian servers which we will then configure with roundrobin balancing.
Any command you see further below must be executed on both/all of your servers.
Step 1 – Update System
Execute the following command to install and use the latest available software packages on your Debian system.
root@localhost:~$ reboot
or
root@localhost:~$ shutdown -r now
Step 2 – Install Apache (optional)
This step is optional as you may want to use HAProxy without Apache. However, for the purpose of demonstrating the successful installation and usage of HAproxy we will install and configure Apache as follows.
root@localhost:~$ apt -y install apache2
Once apache2 is installed, run the following command to insert a pre-defined message in index.html. This will help us understand the HAProxy server that is used every time we will be refreshing our domain.
Server 1:
root@localhost:~$ echo "Server1 says Hello" | sudo tee /var/www/html/index.html
Server 2:
root@localhost:~$ echo "Server2 says Hello" | sudo tee /var/www/html/index.html
Step 3 – Install and Configure HAProxy on Debian 11
Run the following command on both servers to install haproxy:
root@localhost:~$ apt install haproxy -y
Now, lets configure HAproxy to use the roundrobin balance mode between the two servers.
Open the file /etc/haproxy/haproxy.cfg and insert the following configuration. Then save and close your file.
frontend haproxy_apache_front
        bind *:80

        default_backend    haproxy_apache_backend

        option             forwardfor


backend haproxy_apache_backend
        balance            roundrobin

        server             backend01 10.10.10.111:80 check
        server             backend02 10.10.10.112:80 check
Now, restart the haproxy on both servers as follows:
root@localhost:~$ systemctl restart haproxy
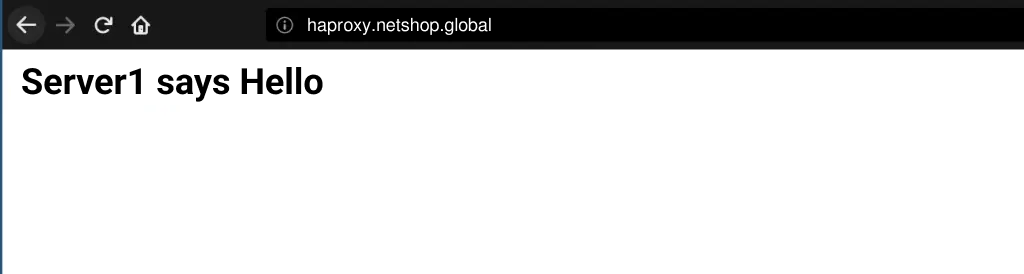
Let’s test our creation! For the purpose of this tutorial, our Apache configuration was setup with vhost “haproxy.netshop.global”.
Output from HAproxy Server 1
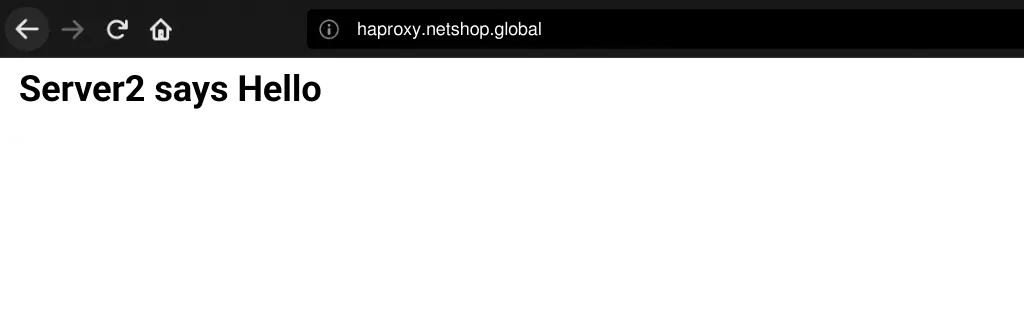
Then reload the page a few times and you should be seeing the message from the 2nd server. This means that HAProxy with roundrobin balance mode work!
Output from HAProxy Server 2
Success! Stay tuned for more HAProxy tutorials with advanced HTTP and TCP configurations!
How To Install MySQL 5.7 on AlmaLinux 8
In this article we will demonstrate the steps you need to perform on your Almalinux 8 server to install MySQL 5.7.
In this article we will demonstrate the steps you need to perform on your Almalinux 8 server to install MySQL 5.7.
Although the current stable version of MySQL is 8.0, we decided to publish this article anyway as there is an increased demand for installing MySQL 5.7 on new Linux distributions such as Almalinux 8.
Steps to Install MySQL 5.7 on AlmaLinux 8
Follow the next steps to complete successfully the installation of MySQL 5.7 (community edition) on your Almalinux 8 server.
Step 1. Update your system
root@localhost:~$ dnf update -y
Once the update completes, reboot your server as follows:
root@localhost:~$ shutdown -r now
Step 2 – Add the Enterprise Linux 7 Repository for MySQL 5.7
By default, AlmaLinux 8’s repository contains the MySQL 8.0 packages. Therefore, we need to add the EL7 repository in order to install MySQL 5.7. Copy the following command and paste it on your server’s terminal:
root@localhost:~$ tee /etc/yum.repos.d/mysql-community.repo<<EOF
[mysql57-community]
name=MySQL 5.7 Community Server
baseurl=http://repo.mysql.com/yum/mysql-5.7-community/el/7/\$basearch/
enabled=1
gpgcheck=0

[mysql-connectors-community]
name=MySQL Connectors Community
baseurl=http://repo.mysql.com/yum/mysql-connectors-community/el/7/\$basearch/
enabled=1
gpgcheck=0

[mysql-tools-community]
name=MySQL Tools Community
baseurl=http://repo.mysql.com/yum/mysql-tools-community/el/7/\$basearch/
enabled=1
gpgcheck=0
EOF
Once done, run the following commands to disable the default mysql AppStream modules:
root@localhost:~$ dnf remove @mysql
root@localhost:~$ dnf -y module reset mysql
root@localhost:~$ dnf -y module disable mysql
Step 3 – Install MySQL 5.7 on AlmaLinux 8
As we have completed preparing our environment for MySQL 5.7, we now proceed to the installation part.
Execute the following command to disable the MySQL 8.0 repo:
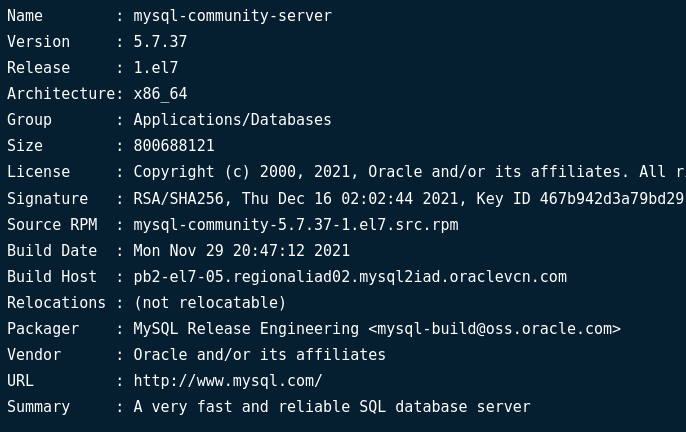
Now, execute the following command to retrieve the temporary password for root, as generated using the installation process:
root@localhost:~$ grep 'A temporary password' /var/log/mysqld.log | tail -1
A sample output will be this:
2022-01-19T23:03:58.688374Z 1 [Note] A temporary password is generated for root@localhost: 4*De@eF^9abG
Now that we have the temporary root password, we proceed to the last configuration steps of MySQL 5.7.
root@localhost:~$ mysql_secure_installation
You will be asked to enter the current password (in our example that is 4*De@eF^9abG) and then you will be asked to set a new mysql root password.
Then, press “Y” when prompted as follows:
Do you wish to continue with the password provided?(Press y|Y for Yes, any other key for No) : Y
Remove anonymous users? (Press y|Y for Yes, any other key for No) : Y Disallow root login remotely? (Press y|Y for Yes, any other key for No) : Y Remove test database and access to it? (Press y|Y for Yes, any other key for No) : Y
Reload privilege tables now? (Press y|Y for Yes, any other key for No) : Y
Congratulations! Following the above simple steps we have demonstrated how to install MySQL 5.7 on AlmaLinux 8 server!